Orange Pavona SPS coral

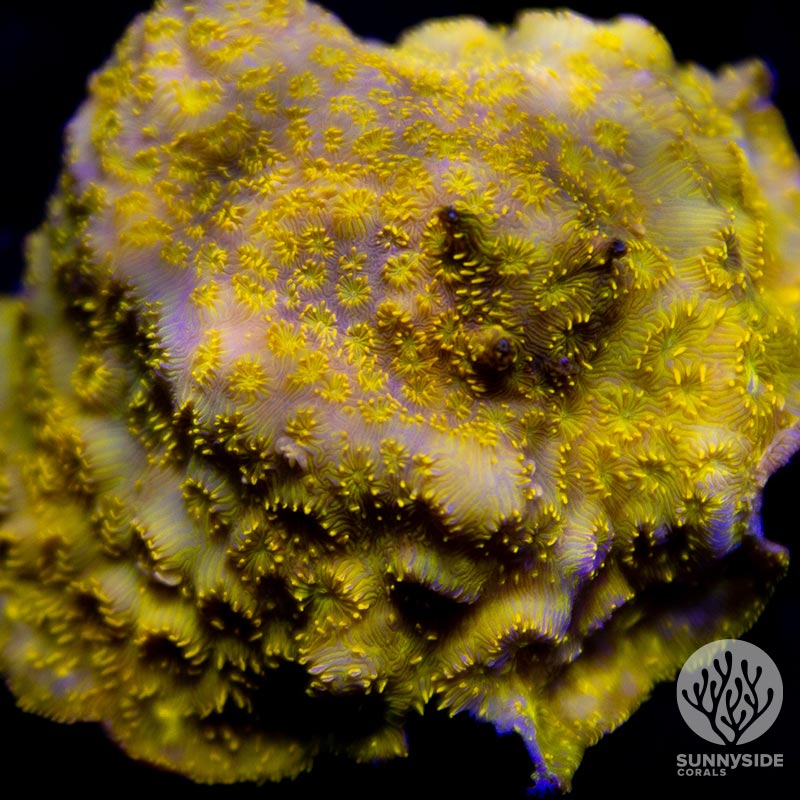
Pavona Coral Care: Tips for Keeping Your Coral Healthy

Pavona coral is a type of small polyp stony (SPS) coral that is widely available and easy to care for, making it a great choice for beginners looking to add SPS corals to their reef aquarium. Pavona coral can grow by encrusting, branching, and plating, and its polyps are seated in deeply embedded corallites, which offer them some additional protection.

When it comes to caring for Pavona coral, it is important to provide it with the right water flow, lighting, and feeding. Pavona coral requires medium to high water flow to thrive, and it should be placed in the middle to top of the tank where it can receive moderate to high lighting of around 100 PAR. While Pavona coral can be fed, broadcast feeding is typically sufficient. Additionally, Pavona coral is known for its hardiness, making it a great first selection for any new venture into SPS keeping.

Understanding Pavona Coral

Pavona coral, also known as Cactus coral or Lettuce coral, is a type of small polyp stony (SPS) coral that belongs to the family Agariciidae. These corals are native to the Indo-Pacific region, including Fiji, Tonga, the Great Barrier Reef, and other areas around Australia.

Species Overview

Pavona corals have a unique growth pattern that sets them apart from other SPS corals. They can grow in three different ways: encrusting, plating, or branching. The polyps of Pavona corals are seated in deeply embedded corallites, which offer them some additional protection. The polyps that cover a Pavona give the coral a fuzzy appearance.

Habitat and Distribution

Pavona corals are found in shallow waters of the tropical Indo-Pacific Ocean, mainly in Fiji, Tonga, Solomon Islands, the Great Barrier Reef, the east African coast, the Red Sea, and the northwestern Indian Ocean. These corals prefer areas with medium to high flow and lighting and are typically found in the middle to top of the tank.

Unique Growth Patterns

One of the unique features of Pavona corals is their growth pattern. Pavona corals can grow in three different ways: encrusting, plating, or branching. Encrusting Pavona corals spread out horizontally across the substrate, while plating Pavona corals grow in flat, plate-like structures. Branching Pavona corals grow vertically and can create a tree-like structure.

Pavona corals are relatively easy to care for and are less demanding than other SPS corals. They are less sensitive to fluctuations in water quality and can tolerate a wider range of conditions. However, they still require stable water parameters, including temperature, salinity, pH, and alkalinity, to thrive.

In summary, Pavona corals are a unique and beautiful addition to any reef tank. With their unique growth patterns and easy care requirements, they are an excellent choice for both beginner and experienced reef keepers.

Aquarium Setup

When setting up an aquarium for Pavona coral, there are a few key factors to consider. These include tank requirements, lighting needs, and water flow and movement.

Tank Requirements

Pavona coral is a popular choice for reef aquariums due to its hardiness and ease of care. To create the ideal environment for Pavona coral, the aquarium should have stable environmental conditions, including a consistent water temperature of 72-78°F (22-26°C). The aquarium should also have a pH level of 8.1-8.4 and a salinity level of 1.023-1.025.

Lighting Needs

Pavona coral requires moderate to high lighting levels, around 100 PAR. LED lights and metal halides are both suitable options for providing adequate lighting. It is important to ensure that the lighting is not too intense, as this can cause the coral to bleach.

Water Flow and Movement

Pavona coral requires strong water flow to thrive. The water flow should be moderate to high, with strong water movement. This will help to ensure that the coral receives the nutrients it needs to grow and remain healthy.

Overall, setting up an aquarium for Pavona coral is a relatively straightforward process. By ensuring that the tank requirements, lighting needs, and water flow and movement are all properly addressed, it is possible to create an ideal environment for this popular coral species.

Water Quality and Parameters

Pavona coral is a hardy SPS coral that is relatively easy to care for, but it still requires specific water parameters to thrive. In this section, we will discuss the different water quality and parameters that are necessary for the health and growth of Pavona coral.

Chemistry and Stability

Water chemistry is crucial for the health of Pavona coral. The pH level should be between 8.0 and 8.4, while the alkalinity should be between 8 and 12 dKH. Calcium and magnesium levels should also be maintained at appropriate levels to ensure proper growth and skeletal development. Trace elements such as strontium should be added as needed.

It is important to maintain the stability of water parameters, as fluctuations can cause stress to the coral and lead to health issues. Regular testing and monitoring of water parameters are essential to ensure stability.

Temperature and Salinity

Pavona coral prefers a temperature range of 75-78°F (24-26°C) and a salinity level of 1.025. It is important to maintain stable temperature and salinity levels to prevent stress to the coral.

Testing and Maintenance

Regular testing and maintenance of water parameters are essential for the health of Pavona coral. Water changes should be performed regularly, and any necessary adjustments should be made to maintain stable water conditions.

In summary, maintaining pristine water conditions is crucial for the health and growth of Pavona coral. Regular testing and monitoring of water parameters, maintaining stable water chemistry and temperature, and performing regular maintenance and water changes are all essential for the health of this hardy SPS coral.

Feeding and Nutrition

Pavona corals are photosynthetic and rely on zooxanthellae algae for their primary source of nutrition. However, they are also capable of catching plankton, including zooplankton and phytoplankton, and absorbing dissolved organic substances such as amino acids directly from the water column.

Feeding Techniques

Pavona corals can be fed with a variety of foods, including phytoplankton, zooplankton, and amino acids. However, broadcast feeding is generally sufficient for them. Feeding the corals too much can lead to excess nutrients in the water, which can cause algae growth and other issues.

Symbiotic Relationships

Pavona corals have a symbiotic relationship with zooxanthellae algae, which live inside their tissues and provide them with energy through photosynthesis. The corals provide the algae with a protected environment and access to light for photosynthesis. The symbiotic relationship between the corals and the algae is essential for the health and survival of both entities.

In addition to the symbiotic relationship with zooxanthellae, Pavona corals can also form a symbiotic relationship with other organisms, such as clownfish and shrimp. These organisms can help to keep the coral clean and free of debris, while the coral provides them with a place to live and protection from predators.

Overall, Pavona corals are relatively easy to care for and can thrive in a variety of environments. By providing them with the right amount of light and water flow, as well as feeding them appropriately, hobbyists can ensure that these corals remain healthy and vibrant for years to come.

Coral Health and Growth

Pavona coral is known for its hardiness, which makes it a great option for beginners. However, proper care is still necessary to ensure the coral thrives and grows as expected. This section will cover some important aspects of pavona coral health and growth.

Growth Rate and Patterns

Pavona coral grows relatively quickly, and its growth pattern is generally encrusting or plating. As the coral grows, it forms distinctive ridges and valleys, which gives it a unique appearance. The growth rate can be affected by different factors, including lighting, water flow, and nutrient levels.

Signs of Good Health

Healthy pavona coral should have vibrant coloration and fully extended polyps. The coral should also be free of any signs of stress, such as closed polyps, tissue recession, or bleaching. Regular water testing and maintenance can help ensure the coral stays healthy.

Common Issues and Remedies

One common issue with pavona coral is detritus buildup, which can lead to tissue recession and poor health. Regular water changes and cleaning can help prevent this issue. Bleaching can also be a problem, which is caused by stressors such as high temperatures or changes in lighting. If bleaching occurs, it is important to identify and address the cause of the stress.

Overall, pavona coral is a hardy and attractive option for reef aquariums. With proper care and attention, it can thrive and add a unique element to any tank.

Propagation and Aquaculture

Pavona coral is a great candidate for propagation and aquaculture. Fragging techniques for Pavona coral are relatively simple and straightforward.

Fragging Techniques

Fragging is the process of cutting a piece of coral from the mother colony and attaching it to a new substrate to grow into a new colony. For Pavona coral, the most common fragging technique is using bone cutters or a saw to cut a piece of the colony, making sure to avoid cutting the polyps. The cut should be made at a 45-degree angle to increase the surface area for attachment to the new substrate.

Once the frag is cut, it should be left to dry for a few hours to allow the tissue to heal and avoid infection. After that, the frag can be attached to a new substrate using glue, putty, or rubber bands. The new substrate should be placed in a well-lit area with moderate to high water flow.

Cultivating Success

Pavona coral is relatively easy to propagate and cultivate in a home aquarium. However, it is important to maintain good water quality and provide adequate lighting and water flow. The mother colony should also be healthy and disease-free to ensure that the frags will be healthy and disease-free as well.

Aquacultured specimens are a great option for those who want to add Pavona coral to their home aquarium. Aquacultured specimens are grown, propagated, and handled with care, making for an easier transition into the home aquarium.

In conclusion, Pavona coral is a great candidate for propagation and aquaculture. Fragging techniques are relatively simple, and aquacultured specimens are readily available. With proper care and maintenance, Pavona coral can thrive in a home aquarium.

Frequently Asked Questions

What lighting conditions are ideal for Pavona coral growth?

Pavona coral requires moderate to high lighting conditions, around 100 PAR. They can thrive under different types of lighting, including metal halides, T5s, and LEDs. The ideal lighting conditions for Pavona coral growth will depend on the specific species of Pavona coral being kept.

How can you ensure proper water flow for Pavona corals in your aquarium?

Pavona coral requires moderate to high water flow to thrive. The water flow should be strong enough to keep the coral clean and free of debris, but not so strong that it damages the coral. The ideal water flow for Pavona coral will depend on the specific species of Pavona coral being kept.

What are the specific water parameters needed for Pavona coral health?

Pavona coral requires stable water parameters to remain healthy. The ideal water parameters for Pavona coral include a salinity of 1.025, a pH of 8.0-8.4, and a temperature of 72-78°F. The alkalinity should be maintained between 8-12 dKH, and calcium levels should be between 380-450 ppm.

How does Pavona coral fare in terms of aggression towards other corals?

Pavona coral is generally peaceful towards other corals. However, it may compete with other corals for space and light. It is important to leave enough space between Pavona coral and other corals to prevent any damage from occurring.

What feeding techniques are recommended for nurturing Pavona corals?

Pavona coral is photosynthetic and can obtain much of its nutrition from the lighting in the aquarium. However, Pavona coral can also benefit from supplemental feeding. They can be fed small pieces of meaty foods such as brine shrimp, mysis shrimp, or plankton. Pavona coral can also be fed with liquid coral food or phytoplankton.

Can you provide tips for successfully fragging Pavona coral to promote propagation?

Fragging Pavona coral is relatively easy and can be done by using a bone cutter or a sharp pair of scissors. The coral should be fragged at the base of the colony, ensuring that each frag has at least one healthy polyp. The frag should then be glued onto a frag plug or a piece of live rock using coral glue. It is important to keep the frag in low light and low flow for a few days until it has had time to attach itself to the new surface.

Gila Monster

Two Little Fishies Kalkwasser: The Ultimate Reef Supplement?

Are you a reef hobbyist looking for a reliable calcium supplement to maintain your tank’s alkalinity and pH levels? We’ve been testing out Two Little Fishies’ Kalkwasser, and we’re impressed with the results.

Our Acropora growth has exploded since starting to dose this Kalkwasser. It’s been a game-changer for maintaining the delicate balance of our reef tank.

short product image alt text

One thing we appreciate about this product is its purity. The Calcium Hydroxide source is top-notch and ideal for replenishing calcium in corals, clams, and calcareous algae that build skeletons of calcium carbonate. It also helps maintain pH, precipitates phosphates, and enhances protein skimming.

At 1 lb (454 g) jar, it’s the perfect size for regular use without taking up too much space.

Bottom Line

If you’re looking for a reliable calcium supplement to maintain your reef tank’s delicate balance, Two Little Fishies’ Kalkwasser is a solid choice.

Its purity, effectiveness, and ease of use make it a go-to for reef hobbyists. So why wait? Click here to purchase Two Little Fishies’ Kalkwasser and elevate your reef tank’s health today!

Two Little Fishies Kalkwasser 1 Lb Overview

We recently tried out Two Little Fishies Kalkwasser 1 Lb and were impressed with the results. This calcium supplement mix is a pure source of Calcium Hydroxide, making it an ideal solution for replenishing calcium and maintaining alkalinity in our aquarium. We noticed a significant improvement in the growth of our Acropora since starting to dose this Kalkwasser.

In addition to promoting coral growth, this product also helps maintain pH levels, precipitates phosphates, and enhances protein skimming. We appreciated the convenience of the 1 lb (454 g) jar, which is easy to use and store.

Overall, we highly recommend Two Little Fishies Kalkwasser 1 Lb to any aquarium hobbyist looking to enhance the health and growth of their corals, clams, and calcareous algae.

Maintaining Aquarium Health

Maintaining the health of our aquarium is crucial for the well-being of our fish and other aquatic creatures. We have been using Two Little Fishies Kalkwasser 1 Lb for a while now, and we have noticed a significant improvement in the health of our aquarium.

Kalkwasser is a calcium hydroxide solution that helps maintain the pH and calcium levels in the aquarium. Our Acropora growth has exploded since we started using this product. We have also noticed that our fish are more active and have brighter colors.

One of the best things about Two Little Fishies Kalkwasser is that it is easy to use. We simply mix it with water and add it to the aquarium. The 1 lb jar lasts for a long time, so it is also cost-effective.

Overall, we highly recommend Two Little Fishies Kalkwasser 1 Lb for anyone looking to maintain the health of their aquarium. It has been a game-changer for us, and we are confident that it will be for you too.

Sustaining Coral and Algae Growth

Maintaining the proper balance of calcium and alkalinity is crucial for the growth of corals and algae in any reef aquarium. We have found that using Two Little Fishies Kalkwasser 1 Lb has been extremely effective in replenishing calcium and maintaining alkalinity levels in our tank. Not only has our Acropora growth exploded since starting to dose this product, but we have also noticed an improvement in the overall health of our corals and algae.

In addition to its calcium supplement properties, this product also helps maintain pH levels, precipitates phosphates, and enhances protein skimming. We appreciate the convenience of the 1 lb jar size, which lasts us a long time and is easy to store.

Overall, we highly recommend Two Little Fishies Kalkwasser 1 Lb for any reef aquarium owner looking to sustain healthy coral and algae growth.

Ease of Use and Mixing

Mixing Two Little Fishies Kalkwasser is a breeze. We found that it dissolves quickly and doesn’t clump like some other calcium supplements we’ve used in the past. The 1 lb jar is easy to handle and store, and the included scoop makes measuring a cinch. We appreciate that this product helps maintain pH and enhances protein skimming while also replenishing calcium and maintaining alkalinity for our corals, clams, and calcareous algae.

One reviewer stated, “Our Acropora growth has exploded since starting to dose this Kalkwasser.” We have to agree that we’ve seen noticeable improvements in the health and growth of our own coral since incorporating this supplement into our routine. Overall, we highly recommend Two Little Fishies Kalkwasser for its ease of use and effectiveness in maintaining a healthy reef environment.

Product Efficacy

We have been using Two Little Fishies Kalkwasser 1 Lb for a few weeks now and we are impressed with its efficacy. Our Acropora growth has significantly improved since we started using this product. We have also noticed that our tank’s pH level has stabilized, which is a great bonus.

The quality of this brand is top-notch and we have not experienced any issues or problems with it. We have been using kalkwasser for a while now, and we can confidently say that this product has been our secret elixir for success.

Overall, we highly recommend Two Little Fishies Kalkwasser 1 Lb to anyone looking for a reliable and effective product to improve their tank’s pH level and promote coral growth.

Pros and Cons

After using Two Little Fishies Kalkwasser 1 Lb for some time, we have come up with a list of pros and cons that we believe potential buyers should consider before making their purchase.

Pros

  • Promotes Acropora growth: Our Acropora growth has exploded since starting to dose this Kalkwasser. We’ve noticed a significant improvement in the health and coloration of our corals.
  • Quality brand: Two Little Fishies has been a trusted brand in the aquarium industry for years. We have never been disappointed with the quality of their products, and this Kalkwasser is no exception.
  • Easy to use: The 1 lb jar of Kalkwasser is easy to measure and mix with water. We appreciate the convenience of having a pre-measured amount of powder to use each time.

Cons

  • Limited use: While Kalkwasser is effective for promoting coral growth, it is not a complete solution for maintaining proper calcium and alkalinity levels in a reef tank. It should be used in conjunction with other supplements and water testing.
  • Price: Compared to other calcium and alkalinity supplements, Kalkwasser can be more expensive. However, we believe the benefits to our coral growth make it worth the investment.

Overall, we highly recommend Two Little Fishies Kalkwasser 1 Lb to reef tank owners looking to promote healthy coral growth. While it may be a bit pricier than other supplements, the quality and effectiveness of this product make it a worthwhile investment.

Customer Reviews

We were curious to see what other customers had to say about Two Little Fishies Kalkwasser 1 Lb, so we checked out the reviews. Overall, customers seem to be very satisfied with this product, with an average rating of 4.8 out of 5 stars. Many customers have been using kalkwasser for years and have found that this brand is of high quality and has never caused any problems.

One customer even mentioned that their Acropora growth has exploded since starting to dose this kalkwasser. While there were only 13 ratings at the time of our review, all of them were positive. It’s clear that Two Little Fishies has a loyal customer base that trusts their products.

Overall, the customer reviews give us confidence in the quality of Two Little Fishies Kalkwasser 1 Lb and make us excited to try it out for ourselves.

Conclusion

After using Two Little Fishies Kalkwasser 1 Lb for some time, we can confidently say that it has been a game-changer for our Acropora growth. The quality of this brand is top-notch and we have never been disappointed with its performance. We have been using kalkwasser for a while now, and we can attest that this product has never caused any problems.

Overall, we highly recommend Two Little Fishies Kalkwasser 1 Lb to anyone looking for a reliable and effective solution for their aquarium needs. We believe that this product is worth the investment and has proven to be a secret elixir for our aquarium. With a 4.8 rating and 13 total ratings, it’s clear that many other aquarium enthusiasts have had a positive experience with this product as well.

Frequently Asked Questions

As we’ve been using Two Little Fishies Kalkwasser 1 Lb in our marine aquarium, we’ve come across a few common questions that we’d like to address.

What are the potential drawbacks of using kalkwasser in an aquarium?

One potential drawback of using kalkwasser is the risk of overdosing. It’s important to carefully measure and monitor the amount of kalkwasser added to the aquarium, as too much can lead to a dangerous increase in pH levels. Additionally, kalkwasser can precipitate phosphates, which can contribute to algae growth. However, with proper dosing and monitoring, these risks can be minimized.

Is kalkwasser a safe additive for all types of marine aquariums?

Kalkwasser is generally safe for use in most types of marine aquariums, including reef tanks and fish-only setups. However, it’s important to note that kalkwasser can raise the pH levels in an aquarium, which may not be suitable for certain types of sensitive fish or invertebrates. As always, it’s important to research and understand the specific needs of your aquarium inhabitants before adding any new additives.

How does kalkwasser affect the pH levels in a reef tank?

Kalkwasser is known for its ability to raise the pH levels in a reef tank, which can have both positive and negative effects. On the positive side, a stable pH level is important for the health and growth of corals and other invertebrates. However, if the pH level gets too high, it can become toxic to fish and other inhabitants. It’s important to carefully monitor the pH levels in your aquarium and adjust the dosage of kalkwasser accordingly.

What is the recommended initial dosage of kalkwasser for a new setup?

The recommended initial dosage of kalkwasser for a new setup is generally around 1 teaspoon per 10 gallons of water. However, it’s important to start with a lower dosage and gradually increase it over time, as every aquarium is different and may require different levels of supplementation. It’s also important to test the pH levels regularly and adjust the dosage as necessary.

Can kalkwasser be used in conjunction with Two Little Fishies’ ReBorn calcium reactor media?

Yes, kalkwasser can be used in conjunction with Two Little Fishies’ ReBorn calcium reactor media. In fact, using both products together can help maintain a stable pH level and provide a comprehensive calcium supplementation regimen for your aquarium. However, as always, it’s important to carefully monitor the pH levels and adjust the dosage of both products as necessary.

How do Two Little Fishies products, such as Sea Elements or AcroPower, interact with kalkwasser treatment?

Two Little Fishies products, such as Sea Elements or AcroPower, can be used in conjunction with kalkwasser treatment. In fact, using these products together can provide a comprehensive supplementation regimen for your aquarium, promoting healthy growth and maintaining a stable pH level. As always, it’s important to carefully monitor the pH levels and adjust the dosage of both products as necessary.

In our experience, using Two Little Fishies Kalkwasser 1 Lb has been a great addition to our marine aquarium. We’ve noticed improved growth and health in our corals and other invertebrates, and the product is easy to use and monitor with regular testing. While there are some potential risks and drawbacks to using kalkwasser, with proper dosing and monitoring, it can be a valuable tool for maintaining a healthy and thriving aquarium.

Blue Alveopora - Cut To Order

Alveopora Coral Care

Alveopora is a genus of colonial stony corals that are found in the Indo-Pacific region. They are often found on reef slopes in turbid water, and are generally uncommon. These corals have a beautiful flower-like appearance and are a popular addition to reef aquariums.

Alveopora coral care is not as difficult as some other LPS corals, such as Goniopora. They can thrive in a wide range of lighting, depending on the species, but high lighting is not recommended. Alveopora corals prefer moderate water movement so their polyps can move freely, but it should not be directed right at the polyps or the movement might be too vigorous and could damage the flesh of the coral.

In this article, we will explore the intricacies of maintaining the stunning Alveopora coral in a vibrant reef aquarium setting. We will cover everything from lighting and water movement to feeding and general care. Whether you are a seasoned reef keeper or a beginner, this guide will provide you with all the information you need to successfully care for your Alveopora coral.

Alveopora Overview

Alveopora is a genus of large polyp stony coral (LPS) that belongs to the family Acroporidae. These corals are found in the Indo-Pacific region, including the Great Barrier Reef. Alveopora has a unique appearance that resembles a flowerpot or sunflower. They have fleshy polyps that extend from their stony skeleton, which is made of calcium structures.

Taxonomy and Classification

Alveopora belongs to the phylum Cnidaria, class Anthozoa, and order Scleractinia. There are currently six recognized species of Alveopora, which are classified based on their location-specific variants. These species include Alveopora allingi, Alveopora daedalea, Alveopora excelsa, Alveopora japonica, Alveopora minuta, and Alveopora spongiosa.

Physical Characteristics

Alveopora has a light and porous skeleton that is made up of interconnecting rods and spines. The colonies can be either massive or branching and often have irregular shapes. The corallites have walls that are very perforated and septa that are mostly composed of fine spines which may meet in the center forming a tangle of columella. Alveopora has long, thin, and colorful tentacles that extend from their polyps during the day.

Habitat and Distribution

Alveopora is found in the shallow waters of the Indo-Pacific region, including the Great Barrier Reef. They prefer areas with moderate to high water flow and bright light. Alveopora is typically found in areas with sandy or rubble substrate. These corals are often found in groups, forming colonies of various sizes. Alveopora is not currently listed as an endangered species, but their populations are threatened by habitat destruction and climate change.

Alveopora Care

Alveopora is a large polyp stony coral that has a unique and beautiful flower-like appearance. In order to keep Alveopora coral healthy and thriving, it is essential to provide proper care and maintenance. Here are some important factors to consider when caring for Alveopora coral.

Aquarium Conditions

Alveopora coral requires specific aquarium conditions to thrive in a reef tank. It prefers moderate water flow and lighting of 100-150 PAR. However, direct water flow should be avoided as it may damage the flesh of the coral. Alveopora coral also requires stable water chemistry, including proper salinity, alkalinity, and magnesium levels. Calcium and iron levels should also be maintained to ensure proper skeletal development.

Feeding and Nutrition

Alveopora coral is photosynthetic and relies on zooxanthellae for much of its nutrition. However, it also benefits from supplemental feeding, particularly with copepods and mysis shrimp. Spot feeding can be done using a pipette or turkey baster to target feed the coral.

Propagation and Growth

Alveopora coral can be propagated through fragmentation or division. To promote growth, colonies should be given ample space to expand and grow. Proper water flow and lighting are also essential for healthy growth.

Health and Maintenance

Alveopora coral is susceptible to bleaching and other health issues if proper care is not provided. Acclimation to the aquarium should be done slowly and carefully to prevent stress. Regular water changes and maintenance are also important to ensure optimal health.

In summary, Alveopora coral care requires attention to proper aquarium conditions, feeding and nutrition, propagation and growth, and health and maintenance. With the right care, Alveopora coral can thrive and add a unique and beautiful element to any reef tank.

Species and Variants

Common Species

There are several species of Alveopora commonly found in the Indo-Pacific region. These include Alveopora allingi, Alveopora catalai, Alveopora daedalea, Alveopora excelsa, Alveopora fenestrata, Alveopora gigas, and Alveopora japonica. These species are often found in shallow water environments and form colonies with irregular columnar structures.

Alveopora gigas is a particularly well-known species due to its distinct morphology. Colonies of A. gigas are composed of blunt-ended irregular columns and are often found in lagoons and other sheltered areas.

Unusual Species and Anomalies

While many species of Alveopora are well-known and well-documented, there are also some unusual species and anomalies that have been identified. For example, Alveopora spongiosa is an encrusting or plate-like species that may grow to be over 2 meters across. This species has long or short fine septal spines that seldom connect and may have pointed or knob-like polyp tentacle tips.

Errors in species identification and classification can also occur. For example, Alveopora and Goniopora species pairs have been confused in the past due to their similar morphologies. However, recent studies have shown that these two genera are actually distinct and should not be confused with one another.

Overall, Alveopora is a diverse and fascinating genus of corals that continues to be the subject of ongoing research and discovery.

Alveopora in the Ecosystem

Alveopora is a large polyp stony coral that is found in the Indo-Pacific region. It is an important part of the reef ecosystem, providing shelter and habitat for a variety of marine organisms, including fish, crustaceans, and other invertebrates.

Symbiotic Relationships

Like other corals, Alveopora forms a symbiotic relationship with zooxanthellae, a type of algae that lives within its tissues. The zooxanthellae provide the coral with nutrients through photosynthesis, while the coral provides the algae with a protected environment and access to sunlight. This symbiotic relationship is crucial to the survival of both the coral and the algae.

Environmental Impact

Alveopora plays an important role in maintaining ecosystem balance in the reef tank. It is a filter feeder, meaning that it feeds on small particles in the water column, helping to keep the water clean and clear. Additionally, the coral provides a substrate for other organisms to attach to and grow on, further contributing to the diversity of the reef ecosystem.

However, like many other coral species, Alveopora is vulnerable to environmental stressors such as pollution, overfishing, and climate change. These stressors can lead to coral bleaching, disease, and even death, which can have a cascading effect on the entire reef ecosystem. Therefore, it is important to take steps to protect and preserve coral reefs, including the species that depend on them, such as Alveopora.

Identification and Comparison

Identifying Alveopora

Alveopora is a large polyp stony (LPS) coral that has a unique flower-like appearance. The colonies are submassive and lobed, and can be over 2 metres across. The corallites have irregular spiny walls, and polyps are often retracted during the day, but are elongate when extended, giving colonies a mop-like appearance. The color of Alveopora is usually grey or pinkish brown when polyps are retracted, and brown when polyps are extended. Alveopora is often confused with Goniopora, which is a close relative and also has a flower-like appearance. However, Goniopora has a more delicate appearance and is more fragile than Alveopora.

Comparison with Similar Corals

Alveopora is often compared to other similar corals, such as Torch Coral, Acropora, Sunflower Coral, and Daisy Coral. While these corals may have some similarities in appearance, they are quite different from Alveopora.

Torch Coral, for example, has a more branching appearance and is often found in shades of green, pink, or purple. Acropora, on the other hand, has a more delicate appearance and is often found in bright colors such as blue, green, and pink. Sunflower Coral, also known as Tubinaria, has a more flattened appearance and is often found in shades of yellow, orange, or brown. Daisy Coral, also known as Turbinaria, has a more flattened appearance and is often found in shades of green, brown, or grey.

When compared to Goniopora, Alveopora is generally considered to be hardier and easier to care for. Goniopora has a more delicate appearance and is more prone to disease and bleaching. However, both corals require similar care and attention to thrive in a reef tank.

In summary, Alveopora is a unique and visually stunning LPS coral that is often confused with other similar corals such as Goniopora, Torch Coral, Acropora, Sunflower Coral, and Daisy Coral. While these corals may have some similarities in appearance, they are quite different from Alveopora in terms of their structure, color, and care requirements.

Aesthetic and Practical Considerations

Aquarium Design

When designing an aquarium featuring Alveopora coral, it is important to consider both aesthetic and practical factors. Alveopora coral is known for its beautiful flower-like appearance and unique green coloration, which can add a striking visual element to any reef tank. To showcase the coral’s beauty, it is recommended to place it in a prominent location within the tank, such as on top of a rock or in the center of the aquascape.

In terms of practical considerations, it is important to ensure that the coral is placed in an area of moderate water movement. Alveopora coral requires some water flow to thrive, but too much can cause damage to the delicate polyps. It is also important to ensure that the coral is not placed too close to other corals, as it can sometimes exhibit aggressive behavior towards other species.

Species Selection for Aquascaping

When selecting other species of coral to include in an aquascape with Alveopora coral, it is important to consider compatibility and growth rates. Alveopora coral is an LPS coral, which means that it is a relatively slow-growing species. It is therefore important to select other species that have similar growth rates, such as Montipora or other LPS corals.

Soft corals can also be a good choice to pair with Alveopora coral, as they often have similar water flow requirements. When selecting rocks to use in the aquascape, it is important to choose pieces that provide ample space for the coral to expand and grow. It is also recommended to use rocks with a natural appearance, as this can help to create a more realistic and aesthetically pleasing environment for the coral.

Overall, when designing an aquarium featuring Alveopora coral, it is important to consider both aesthetic and practical factors. By carefully selecting other species of coral and designing the aquascape with the coral’s needs in mind, it is possible to create a beautiful and thriving reef tank.

Frequently Asked Questions

What are the common diseases affecting Alveopora corals?

Alveopora corals are vulnerable to various diseases, including brown jelly disease, white band disease, and black band disease. Brown jelly disease is characterized by a brown, slimy substance that covers the coral’s tissue. White band disease causes the coral’s tissue to separate from the skeleton, resulting in a white band around the coral’s base. Black band disease causes a dark band to form on the coral’s tissue, which gradually spreads and causes tissue death.

Why is my Alveopora coral not opening up?

Several factors can cause an Alveopora coral to remain closed, including poor water quality, inadequate lighting, and improper water flow. Additionally, Alveopora corals can be sensitive to changes in their environment, such as fluctuations in temperature or salinity.

What could be causing my Alveopora to die?

Several factors can cause an Alveopora coral to die, including poor water quality, inadequate lighting, and improper water flow. Additionally, Alveopora corals can be sensitive to changes in their environment, such as fluctuations in temperature or salinity.

What is the ideal PAR range for Alveopora corals?

Alveopora corals require moderate lighting, with a PAR range of 50-100. It is important to acclimate the coral to the lighting gradually to avoid shocking it.

Can Alveopora corals exhibit aggressive behavior towards other species?

Alveopora corals can exhibit semi-aggressive behavior towards other coral species. It is important to provide enough space between Alveopora corals and other species to avoid territorial disputes.

How should Alveopora be cared for to ensure its health and growth?

To ensure the health and growth of Alveopora corals, it is important to maintain stable water parameters, including temperature, salinity, and pH. Additionally, Alveopora corals require moderate lighting and water flow. It is also important to supplement their diet with phytoplankton and other small food particles. Regular water changes and proper aquarium maintenance are also crucial for the health of Alveopora corals.

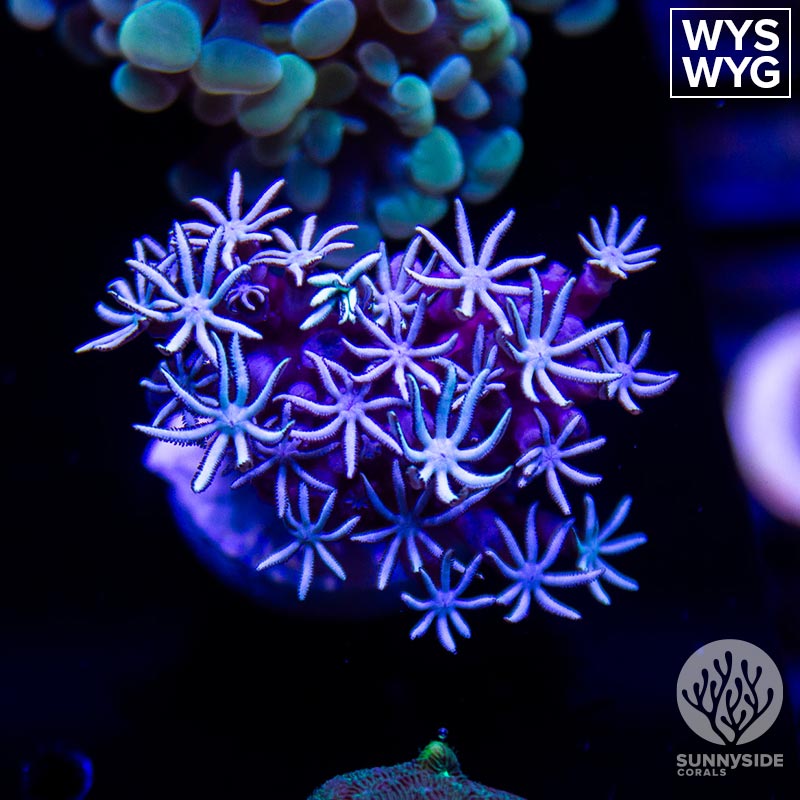
Clove Polyps: Characteristics, Care, and Propagation

Clove polyps, scientifically known as Clavularia spp., are an attractive and popular choice for reef aquarium hobbyists. These soft corals come in a variety of colors, including green, pink, and purple, and add a unique texture to any reef tank. They are relatively easy to care for and are a great option for both beginner and experienced aquarists.

Clove polyps are colonial type corals, meaning they form a colony of many individual polyps all connected together. As they do not have a calcified skeleton structure, they can be more tolerant of swings in the alkalinity, calcium, and magnesium when compared to other corals. They are also known to be peaceful and non-aggressive towards other inhabitants of the reef tank.

In this article, we will delve into the world of clove polyps, discussing their care requirements, feeding habits, and placement in a reef tank. Whether you are a seasoned reef aquarium hobbyist or just starting out, this guide will provide you with the necessary information to successfully keep and care for clove polyps in your reef tank.

Classification and Characteristics

Taxonomy

Clove polyps belong to the genus Clavularia, which is a type of soft coral. They are part of the family Clavulariidae, which also includes other soft corals such as the green star polyp (GSP). Clove polyps are classified as octocorals, meaning they have eight feathery tentacles surrounding their mouth.

Physical Description

Clove polyps have a unique appearance that makes them easily recognizable. They have a star-shaped polyp with eight feathery tentacles that come in various colors. The polyps grow on long stalks known as calyces. They can reach a height of 2-3 inches (5-7.6cm) and require a minimum tank size of 10 gallons (39L).

Color Variations

Clove polyps come in a range of colors, including green, purple, white, brown, yellow, and cream. Their polyps have a single distinctive eight-leaved tentacle associated with all the octocorals. The coloration can vary depending on the species and the environment they are in. Some species have fluorescent colors that glow under blue light.

Clove polyps are easy to care for and make a great addition to any reef tank. They are peaceful and can overgrow other corals, but they do not have sweeper tentacles. With moderate lighting and water flow, they can thrive in a home aquarium.

Natural Habitat

Geographical Distribution

Clove polyps are a species of soft coral found in the Indo-Pacific region. They are commonly found in the waters surrounding Fiji, Tonga, Solomon Islands, and the Great Barrier Reef. These corals are known to thrive in warm tropical waters and are typically found in shallow waters, ranging from 3 to 20 meters in depth.

Environmental Conditions

Clove polyps are known to prefer environments that offer moderate to high water flow. They are typically found growing on rocky substrates, but can also be found on sand and rubble. These corals require a moderate amount of light to thrive, and are typically found in areas with moderate to high light levels.

In their natural habitat, clove polyps are known to be peaceful and non-aggressive. They are often found growing in large colonies, and are known for their vibrant colors and unique shapes. These corals are known to be hardy and adaptable, and can thrive in a variety of environmental conditions.

Overall, clove polyps are a fascinating species of soft coral that are well-suited to life in the Indo-Pacific region. Their ability to thrive in a variety of environmental conditions makes them a popular choice for aquarium enthusiasts around the world.

Aquarium Care

Clove polyps are a great addition to any aquarium due to their vibrant colors and easy care. Here are some tips to keep your clove polyps healthy and thriving in your aquarium.

Placement and Spacing

Clove polyps should be placed on live rock or substrate in the aquarium. They can be placed close together, as they do not have aggressive tendencies towards other corals. However, it is important to leave enough space for them to expand and grow without crowding.

Lighting Requirements

Clove polyps are photosynthetic, which means they require moderate to high lighting. They can thrive under a variety of lighting types, including LED and T5 lighting. It is important to acclimate them to the lighting gradually to prevent any stress.

Water Flow and Quality

Clove polyps prefer moderate water flow in the aquarium. They can tolerate a wide range of water conditions, but it is important to maintain stable water parameters. Keep the water temperature between 72°F and 78°F, and salinity between 1.023 and 1.025. Maintaining proper alkalinity, calcium, and magnesium levels is also important for the health of clove polyps.

Feeding Practices

Clove polyps are filter feeders and can obtain most of their nutrients from the water column. However, they will benefit from supplemental feeding of small particles such as mysis shrimp. It is important to avoid overfeeding and maintain a clean aquarium to prevent detritus buildup.

Overall, clove polyps have a care level of easy and are a great choice for beginners or hobbyists with smaller aquariums. They are also reef-safe and can be kept with a variety of tank mates. With proper care and maintenance, clove polyps can thrive and add a pop of color to any reef tank.

Propagation and Growth

Reproduction Methods

Clove polyps can reproduce both sexually and asexually. Sexual reproduction usually occurs in the wild, where male and female gametes are released into the water column and fertilization occurs. Asexual reproduction, on the other hand, is more common in captive settings. This is because it is easier to control the conditions required for asexual reproduction.

Asexual reproduction in clove polyps occurs through a process called stolonation. Stolonation involves the formation of stolons, which are runners that grow from the base of the polyp. These stolons eventually develop into new polyps, which are genetically identical to the parent polyp. This process allows for rapid colony growth and can be a useful tool for propagation.

Growth Patterns

Clove polyps are considered to be fast-growing soft corals. They have a branching growth pattern and can quickly cover available space in the reef. They can grow up to 2-3 inches (5-7.6cm) in height and require moderate to high water flow and moderate lighting to thrive.

When it comes to propagation, it is important to provide enough space for the clove polyps to grow and expand. This can be achieved by placing the parent colony in an area with plenty of available space. As the colony grows, it will begin to fill in the surrounding area, creating a larger colony.

Overall, clove polyps are a great addition to any reef aquarium. With their fast growth and ease of propagation, they can quickly fill in available space and provide a beautiful display.

Compatibility and Interaction

Reef Tank Companions

Clove polyps are not particularly aggressive and can coexist with a variety of tank mates. They are known to be peaceful and can be kept with other soft corals, LPS corals, and some SPS corals. However, it is important to keep in mind that clove polyps can grow quickly and run rampant in a reef tank if not kept in check. Therefore, it is recommended to keep them away from aggressive corals that may damage or overgrow them.

Aggression and Defense

Clove polyps are not aggressive towards other corals or tank mates. They do not have sweeper tentacles like some other corals, which means they will not harm other corals in the tank. However, they can overgrow other corals if not trimmed regularly. Therefore, it is important to keep an eye on their growth and trim them as needed.

In conclusion, clove polyps are peaceful and can coexist with a variety of tank mates. However, they can grow quickly and overtake other corals if not kept in check. It is recommended to keep them away from aggressive corals and to trim them regularly to prevent overgrowth.

Varieties and Related Species

Common Varieties

Clove polyps come in a range of colors, including brown, tan, pink, purple, green, or white. The Blue Clove variety is a popular choice for many hobbyists due to its beautiful blue background color. These polyps are a versatile addition to any reef tank, providing motion and color to the aquarium.

Similar Species

Anthelia is a similar species to clove polyps coral. However, anthelia is a faster-growing coral and can quickly take over a tank if not kept in check. Clove polyps grow at a slower rate, making them a better choice for hobbyists who want a colorful addition to their tank without the risk of it taking over.

Clove polyps are an easy coral to care for, making them a popular choice for beginners and experts alike. They prefer moderate to low lighting and moderate to low water flow. They are also tolerant of a wide range of water parameters, making them a hardy addition to any tank.

In summary, clove polyps are a beautiful and versatile addition to any reef tank. They come in a range of colors and are easy to care for, making them a popular choice for hobbyists of all levels. While similar species like anthelia may grow faster, clove polyps grow at a slower rate, making them a better choice for hobbyists who want a colorful addition to their tank without the risk of it taking over.

Frequently Asked Questions

How do I properly care for Clove Polyps in an aquarium?

Clove Polyps are relatively easy to care for and are a great addition to any aquarium. They require moderate to high water flow and moderate lighting. They can tolerate a wide range of water parameters, but it is best to keep them in stable conditions. Clove Polyps are filter feeders, so they will benefit from regular feedings of planktonic foods, such as phytoplankton or zooplankton.

What are the signs that Clove Polyps are dying, and how can I address them?

If Clove Polyps are not opening up or are receding, it may be a sign of poor water quality or low flow. Check the water parameters and adjust as necessary. Poor water quality can also lead to the growth of unwanted algae, which can overtake the Clove Polyps. If this occurs, it is best to remove the affected polyps and clean the area thoroughly.

Can you explain the process of fragging Clove Polyps for propagation?

Fragging Clove Polyps is a simple process. First, select a healthy polyp and remove it from the rock or substrate. Then, using a sharp razor blade or scissors, cut the polyp at the base. The polyp can then be glued or attached to a new rock or substrate. Clove Polyps are fast growers and will quickly cover the new surface.

What conditions are necessary for Clove Polyps to open and thrive?

Clove Polyps require moderate to high water flow and moderate lighting to open and thrive. They can tolerate a wide range of water parameters, but it is best to keep them in stable conditions. Clove Polyps are filter feeders, so regular feedings of planktonic foods, such as phytoplankton or zooplankton, will help them thrive.

Are Clove Polyps considered aggressive towards other corals in a reef tank?

Clove Polyps are generally considered peaceful and non-aggressive towards other corals in a reef tank. However, they can overgrow other corals if left unchecked. It is best to keep them in an area where they have room to grow without encroaching on other corals.

What is the ideal placement for Clove Polyps in a reef aquarium for optimal growth?

Clove Polyps can be placed in various areas of a reef aquarium, but they prefer moderate to high water flow and moderate lighting. They can be placed on rocks or substrate, and they will quickly spread to cover the surface. It is best to keep them in an area where they have room to grow without encroaching on other corals.

Superman Rhodactis Mushroom

Rhodactis Mushroom: Characteristics, Care, and Maintenance

Rhodactis mushroom is a popular and diverse corallimorph species in the reef aquarium hobby. These mushrooms are known for their unique and colorful appearance, making them a favorite among aquarists. Rhodactis mushrooms are easy to care for and can be a great addition to any reef tank.

Rhodactis mushrooms are found in the Indo-Pacific region, including the Great Barrier Reef. They come in a variety of colors and patterns, ranging from solid colors to stripes and spots. These mushrooms are hardy and can thrive in a wide range of water conditions, making them a great choice for beginners. They are also known for their fast growth rate, which can be beneficial for filling in empty spaces in a reef tank.

Overall, Rhodactis mushrooms are a great addition to any reef tank. They are easy to care for, come in a variety of colors and patterns, and can quickly fill in empty spaces in a tank. With the right care, these mushrooms can thrive and add a unique and colorful touch to any aquarium.

Rhodactis Mushroom Overview

Rhodactis mushroom, also known as mushroom coral, is a type of soft coral belonging to the order Corallimorpharia. These corals are commonly found in the Indo-Pacific region, including Tonga, Fiji, Solomon Islands, and the Great Barrier Reef.

Scientific Classification

Rhodactis mushrooms belong to the family Discosomatidae, which is a group of corallimorphs. They are classified under the order Corallimorpharia, which is a subclass of the phylum Cnidaria. The scientific name of the Rhodactis mushroom is Rhodactis inchoata.

Physical Characteristics

Rhodactis mushrooms have a unique texture and coloration. They have a fleshy appearance and are covered in small, hair-like tentacles that give them a hairy appearance. The polyps of these corals are large and can be up to several inches in diameter. They come in a variety of colors, including green, orange, red, and brown.

Habitat and Distribution

Rhodactis mushrooms are found in the shallow waters of the Indo-Pacific region. They are commonly found in lagoons, reef flats, and other shallow water environments. These corals are often found growing on rocks, sand, and other hard surfaces.

In summary, Rhodactis mushrooms are a unique and fascinating type of soft coral that can be found in the shallow waters of the Indo-Pacific region. They have a distinctive texture and coloration, and are commonly found in Tonga, Fiji, Solomon Islands, and the Great Barrier Reef. Their scientific classification is under the order Corallimorpharia, and they belong to the family Discosomatidae.

Aquarium Care

Rhodactis mushrooms are a popular addition to aquariums and reef tanks due to their vibrant colors and ease of care. To ensure the health and longevity of these soft corals, it is important to provide them with the appropriate lighting, water parameters, placement, and flow.

Lighting Requirements

Rhodactis mushrooms require moderate lighting to thrive. They can be kept under LED lights, but it is important to ensure that the PAR (photosynthetically active radiation) levels are adequate. A PAR meter can be used to measure the light intensity, and the optimal PAR range for Rhodactis mushrooms is between 50-150. It is recommended to provide them with 8-10 hours of lighting per day, but never exceed 12 hours as this may lead to coral bleaching.

Water Parameters

To keep Rhodactis mushrooms healthy, it is important to maintain stable water parameters. The recommended temperature range is between 75-80°F, and the pH should be kept between 8.1-8.4. Additionally, it is important to keep nitrates and nitrites at low levels, and maintain proper calcium levels to promote healthy growth. Regular water changes can help maintain water quality and stability.

Placement and Flow

Rhodactis mushrooms can be placed on live rocks or directly on the substrate. They prefer moderate water flow, so it is important to ensure that the water movement is not too strong. Placing them in an area with moderate flow will help ensure that they receive adequate nutrients and oxygen.

In summary, providing Rhodactis mushrooms with appropriate lighting, stable water parameters, and moderate flow will help ensure their health and longevity in the aquarium.

Feeding and Nutrition

Rhodactis mushrooms are known to be easy to care for and do not require frequent feedings. They are photosynthetic and can derive their nutrition from the zooxanthellae living within their tissues. However, feeding the mushrooms can speed up their growth and enhance their coloration.

Feeding Techniques

Rhodactis mushrooms can be fed with small pieces of meaty foods such as shrimp or fish. They can also be spot fed with liquid foods such as phytoplankton and zooplankton. Spot feeding can be done by turning off the pumps in the aquarium and dropping the food directly onto the mushroom’s mouth. It is important to note that overfeeding can lead to poor water quality and other health issues for the mushroom.

Symbiotic Relationships

Rhodactis mushrooms have a symbiotic relationship with photosynthetic algae called zooxanthellae. The algae live within the mushroom’s tissues and provide it with nutrition through photosynthesis. In return, the mushroom provides the algae with a safe place to live and carry out photosynthesis. This relationship allows the mushroom to survive in low-nutrient environments and makes it an ideal addition to a reef aquarium.

Overall, Rhodactis mushrooms are low maintenance and easy to care for. While they do not require frequent feedings, providing them with occasional feedings can enhance their growth and coloration. Their symbiotic relationship with zooxanthellae makes them an excellent addition to a reef aquarium.

Propagation and Growth

Asexual Reproduction

Rhodactis mushrooms are known for their ability to self-propagate through a process called asexual reproduction. This means that they do not require a partner to reproduce. Instead, they split themselves longitudinally, creating two genetically identical clones. This process is also known as “splitting.”

To propagate Rhodactis mushrooms, one can simply place a frag (short for fragment) of the mushroom on a frag plug and wait for it to grow. Alternatively, one can cut the mushroom in half and place each half on a separate frag plug. The latter method is more time-consuming but can result in faster growth rates.

Growth Patterns

Rhodactis mushrooms have a moderate growth rate and can reach a size of up to 4-8 inches in diameter. Their growth patterns are influenced by factors such as lighting, water flow, and nutrient availability. They prefer moderate to high water flow and moderate lighting levels.

When placed in an aquarium, Rhodactis mushrooms can attach themselves to rocks and other surfaces. They can also move around the aquarium by detaching themselves from their original location and attaching themselves elsewhere.

In conclusion, Rhodactis mushrooms are relatively easy to propagate and have moderate growth rates. They can self-propagate asexually through longitudinal fission or splitting. When placed in an aquarium, they prefer moderate to high water flow and moderate lighting levels.

Species Variants and Identification

Common Varieties

Rhodactis mushrooms are a type of mushroom coral that belong to the Discosoma genus. They are often referred to by their common names such as the Superman Mushroom, Bullseye Mushroom, Tonga Blue Mushroom, or Hairy Mushroom. The scientific name for the Bullseye Mushroom is Rhodactis inchoata. These mushrooms come in a variety of colors including blue, green, red, and violet. Some varieties may also have a combination of these colors.

Identifying Features

The Bullseye Mushroom is one of the most common varieties of Rhodactis mushrooms. It is easily recognizable by its vibrant blue coloration with green highlights and a red mouth area. The mushroom’s texture is smooth and fleshy, and it can grow up to 3 inches in diameter. The Bullseye Mushroom has papillae that form cauliflower-like patterns, which are characteristic of this species.

Other varieties of Rhodactis mushrooms may have different identifying features. For example, the Superman Mushroom (Rhodactis indosinensis) has a bright red or orange coloration with blue highlights, while the Hairy Mushroom (Rhodactis mussoides) has a fuzzy texture and can be found in various shades of green.

When identifying Rhodactis mushrooms, it is important to look for specific features such as coloration, texture, and papillae patterns. It is also important to note the size and shape of the mushroom, as well as any unique characteristics that may be present.

In conclusion, Rhodactis mushrooms are a diverse group of mushroom corals that come in a variety of colors and textures. The Bullseye Mushroom is one of the most common varieties and is easily recognizable by its blue coloration with green highlights and red mouth area. When identifying Rhodactis mushrooms, it is important to look for specific features such as coloration, texture, and papillae patterns.

Compatibility and Interaction

Tank Mates

Rhodactis mushrooms are generally considered to be peaceful and compatible with most other reef tank inhabitants. They can be kept with a variety of fish, invertebrates, and other corals, including both stony and soft corals. However, caution should be exercised when placing them near aggressive or territorial corals, as they may be subject to attack or damage.

It is recommended to provide enough space between Rhodactis mushrooms and other corals, as they can extend their sweeper tentacles at night, which can cause damage to nearby corals.

Defensive Mechanisms

Rhodactis mushrooms have a few defensive mechanisms that help them to protect themselves from predators. They can produce toxins that deter some fish and invertebrates from eating them. Additionally, they can retract their tentacles and close their mouths to protect themselves from physical damage.

However, it is important to note that Rhodactis mushrooms are not invincible and can be damaged by aggressive tank mates or improper care. It is important to provide them with a suitable location on the rockwork and to avoid placing them in direct flow or bright light, as this can cause damage to their tissues.

Overall, Rhodactis mushrooms are a great addition to a reef tank and can be kept with a variety of other tank mates. With proper care and attention, they can thrive and add color and interest to any aquarium.

Health and Disease Management

Common Ailments

Rhodactis mushrooms are generally hardy and can tolerate a range of water parameters, but they are not immune to diseases and infections. One of the most common ailments that affect Rhodactis mushrooms is brown jelly disease. This is a bacterial infection that can quickly spread to other corals and cause extensive damage if left untreated. Signs of brown jelly disease include a brownish, slimy substance that covers the coral’s surface, and a foul odor.

Another common ailment that affects Rhodactis mushrooms is algae overgrowth. Algae can quickly grow on the coral’s surface, blocking out light and depriving the coral of nutrients. This can cause the coral to become weak and more susceptible to diseases.

Maintaining Optimal Health

To maintain optimal health, Rhodactis mushrooms require stable water parameters and high water quality. It is important to maintain proper water flow, lighting, and nutrient levels to ensure the coral’s optimal health. Regular water changes, the use of a quality protein skimmer, and regular testing can help maintain stable water parameters and prevent the buildup of harmful substances.

Feeding Rhodactis mushrooms is not required, but it can speed up growth. However, overfeeding can lead to nutrient imbalances and other problems. It is important to provide the coral with a balanced diet of phytoplankton and other small organisms.

In conclusion, Rhodactis mushrooms are hardy corals that can tolerate a range of water parameters. However, to maintain optimal health and prevent diseases, it is important to maintain stable water parameters, high water quality, and provide a balanced diet.

Purchasing and Acclimation

Selecting Healthy Specimens

When purchasing Rhodactis mushrooms, it is important to select healthy specimens. Look for mushrooms that are fully open and have a vibrant coloration. Avoid specimens that are closed up, discolored, or have a slimy texture. It is also important to inspect the substrate the mushrooms are attached to. Make sure the substrate is clean and free of debris.

Acclimation Process

After purchasing Rhodactis mushrooms, it is important to acclimate them to their new environment. The acclimation process should take place over a period of 1-2 hours. The following steps should be followed:

  1. Turn off the aquarium lights and dim the room lights.
  2. Float the bag containing the mushrooms in the aquarium for 10-15 minutes to allow the temperature to equalize.
  3. Open the bag and slowly add small amounts of aquarium water to the bag every 5-10 minutes until the bag is full.
  4. Use a net to transfer the mushrooms to the aquarium.
  5. Place the mushrooms in a low to medium flow area of the aquarium on a clean substrate.

During the acclimation process, it is important to monitor the pH, temperature, and salinity levels of the water. It is also important to avoid exposing the mushrooms to direct light or strong water flow during the first few hours after acclimation.

Rhodactis mushrooms are relatively affordable and can be purchased for around $20-$50 depending on the size and coloration of the specimen. They come in a variety of colors, including green, blue, red, and purple. Their texture is fleshy and smooth, and they are typically placed on the substrate of the aquarium.

Frequently Asked Questions

What are the different types of Rhodactis mushroom corals?

Rhodactis mushrooms are a genus of mushroom corals that come in a variety of colors, shapes, and sizes. They can be found in green, brown, tan, pink, and purple colors. The tentacle colors usually contrast with the body. Some popular species include Rhodactis indosinensis, Rhodactis howesii, and Rhodactis mussoides.

How should Rhodactis mushrooms be placed in a reef aquarium for optimal growth?

Rhodactis mushrooms are relatively easy to care for and can be placed in any part of the reef aquarium. They can be attached to rocks or placed on the substrate. It is important to ensure that they are not placed too close to other corals, as they can become aggressive and overgrow other corals.

What is the typical growth rate of Rhodactis mushrooms in captivity?

Rhodactis mushrooms have a moderate growth rate and can grow up to 4-8 inches. The growth rate can be influenced by factors such as lighting, water quality, and feeding.

What lighting conditions are ideal for the health of Rhodactis mushrooms?

Rhodactis mushrooms require moderate to high lighting conditions for optimal health. They can thrive under a variety of lighting systems, including metal halides, T5s, and LEDs. It is important to acclimate them to the lighting conditions slowly to prevent shock.

How does splitting occur in Rhodactis mushrooms, and what care is required during this process?

Rhodactis mushrooms reproduce asexually by means of fission. This process occurs when the mushroom splits into two or more individuals. Splitting can occur spontaneously or as a result of physical damage. During this process, it is important to ensure that the newly formed individuals have access to adequate lighting, water flow, and nutrients.

Can Rhodactis mushroom corals cause stings, and how should they be handled?

Rhodactis mushrooms have stinging cells called nematocysts, which they use for protection and capturing prey. However, they are not usually aggressive towards other corals or fish. If handling is necessary, it is recommended to wear gloves to prevent skin irritation.

Gila Monster

UV Sterilizer for Reef Tanks: Benefits and Usage

UV sterilizers are a popular choice for reef tank enthusiasts who want to keep their aquatic ecosystem healthy and thriving. These devices emit ultraviolet light rays that can effectively damage the DNA of harmful bacteria, parasites, and algae, reducing their proliferation in the aquarium. UV sterilizers can also be an excellent way to clear up cloudy water and help keep it crystal clear.

When selecting a UV sterilizer for a reef tank, there are several factors to consider. The size of the aquarium, the flow rate of the water, and the type of livestock in the tank can all impact the effectiveness of the sterilizer. It is important to choose a unit that is appropriately sized for the tank and can handle the flow rate of the filtration system. Additionally, some types of livestock, such as corals, may be sensitive to the UV radiation emitted by the sterilizer, so it is important to research the specific needs of the tank’s inhabitants before making a purchase.

Overall, a UV sterilizer can be a valuable addition to a reef tank, helping to maintain a healthy and clear aquatic environment. By selecting the right unit and using it correctly, reef tank enthusiasts can enjoy the benefits of this powerful tool while keeping their aquatic ecosystem flourishing.

Understanding UV Sterilization in Reef Tanks

UV sterilizers are commonly used in reef tanks to provide effective sterilization of microorganisms in the water. The principles of UV sterilization involve the use of ultraviolet light to damage the DNA of microorganisms, rendering them unable to reproduce and causing them to die off.

Principles of UV Sterilization

The effectiveness of UV sterilization depends on several factors, including the intensity of the UV light, the contact time between the water and the UV light, and the flow rate of the water through the sterilizer. The higher the intensity of the UV light, the more effective it will be at killing microorganisms. Similarly, a longer contact time between the water and the UV light will increase the effectiveness of the sterilization process.

UV sterilization works by exposing microorganisms to ultraviolet light, which damages their DNA and prevents them from reproducing. This can help to reduce the risk of disease outbreaks in the reef tank, as well as improve water clarity by reducing the growth of algae and bacteria.

Benefits for Reef Aquariums

There are several benefits to using UV sterilizers in reef aquariums. One of the main benefits is improved water clarity, as the sterilizer can help to reduce the growth of algae and bacteria in the water. This can help to prevent cloudy water and promote a healthy environment for the reef tank inhabitants.

Another benefit of UV sterilization is the reduction of disease outbreaks in the reef tank. By killing off microorganisms that can cause disease, UV sterilization can help to prevent the spread of disease among the reef tank inhabitants. This can be especially important in larger reef tanks or those with a high population density.

Overall, UV sterilization can be an effective tool for maintaining a healthy and thriving reef tank. By reducing the growth of microorganisms and promoting water clarity, UV sterilizers can help to create a safe and healthy environment for the reef tank inhabitants.

Choosing the Right UV Sterilizer

When it comes to choosing the right UV sterilizer for a reef tank, there are several factors to consider. Understanding these factors can help ensure that the chosen sterilizer is effective, efficient, and within budget.

Factors to Consider

One of the most important factors to consider when choosing a UV sterilizer is the wattage. The wattage of a sterilizer determines its sterilization power. A higher wattage sterilizer will have more sterilization power and can handle larger aquarium systems. However, a higher wattage sterilizer will also be physically larger and more expensive.

Another important factor to consider is the flow rate of the sterilizer. The flow rate refers to the rate at which water passes through the sterilizer. It is important to choose a sterilizer with a flow rate that matches the flow rate of the aquarium system. If the sterilizer has a lower flow rate than the aquarium system, it may not be effective. If the sterilizer has a higher flow rate than the aquarium system, it may be too powerful and waste energy.

Understanding Wattage and Flow Rates

Understanding the relationship between wattage and flow rates is crucial when choosing a UV sterilizer. A sterilizer with a higher wattage will require a higher flow rate to be effective. Conversely, a sterilizer with a lower wattage will require a lower flow rate to be effective.

It is important to choose a sterilizer with a wattage and flow rate that matches the size and needs of the aquarium system. A sterilizer that is too small will not be effective, while a sterilizer that is too large will be a waste of energy and money.

When choosing a UV sterilizer, it is also important to consider the quality and effectiveness of the sterilizer. Look for sterilizers that are made from high-quality materials and have a proven track record of effectiveness. This will help ensure that the chosen sterilizer is reliable and effective.

Overall, choosing the right UV sterilizer for a reef tank requires careful consideration of several factors, including wattage, flow rate, quality, and effectiveness. By understanding these factors and choosing a sterilizer that matches the needs of the aquarium system, reef tank owners can ensure that their aquarium is healthy and thriving.

Installation and Setup

When it comes to installing and setting up a UV sterilizer for a reef tank, there are a few key things to keep in mind. This section will cover the two main aspects of installation and setup: mounting and plumbing, and integrating with existing filtration.

Mounting and Plumbing

The first step in installing a UV sterilizer is to determine where to mount it. The physical size of the unit should be taken into consideration, as well as the available space in the sump or filtration system. Once the location has been determined, the UV sterilizer can be mounted using the included brackets or other mounting hardware.

Next, the inlet and outlet tubing should be connected to the UV sterilizer. It is important to use the correct size tubing to ensure proper flow rate through the unit. The inlet tubing should be connected to the water source, such as the return pump, and the outlet tubing should be connected to the destination, such as the protein skimmer or biological filter.

Integrating with Existing Filtration

When integrating a UV sterilizer with an existing filtration system, it is important to consider the flow rate of the system. The UV sterilizer should be sized appropriately for the total volume of water in the tank and sump, and the flow rate of water through the unit should be 1.5 times the total volume of water per hour [1].

To ensure proper integration, the UV sterilizer should be installed inline with the return pump, using the return line as the inlet and the destination (such as the protein skimmer or biological filter) as the outlet [2]. This will ensure that all of the water in the system passes through the UV sterilizer before reaching its destination.

In summary, installing and setting up a UV sterilizer for a reef tank requires careful consideration of the physical size of the unit, the available space in the sump or filtration system, and the flow rate of the system. By following these guidelines and integrating the UV sterilizer inline with the return pump, reef tank owners can enjoy the benefits of improved water clarity and reduced risk of disease and parasites.

Maintaining a UV Sterilizer

A UV sterilizer is an essential component of a reef tank setup. It helps to maintain a healthy environment by neutralizing unwanted viruses and bacteria in the water. However, it is crucial to maintain the UV sterilizer to ensure it is functioning correctly. This section will cover the two main aspects of maintaining a UV sterilizer: cleaning and bulb replacement, and monitoring performance.

Cleaning and Bulb Replacement

Cleaning the UV sterilizer regularly is necessary to ensure that it is functioning correctly. The quartz sleeve should be cleaned with a soft brush and a mild detergent to remove any buildup. It is essential to ensure that the quartz sleeve is not scratched or damaged during cleaning, as this can affect the performance of the UV sterilizer.

The UV bulb is the heart of the UV sterilizer, and it is essential to replace it regularly. The frequency of bulb replacement depends on the manufacturer’s recommendation and the hours of use. It is best to replace the bulb every six to twelve months, even if it is still working. This ensures that the UV sterilizer is functioning at its optimal level.

Monitoring Performance

Monitoring the performance of the UV sterilizer is crucial to ensure that it is functioning correctly. The flow rate of water through the UV sterilizer is essential to ensure that the marine organisms are exposed to the UV light for an adequate amount of time. It is recommended to measure the flow rate periodically to ensure that it is within the manufacturer’s recommendation.

It is also essential to monitor the UV sterilizer’s performance by using a UV monitor. A UV monitor measures the intensity of the UV light and alerts the user if the UV light is not strong enough. This ensures that the UV sterilizer is functioning correctly and that the marine organisms are being exposed to the correct level of UV light.

In conclusion, maintaining a UV sterilizer is crucial to ensure that it is functioning correctly and providing the necessary protection to the marine organisms in the reef tank. Regular cleaning and bulb replacement, along with monitoring performance, are essential components of UV sterilizer maintenance.

Balancing UV Sterilization with Biological Filtration

When it comes to reef tanks, balancing the use of UV sterilizers with biological filtration is crucial. While UV sterilizers are effective at eliminating harmful microbes such as bacteria, parasites, and algae, they can also harm beneficial bacteria that are essential for maintaining a healthy tank.

Preserving Beneficial Bacteria

Beneficial bacteria play a vital role in the natural food chain of a reef tank. They help break down waste and convert harmful ammonia and nitrite into less harmful nitrate. Without these bacteria, the tank can quickly become toxic to its inhabitants.

To preserve beneficial bacteria while using a UV sterilizer, it is essential to ensure that the sterilizer is not overused. A UV sterilizer should only be used for a few hours each day, and the water should be allowed to circulate through the biological filter for the remainder of the time.

Avoiding Over-Sterilization

Over-sterilization can be harmful to the delicate balance of a reef tank. When the UV sterilizer is used too frequently or for too long, it can kill off beneficial bacteria and disrupt the natural food chain of the tank.

To avoid over-sterilization, it is essential to monitor the water parameters regularly. If the nitrate levels are consistently low, it may be an indication that the UV sterilizer is being overused. In this case, it may be necessary to reduce the amount of time that the sterilizer is in use or to switch to a lower wattage bulb.

Overall, balancing the use of a UV sterilizer with biological filtration is essential for maintaining a healthy reef tank. While UV sterilizers are effective at eliminating harmful microbes, they must be used correctly to avoid harming beneficial bacteria and disrupting the natural food chain of the tank.

Troubleshooting Common Issues

UV sterilizers are a great addition to any reef tank, but they are not without their issues. Here are some common problems that reef tank owners might encounter and how to troubleshoot them.

Handling Cloudy Water

Cloudy water can be caused by a variety of factors, including overfeeding, poor filtration, and high levels of dissolved organic matter. A UV sterilizer can help clear up cloudy water, but if the problem persists, there are a few things that reef tank owners can do.

First, they should reduce the amount of food they are feeding their fish and other tank inhabitants. Overfeeding can lead to excess waste, which can contribute to cloudy water. Second, they should check their filtration system to make sure it is working properly. If the filter is clogged, it can’t do its job effectively. Finally, they should consider adding a protein skimmer to their tank. Protein skimmers can remove dissolved organic matter from the water, which can help reduce cloudiness.

Addressing Algae and Bacterial Blooms

Algae and bacterial blooms are common problems in reef tanks. Algae can be caused by a variety of factors, including excess nutrients in the water and too much light. Bacterial blooms can be caused by a buildup of organic matter in the tank.

To address these issues, reef tank owners should first make sure their UV sterilizer is working properly. A UV sterilizer can help kill off free-floating algae and bacteria, which can help reduce the problem. They should also consider reducing the amount of light their tank is receiving. If the algae or bacterial bloom is severe, they may need to do a water change to remove excess nutrients from the water. Finally, they should make sure their filtration system is working properly and consider adding a protein skimmer to their tank to remove organic matter from the water.

Overall, UV sterilizers are a great tool for maintaining a healthy reef tank. By troubleshooting common issues like cloudy water, algae, and bacterial blooms, reef tank owners can keep their tanks looking beautiful and healthy.

Advanced Topics in UV Sterilization

Enhancing Water Flow with Closed-Loop Systems

Advanced reef tank owners know that proper water flow is crucial for the health of their marine organisms. Closed-loop systems are an advanced technique that can be used to enhance the water flow in a reef tank. A closed-loop system uses a separate pump to move water through the UV sterilizer, which can increase the effectiveness of the sterilizer.

By using a closed-loop system, the flow rate of water through the UV sterilizer can be controlled more precisely, which can help to optimize the contact time and rate of sterilization. Additionally, using a valve to regulate the flow rate of water through the UV sterilizer can help to ensure that the water is flowing through the unit at the optimal rate.

Smart Control with GHL and Neptune Systems

GHL and Neptune Systems are two popular brands of aquarium controllers that can be used to control UV sterilizers. These controllers allow for smart control of the sterilizer, which can help to optimize the effectiveness of the unit.

For example, GHL controllers can be used to monitor the flow rate of water through the UV sterilizer. If the flow rate drops below the desired level, the controller can automatically adjust the flow rate to ensure that the water is flowing through the unit at the optimal rate.

Similarly, Neptune Systems controllers can be used to monitor the performance of the UV sterilizer. If the unit is not performing at the desired level, the controller can alert the owner and provide recommendations for how to optimize the unit.

Overall, advanced topics in UV sterilization include enhancing water flow with closed-loop systems and using smart control with GHL and Neptune Systems. By using these advanced techniques, reef tank owners can optimize the effectiveness of their UV sterilizers and ensure the health of their marine organisms.

Impact on Reef Tank Inhabitants

UV sterilizers are a popular addition to saltwater reef tanks. They are used to control disease-causing parasites, bacteria, and viruses, and to promote coral health. However, some aquarists are hesitant to use them out of concern for their impact on the tank’s inhabitants. In this section, we will explore the effects of UV sterilizers on corals, invertebrates, and fish.

Effects on Corals and Invertebrates

UV sterilizers have little to no impact on corals and invertebrates. According to [Bulk Reef Supply](https://duckduckgo.com/y.js?ad_domain=bulkreefsupply.com&ad_provider=bingv7aa&ad_type=txad&rut=5cf92807ef5af0a4528c9de4956bb87ccc156a4d63be3401d5e34d8ae0a132e9&u3=https%3A%2F%2Fwww.bing.com%2Faclick%3Fld%3De8uSAgU75annValQ65my6u3zVUCUwJn48AmDb93HORThCeD1i4k5WVGLgDTwN9Ze59GjdaYGPbDOiHbVQYplpdZsVePudbelj5ys3UzVQ2GidMSGI6PZHzf7Xd7sTOd7erzK1LaSrhXXbjrO_SotjYApWGvHUpOqnwwqIIuvGq6arTT45kikorBTBE44sIKztbzHUlRA%26u%3DaHR0cHMlM2ElMmYlMmZ3d3cuYnVsa3JlZWZzdXBwbHkuY29tJTJmcHJvdGVpbi1za2ltbWVycyUyZnV2LXN0ZXJpbGl6ZXJzLmh0bWwlM2Z1dG1fdGVybSUzZHJlZWYlMjUyMHV2JTI1MjBzdGVyaWxpemVyJTI2dXRtX2NhbXBhaWduJTNkRUwlMmIlMjU3QyUyYkFDUV9Qcm9zcGVjdGluZ19TZWFyY2glMmIlMjU3QyUyYlJPQVMlMmIlMjU3QyUyYk5CJTJiJTI1N0MlMmJTa2ltbWVycyUyYiUyNTI2JTJiRmlsdHJhdGlvbiUyNnV0bV9zb3VyY2UlM2RiaW5nJTI2dXRtX21lZGl1bSUzZHBwYyUyNmhzYV9hY2MlM2Q3MzczMzQxNDM4JTI2aHNhX2NhbSUzZDExMjI1MjY4NDA2JTI2aHNhX2dycCUzZDExNzUzNzg4MzQ3NDE3NzklMjZoc2FfYWQlM2QlMjZoc2Ffc3JjJTNkcyUyNmhzYV90Z3QlM2Rrd2QtNzM0NjEzMjExNDU0OTAlM2Fsb2MtMTkwJTI2aHNhX2t3JTNkcmVlZiUyNTIwdXYlMjUyMHN0ZXJpbGl6ZXIlMjZoc2FfbXQlM2RwJTI2aHNhX25ldCUzZGFkd29yZHMlMjZoc2FfdmVyJTNkMyUyNm1zY2xraWQlM2RmNTUyOWNhM2MzMmMxOGQyNDUzNWY5ZDcyOWVkYWI3ZiUyNnV0bV9jb250ZW50JTNkVVYlMjUyMFN0ZXJpbGl6ZXJz%26rlid%3Df5529ca3c32c18d24535f9d729edab7f&v

Conclusion

In conclusion, UV sterilizers play a crucial role in maintaining the health and clarity of reef aquariums. When used effectively, they can help eliminate harmful microbes and prevent the growth of algae, contributing to a balanced and thriving ecosystem. Hobbyists can benefit from incorporating UV sterilizers into their reef tanks, as they provide an added layer of protection against waterborne pathogens.

Aqua UV and Pentair Aquatics are reputable brands that offer reliable UV sterilizer systems designed specifically for reef aquariums. It is essential for hobbyists to carefully consider the flow rate and installation of UV sterilizers to ensure optimal performance and effectiveness. By implementing these considerations, hobbyists can enhance the overall water quality and create an environment conducive to the well-being of marine life within their reef tanks.

Frequently Asked Questions

How does a UV sterilizer benefit a reef tank?

A UV sterilizer helps to eliminate harmful microorganisms such as bacteria, viruses, and parasites in a reef tank. By exposing the water to UV light, the sterilizer can kill these organisms, thus reducing the risk of disease and infection in the aquarium.

Can a UV sterilizer have negative effects on a reef tank’s ecosystem?

While a UV sterilizer can help to eliminate harmful organisms, it can also kill beneficial ones such as phytoplankton and zooplankton. These organisms are important for the health of the reef ecosystem, as they serve as a food source for corals and other invertebrates. It is important to use a UV sterilizer appropriately and to monitor the effects on the ecosystem.

What is the recommended duration for running a UV sterilizer in a reef aquarium?

The recommended duration for running a UV sterilizer in a reef aquarium varies depending on the specific sterilizer and the size of the tank. In general, it is recommended to run the sterilizer for 8-10 hours per day. This will help to maintain a healthy balance of microorganisms in the tank.

What size UV sterilizer is appropriate for a 75 gallon reef tank?

For a 75 gallon reef tank, a UV sterilizer with a flow rate of 400-600 gallons per hour is appropriate. It is important to choose a sterilizer that is appropriately sized for the tank in order to ensure effective sterilization without disrupting the ecosystem.

Are there specific UV sterilizer brands recommended for nano reef tanks?

There are several UV sterilizer brands that are recommended for nano reef tanks, including Aqua Ultraviolet, Coralife, and Innovative Marine. It is important to choose a sterilizer that is appropriately sized for the tank and that is compatible with the other equipment in the system.

How does the Innovative Marine UV Sterilizer compare to other brands for reef tanks?

The Innovative Marine UV Sterilizer is a popular choice for reef tanks due to its compact size and ease of use. It is designed to be used with Innovative Marine’s line of all-in-one aquariums, but can also be used with other tanks. While there are other brands of UV sterilizers available on the market, the Innovative Marine model is known for its reliability and effectiveness.

Green and Purple Fungia Plate Coral

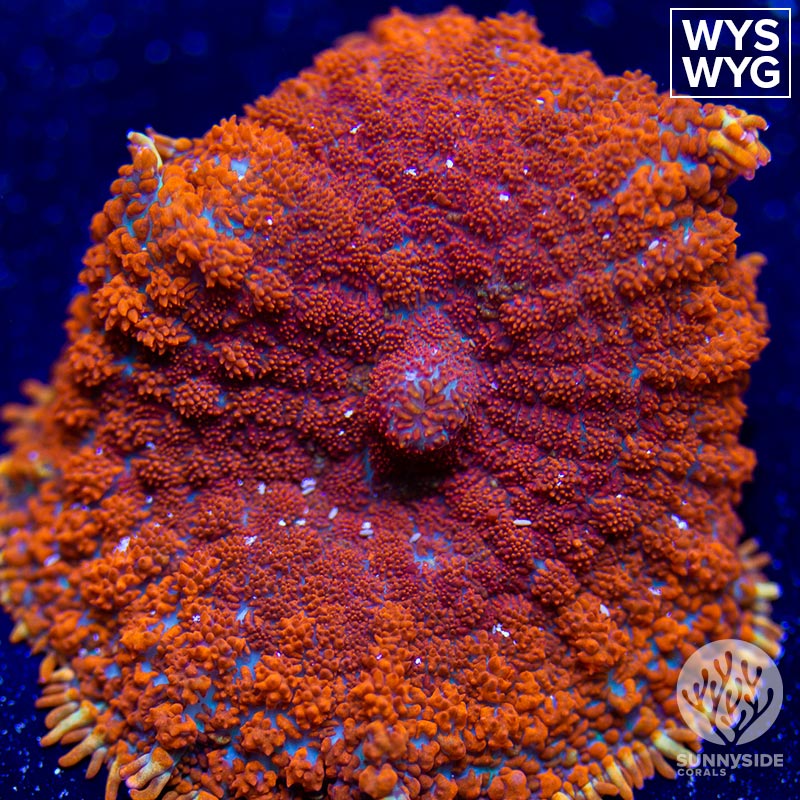
Plate Coral: Characteristics and Care

Salt water plate coral is a stunning addition to any saltwater aquarium. These corals belong to the Fungiidae family and are commonly referred to as “plate corals”. They are known for their unique and beautiful appearance, which resembles a flat disc or plate.

Plate corals are relatively easy to care for, making them a popular choice for both beginner and experienced aquarists. They require moderate to high lighting and moderate water flow, and they can be placed on the substrate or attached to live rock. However, it is important to note that plate corals are aggressive towards other corals and should be given enough space to avoid any potential conflicts. Additionally, they should not be kept with aggressive fish or invertebrates that may damage their delicate tissue.

Overall, salt water plate coral is a fascinating and rewarding addition to any saltwater aquarium. With proper care and attention, these corals can thrive and add a unique touch of beauty to any underwater environment.

Understanding Plate Corals

Species Overview

Plate corals are a type of stony coral that belongs to the Fungiidae family. They are typically flat and round, with a single mouth in the center of the coral. Plate corals come in a variety of colors, including green, brown, and purple, and can grow up to several inches in diameter.

There are several different genera of plate corals, including Fungia, Heliofungia, Cycloseris, and Lithophyllon. While they share many similarities, each genus has its own distinct characteristics and care requirements.

Habitat and Distribution

Plate corals are found in the shallow waters of the Indo-Pacific region, including the Red Sea, the Great Barrier Reef, and the waters around Indonesia and Malaysia. They are typically found in areas with strong water flow, such as near reef edges and in lagoons.

In their natural habitat, plate corals can be found attached to hard surfaces such as rocks and coral rubble. They are typically found in areas with moderate to high light levels, and require clean, clear water to thrive.

Overall, plate corals are a popular choice for reef aquariums due to their unique appearance and relative ease of care. With proper water quality and lighting, these corals can thrive in a home aquarium and provide a beautiful addition to any reef ecosystem.

Aquarium Setup

Tank Requirements

When setting up an aquarium for Salt Water Plate Coral, it is important to consider the tank’s size and shape. A reef aquarium with a capacity of at least 30 gallons is recommended to provide ample space for the coral to grow. The aquarium should also have a large surface area to allow for proper gas exchange.

Water Parameters

Maintaining proper water parameters is crucial for the health and growth of Salt Water Plate Coral. The ideal salinity range is between 1.023 and 1.025, while the alkalinity should be between 8 and 12 dKH. The temperature of the water should be kept between 75 and 80 degrees Fahrenheit. Calcium, magnesium, strontium, and iodine levels should also be monitored and maintained at appropriate levels. Trace elements should also be added to the water as needed.

Substrate and Placement

Salt Water Plate Coral should be placed on the bottom of the tank on a sandbed or slope. The sand should be fine-grained and free of debris. The coral can also be placed on rocks or rubble, but it is important to ensure that it is securely attached to prevent it from falling and getting damaged. The coral should be placed in an area with moderate lighting and water flow.

In conclusion, setting up an aquarium for Salt Water Plate Coral requires careful consideration of tank requirements, water parameters, substrate, and placement. By maintaining proper water parameters and providing a suitable environment, the coral can thrive and grow in a healthy manner.

Caring for Plate Corals

Plate corals are a stunning addition to any saltwater aquarium. They come in a variety of colors and patterns, making them a popular choice for reef enthusiasts. However, to keep these corals healthy, you need to provide them with the right conditions. In this section, we will cover the basics of plate coral care, including lighting, water flow, feeding, growth, and propagation.

Lighting and Flow

Plate corals require moderate lighting and moderate water flow. Too much light can cause the coral to bleach, while too little can prevent it from growing. Similarly, too much flow can damage the coral, while too little can cause debris to accumulate on its surface. It is essential to strike a balance between the two.

Feeding and Nutrition

Plate corals are photosynthetic, which means they can generate their food through photosynthesis. However, they also require supplemental feeding to thrive. The best food for plate corals is mysis shrimp or brine shrimp. You can feed them once or twice a week, depending on their size and growth rate. Be sure not to overfeed, as this can cause water quality issues.

Growth and Propagation

Plate corals grow slowly, but they can reach a considerable size over time. They can also be propagated by fragging. To frag a plate coral, you need to cut a piece of the coral and glue it to a rock or frag plug. It is essential to use a sharp knife and wear gloves to avoid injuring yourself or damaging the coral.

In summary, caring for plate corals requires moderate lighting and water flow, supplemental feeding, and occasional fragging. By providing your plate corals with the right conditions, you can enjoy their beauty for years to come.

Compatibility and Coexistence

Tank Mates

When it comes to tank mates, plate corals are considered to be semi-aggressive. Therefore, it is essential to choose the right tank mates that can coexist with them peacefully. Reef-safe animals such as clownfish, gobies, and blennies are excellent choices. Also, avoid keeping them with anemones as they may sting each other.

Avoiding Aggression

Plate corals have a unique way of aggression. They cover their neighbors with thick mucus that has chemicals in it that are generally toxic to the cells of the neighboring coral. Therefore, it is essential to keep them away from other corals that have long polyps or tentacles that can touch the plate coral’s feeding tentacles.

It is also crucial to provide enough space between plate corals and other corals to avoid any competition for space. It is recommended to keep them at least 4 to 6 inches apart. Additionally, avoid keeping them in high flow areas as it can stress them out and cause damage to their tissues.

In summary, choosing the right tank mates and providing enough space between the plate corals and other corals can help avoid any aggression and ensure a peaceful coexistence in the tank.

Common Varieties of Plate Corals

Plate corals are a type of large polyp stony (LPS) coral that can be found in a variety of colors, shapes, and sizes. They are popular among reef aquarium hobbyists due to their hardiness and ease of care. In this section, we will explore the common varieties of plate corals.

Color Variations

Plate corals come in a range of colors, including red, green, orange, purple, and pink. The Fungia plate coral, for example, is often brown or green with a hint of purple, while the Pinwheel plate coral is typically green with orange polyps.

Shape and Size Differences

Plate corals also vary in shape and size. The Fungia plate coral is round and flat, while the Long Tentacle plate coral has long, flowing tentacles that extend from its circular base. The Pinwheel plate coral, as its name suggests, has a pinwheel-like shape with multiple circular plates.

In terms of size, plate corals can range from just a few inches in diameter to over a foot wide. It’s important to consider the size of your aquarium when selecting a plate coral, as larger specimens will require more space to grow and thrive.

Overall, plate corals are a diverse and fascinating group of corals that can add a beautiful and unique element to any reef aquarium. With proper care and attention, they can thrive in a variety of environments and provide years of enjoyment for their owners.

Potential Challenges

Health Issues

Saltwater plate coral is generally considered a hardy and easy-to-care-for species, but there are still some health issues that can arise. One of the most common issues is the buildup of mucus on the coral’s surface. This mucus can trap debris and other particles, leading to poor water quality and potential health problems for the coral. Regular water changes and proper filtration can help prevent this issue.

Another health concern for saltwater plate coral is movement. These corals can be damaged if they are knocked over or bumped by other aquarium inhabitants. It is important to ensure that the coral is securely attached to the substrate and that there is enough space around it to prevent accidental damage.

Environmental Stress

Saltwater plate coral can also be affected by environmental stressors. High levels of nitrates and phosphates in the water can lead to poor coral health and growth. It is important to monitor these levels and take steps to reduce them if necessary.

Medium water movement is ideal for saltwater plate coral. Strong currents can cause the coral to become stressed and may even lead to tissue damage. It is important to ensure that the coral is placed in an area of the tank where the water movement is appropriate for its needs.

Overall, with proper care and attention, saltwater plate coral can thrive in a home aquarium. By monitoring water quality, providing appropriate water movement, and ensuring that the coral is securely attached to the substrate, hobbyists can help ensure the long-term health and well-being of this beautiful species.

Advanced Topics

Symbiotic Relationships

One of the most fascinating aspects of saltwater plate coral is their symbiotic relationship with zooxanthellae, a type of symbiotic algae. These algae live within the coral’s tissues and provide it with essential nutrients through photosynthesis. In return, the coral provides the algae with a protected environment and necessary nutrients for photosynthesis. This mutually beneficial relationship is essential to the health and survival of the coral.

Innovative Care Techniques

Innovative care techniques can help maintain the health of saltwater plate coral. For example, some aquarists have had success using LED lighting to mimic the natural light conditions of the coral’s natural habitat. This can help promote the growth of symbiotic algae and enhance the coral’s coloration.

Another technique is the use of reef supplements, which can help provide the coral with essential nutrients and trace elements. However, it is important to use these supplements in moderation and follow the manufacturer’s instructions carefully.

Regular water changes are also critical to maintaining the health of saltwater plate coral. This helps remove any accumulated toxins and replenish essential nutrients.

In summary, understanding the symbiotic relationship between the saltwater plate coral and zooxanthellae, as well as implementing innovative care techniques, can help ensure the health and longevity of these fascinating organisms.

Selecting Plate Corals for Beginners

Plate corals are a great addition to any reef aquarium. They are relatively easy to care for and come in a variety of colors and shapes. For beginner reef aquarists, selecting the right plate coral is important to ensure their success in the hobby.

When selecting a plate coral, beginners should look for corals that are low-maintenance and hardy. LPS corals, including plate corals, are generally easier to care for than SPS corals, making them a great choice for beginners.

It is also important to consider the size of the plate coral. Some plate corals can grow quite large, so beginners should choose a coral that will fit comfortably in their tank. It is also important to consider the placement of the coral in the tank. Plate corals should be placed on a solid substrate, as they do not have a strong base like other corals.

Beginners should also consider the lighting and water flow in their tank when selecting a plate coral. Plate corals require moderate lighting and moderate water flow. Too much or too little of either can result in the coral not thriving.

In summary, when selecting a plate coral for beginners, it is important to consider the coral’s hardiness, size, placement, lighting, and water flow. By selecting a low-maintenance, hardy coral that fits comfortably in their tank and is placed in the appropriate lighting and water flow conditions, beginner reef aquarists can enjoy the beauty of plate corals in their aquarium.

Exploring LPS Corals Beyond Plate Corals

While saltwater plate corals are a popular choice among aquarium enthusiasts, there are many other types of LPS corals that can add color and diversity to your reef tank. Here are a few other popular LPS corals to consider:

Other Popular LPS Corals

  • Elegance Coral: This coral has long, flowing tentacles and comes in a variety of colors. It prefers low to moderate light and moderate water flow.
  • Torch Coral: Torch corals have long, thin polyps that resemble torches. They come in a variety of colors and prefer moderate to high light and moderate water flow.
  • Brain Coral: As the name suggests, this coral has a brain-like appearance and comes in a variety of colors. It prefers low to moderate light and moderate water flow.
  • Bubble Coral: This coral has large, bubble-like polyps and comes in a variety of colors. It prefers low to moderate light and moderate water flow.
  • Duncan Coral: Duncan corals have long, branching polyps and come in a variety of colors. They prefer moderate to high light and moderate water flow.
  • Favia Coral: Favia corals have short, thick polyps and come in a variety of colors. They prefer low to moderate light and moderate water flow.
  • Acans: Acans have short, fleshy polyps and come in a variety of colors. They prefer moderate to high light and moderate water flow.
  • Candy Cane Coral: This coral has long, tube-like polyps and comes in a variety of colors. It prefers moderate to high light and moderate water flow.
  • Scoly: Scoly corals have large, circular polyps and come in a variety of colors. They prefer moderate to high light and moderate water flow.
  • Symphyllia: Symphyllia corals have large, fleshy polyps and come in a variety of colors. They prefer low to moderate light and moderate water flow.
  • Pipe Organ Coral: This coral has long, tube-like polyps and comes in a variety of colors. It prefers low to moderate light and moderate water flow.
  • Leptastrea: Leptastrea corals have small, compact polyps and come in a variety of colors. They prefer moderate to high light and moderate water flow.
  • War Coral: War corals have large, fleshy polyps and come in a variety of colors. They prefer moderate to high light and moderate water flow.
  • Slipper Coral: This coral has long, tube-like polyps and comes in a variety of colors. It prefers moderate to high light and moderate water flow.
  • Flowerpot: Flowerpot corals have long, thin polyps and come in a variety of colors. They prefer moderate to high light and moderate water flow.
  • Green Star Polyps (GSP): GSP is a type of soft coral that has bright green polyps. It prefers moderate to high light and moderate water flow.

When selecting LPS corals for your reef tank, it’s important to consider their lighting and flow requirements, as well as their compatibility with other corals and fish in your tank. Always research the specific needs of each coral before adding it to your aquarium.

Frequently Asked Questions

How do you care for Long Tentacle Plate Coral?

The Long Tentacle Plate Coral is a hardy and easy to care for coral species. They prefer low to moderate light and moderate water flow. They also require regular feeding of small meaty foods, such as brine shrimp or mysis shrimp. It is important to keep the water quality stable and maintain proper pH and alkalinity levels.

What are the signs of a dying Plate Coral and how can you prevent it?

A dying Plate Coral may show signs of discoloration, tissue recession, and lack of polyp extension. It is important to maintain stable water quality and avoid sudden changes in temperature, salinity, or pH levels. Regular water changes and proper filtration can help prevent the buildup of harmful waste products.

What are the best practices for placing Plate Coral in an aquarium?

Plate Coral should be placed on a solid substrate, such as live rock or sand, with ample space around them to allow for growth and expansion. They should be placed in an area with moderate water flow and low to moderate light. It is important to avoid placing them too close to other corals or in areas with high levels of sediment or debris.

What organisms commonly feed on Plate Coral in captivity?

Plate Coral can be preyed upon by certain fish species, such as butterflyfish and angelfish, as well as certain invertebrates, such as snails and crabs. It is important to research the compatibility of any potential tank mates before introducing them to the aquarium.

Can Plate Coral species exhibit aggressive behavior towards other corals?

Plate Coral species are generally considered to be non-aggressive towards other corals. However, they may compete for space with other sessile invertebrates and can be damaged by coral-eating fish.

Is it difficult to maintain Plate Corals in a home aquarium?

Plate Corals are generally considered to be easy to maintain in a home aquarium, as long as proper care is taken with water quality, lighting, and feeding. They can be a great addition to a reef tank and can add color and diversity to the aquarium.

Filter Media for Saltwater Tank: Choosing the Best Options for Your Aquarium

Filter media is an essential component of any saltwater tank setup. It helps to remove impurities, toxins, and other harmful substances from the water, ensuring a healthy and safe environment for marine life. Filter media comes in various forms, each designed to serve a specific purpose in maintaining water quality.

Biological filter media, for instance, provides a surface area for beneficial bacteria to grow and thrive. These bacteria help break down waste and other organic matter in the water, converting them into less harmful substances. Chemical filter media, on the other hand, helps remove dissolved impurities such as heavy metals and organic compounds from the water. Mechanical filter media captures debris and other particles, preventing them from circulating in the water column.

Choosing the right filter media for a saltwater tank can be overwhelming, given the variety of options available. However, with proper research and guidance, aquarists can select the best filter media combination for their specific needs. In the following sections, we will explore some of the most popular filter media options available for saltwater tanks and their respective benefits.

Understanding Aquarium Filtration

Types of Filtration

Filtration is a crucial aspect of maintaining a healthy saltwater aquarium. There are three main types of filtration: mechanical, biological, and chemical. Mechanical filtration removes debris and particles from the water through the use of filters. Biological filtration uses beneficial bacteria to break down waste products in the water. Chemical filtration removes impurities and toxins from the water through the use of chemical media.

Mechanical filtration is the first line of defense in keeping the water clear and free of debris. This type of filtration typically involves the use of a filter pad or sponge to trap debris and particles. Biological filtration is essential in maintaining a healthy aquarium. Beneficial bacteria colonize the filter media and break down harmful waste products such as ammonia and nitrite. Chemical filtration is used to remove impurities and toxins from the water. The most common chemical filter media used in saltwater aquariums are activated carbon and GFO (Granular Ferric Oxide).

Importance of Water Quality

Maintaining high water quality is essential for the health and well-being of the fish and other inhabitants of a saltwater aquarium. Poor water quality can lead to stress, disease, and even death. To maintain good water quality, it is important to test the water regularly for ammonia, nitrite, nitrate, pH, and salinity. Regular water changes are also essential in removing excess nutrients and waste products from the water.

In conclusion, understanding the different types of filtration and the importance of water quality is crucial in maintaining a healthy saltwater aquarium. By using a combination of mechanical, biological, and chemical filtration and regularly testing and maintaining good water quality, aquarium owners can ensure the health and well-being of their fish and other aquatic inhabitants.

Filter Media Basics

Role of Filter Media

Filter media is an essential component of any saltwater aquarium filtration system. Its primary function is to remove impurities from the aquarium water, such as excess nutrients, debris, and waste products. The filter media works by providing a surface area for beneficial bacteria to grow, which then breaks down and removes the impurities from the water.

There are several types of filter media available for saltwater aquariums, including mechanical, biological, and chemical. Mechanical filter media, such as filter pads and sponges, physically trap debris and waste particles. Biological filter media, such as ceramic rings and bio-balls, provide a surface area for beneficial bacteria to grow and break down organic waste. Chemical filter media, such as activated carbon and phosphate removers, remove impurities from the water by binding to them.

Selection Criteria

When selecting filter media for a saltwater aquarium, there are several factors to consider. First, the type of filter media should be selected based on the specific needs of the aquarium. For example, if the aquarium has a high bioload, a biological filter media with a large surface area may be necessary to support the growth of beneficial bacteria.

Second, the flow rate of the aquarium water should be taken into consideration when selecting a filter media. Some filter media, such as activated carbon, require a higher flow rate to be effective, while others, such as biological filter media, may require a slower flow rate to provide sufficient contact time for the bacteria to break down waste.

Finally, the aquarium owner should consider the ease of maintenance and replacement when selecting a filter media. Some filter media, such as filter pads and sponges, require frequent cleaning and replacement, while others, such as ceramic rings and bio-balls, may only need to be replaced every few years.

Overall, selecting the right filter media for a saltwater aquarium is crucial to maintaining a healthy and thriving ecosystem. By considering the specific needs of the aquarium and selecting a filter media that meets those needs, the aquarium owner can ensure that the water remains clean and clear, and the inhabitants of the aquarium remain healthy and happy.

Mechanical Filtration

Mechanical filtration is the first line of defense in a saltwater aquarium filtration system. It is responsible for removing large particles such as uneaten food, fish waste, and detritus from the water before they have a chance to break down and cause issues. There are several types of mechanical filtration media available, including sponge and foam, filter socks, and floss.

Sponge and Foam

Sponge and foam are common mechanical filtration media used in saltwater aquariums. They are available in different densities and can be cut to fit any filter. They work by trapping debris and particulate matter as water passes through them. Sponge and foam are easy to clean and can be reused multiple times.

Filter Socks and Floss

Filter socks and floss are also popular mechanical filtration media. Filter socks are made of a mesh material that traps debris and particulate matter as water passes through them. They are designed to be used once and then thrown away. Floss, on the other hand, is a synthetic material that is similar to cotton. It works by trapping debris and particulate matter as water passes through it. Floss is also designed to be used once and then thrown away.

When selecting mechanical filtration media for a saltwater aquarium, it is important to consider the flow rate of the filter. If the media is too dense, it can restrict water flow and decrease the efficiency of the filter. It is also important to clean or replace the media regularly to prevent it from becoming clogged and reducing the effectiveness of the filtration system.

In conclusion, mechanical filtration is an essential component of a saltwater aquarium filtration system. Sponge and foam, filter socks, and floss are all effective mechanical filtration media that can help keep the water in a saltwater aquarium clean and clear.

Chemical Filtration

Chemical filtration is an essential part of maintaining a healthy saltwater aquarium. The goal of chemical filtration is to remove impurities, such as phosphates, heavy metals, contaminants, medications, and tannins, from the water. There are several types of chemical filter media available, including activated carbon, resin media, and specialty media.

Activated Carbon

Activated carbon is one of the most common and effective chemical filter media used in saltwater aquariums. It works by adsorbing impurities from the water, including dissolved organic compounds, odors, and colors. Activated carbon is available in different forms, including pellets, granules, and powder. It is recommended to use high-quality activated carbon, such as Chemi-Pure Blue, which contains both activated carbon and ion exchange resins.

Resin Media

Resin media is another type of chemical filter media that is used to remove specific impurities from the water. For example, ion exchange resins can be used to remove nitrates and phosphates from the water. This type of media is often used in conjunction with activated carbon to achieve a comprehensive chemical filtration system.

Specialty Media

There are several types of specialty media available for use in saltwater aquariums. For example, phosphate-removing media, such as GFO (Granular Ferric Oxide), can be used to reduce phosphate levels in the water. Other specialty media include those designed to remove heavy metals, such as copper and lead, from the water.

In conclusion, chemical filtration is an important part of maintaining a healthy saltwater aquarium. By using high-quality chemical filter media, such as activated carbon, resin media, and specialty media, aquarium owners can effectively remove impurities from the water and provide a safe and healthy environment for their aquatic pets.

Biological Filtration

Biological filtration is an essential component of any saltwater tank, as it helps to maintain a healthy and stable environment for fish and other marine life. This type of filtration relies on beneficial bacteria to break down waste products, which helps to maintain water quality and prevent the buildup of harmful toxins.

Bio-Media Types

There are several types of bio-media that can be used in a saltwater tank to support beneficial bacteria growth. Ceramic rings and bio balls are two popular options, as they provide a large surface area for bacteria to colonize. Live rock is another effective bio-media, as it contains a naturally occurring population of beneficial bacteria.

Beneficial Bacteria Habitat

Beneficial bacteria require a specific habitat to thrive, which includes a surface area to attach to, oxygen, and a food source. Bio-media such as ceramic rings and bio balls provide an excellent surface area for bacteria to grow, while live rock provides both a surface area and a food source in the form of organic matter.

It is important to note that beneficial bacteria can take several weeks to establish in a new tank, so it is recommended to add bio-media and live rock early in the tank setup process. Additionally, it is important to avoid cleaning or replacing bio-media too frequently, as this can disrupt the established bacterial colonies and harm the overall health of the tank.

Overall, biological filtration is a crucial aspect of maintaining a healthy saltwater tank, and selecting the right bio-media can help to support the growth of beneficial bacteria and maintain a stable environment for marine life.

Media Reactors and Accessories

When it comes to saltwater tank filtration, media reactors and accessories are essential tools. Media reactors are devices that hold filter media and increase their effectiveness by forcing all the water that enters the reactor to come in contact with the media. There are different types of media reactors available, including fluidized media reactors and media bags.

Media Bags

Media bags are mesh bags that hold filter media, such as granular ferric oxide (GFO) or activated carbon. They are an affordable and easy-to-use option for hobbyists who want to improve their tank’s filtration. Media bags can be placed in a sump, hang-on filter, or canister filter. They are also compatible with some fluidized media reactors.

Fluidized Media Reactors

Fluidized media reactors are more complex than media bags, but they offer superior filtration. They circulate water through a chamber filled with filter media, such as GFO or ferric oxide. The media is kept in motion by a pump, which prevents clumping and ensures that all water comes into contact with the media. Fluidized media reactors are more expensive than media bags but are highly effective at removing impurities from the water.

When using media reactors and accessories, it is important to choose the right type of media for your tank. GFO is an effective phosphate remover, while activated carbon is useful for removing organic compounds and discoloration. Hobbyists should also be aware of the lifespan of their media and replace it regularly to maintain optimal filtration.

In conclusion, media reactors and accessories are essential tools for any saltwater tank hobbyist. By choosing the right type of media and using the appropriate reactor or bag, hobbyists can ensure that their tank’s water is clean and healthy for their marine life.

Maintaining Filter Media

Proper maintenance of filter media is crucial to ensure the longevity and efficiency of the filtration system. Neglecting filter media can lead to poor water quality, which can have a negative impact on the health of the saltwater tank inhabitants.

Cleaning and Replacement

Filter media should be cleaned or replaced regularly to prevent clogging and maintain optimal performance. The frequency of cleaning or replacement depends on the type of filter media, the size of the tank, and the bioload of the tank inhabitants.

Mechanical filter media, such as filter pads, should be cleaned or replaced frequently to remove debris and prevent clogging. Chemical filter media, such as activated carbon, should be replaced every 4-6 weeks to maintain its effectiveness. Biological filter media, such as ceramic rings or bio-balls, should be cleaned gently in tank water to prevent the loss of beneficial bacteria.

Impact on Water Parameters

Improper maintenance of filter media can lead to an increase in nitrates and phosphates, which can negatively impact water quality. This can be avoided by regularly cleaning or replacing filter media, as well as performing regular water changes.

Nitrates and phosphates are byproducts of the nitrogen cycle and can accumulate in the tank if not removed. High levels of nitrates and phosphates can lead to algae growth and harm the health of the tank inhabitants. Regular water changes can help remove these harmful substances from the tank.

In conclusion, proper maintenance of filter media is crucial to ensure the health of the saltwater tank inhabitants. Regular cleaning or replacement of filter media can prevent clogging and maintain optimal performance, while also preventing an increase in nitrates and phosphates.

Advanced Filtration Solutions

For saltwater aquariums, advanced filtration solutions are necessary to maintain the proper water quality. These solutions include protein skimmers and denitrification systems.

Protein Skimmers

Protein skimmers are a popular choice for advanced filtration in saltwater aquariums. They work by removing organic waste from the water before it has a chance to break down into harmful nitrates. Protein skimmers work by creating a foam that collects the waste, which is then removed from the tank.

There are many different types of protein skimmers available, including hang-on-back and in-sump models. Some protein skimmers also come with additional features, such as adjustable air flow and water level control.

Denitrification Systems

Denitrification systems are another advanced filtration solution for saltwater aquariums. These systems work by converting nitrates into nitrogen gas, which is then released into the atmosphere. This process helps to reduce the amount of nitrates in the water, which can be harmful to fish and other aquatic life.

There are many different types of denitrification systems available, including bio-pellet reactors and deep sand beds. These systems can be used in conjunction with protein skimmers to provide comprehensive filtration for saltwater aquariums.

Overall, advanced filtration solutions are necessary for maintaining the proper water quality in saltwater aquariums. Protein skimmers and denitrification systems are just two of the many options available to aquarium owners. By choosing the right filtration system for their specific needs, aquarium owners can ensure that their fish and other aquatic life thrive in a healthy environment.

Filter Media for Specific Aquarium Types

When it comes to choosing filter media for specific aquarium types, there are a few factors to consider. Two common types of saltwater tanks are reef aquariums and fish-only saltwater tanks. Each tank type has its own unique considerations when it comes to filter media.

Reef Aquarium Considerations

Reef aquariums are home to a variety of delicate and sensitive marine life, including corals, anemones, and invertebrates. It is essential to maintain water quality and reduce organic waste to keep these creatures healthy. Biological filtration is especially critical in reef tanks, as the beneficial bacteria that live on filter media help break down organic waste, such as fish waste, excess food, and decaying matter.

Some of the best filter media options for reef aquariums include:

  • Live rock: Live rock is a natural biological filter that provides a surface area for beneficial bacteria to grow and thrive. It is also an excellent source of natural filtration, as it can remove excess nutrients from the water.
  • Protein skimmers: Protein skimmers are excellent at removing organic waste from the water, including dissolved organic compounds and proteins. They are especially useful in reef aquariums with a high bio-load.
  • Activated carbon: Activated carbon can help remove impurities from the water, including toxins and other contaminants. It is also an excellent option for removing odors and discoloration.

Fish-Only Saltwater Tanks

Fish-only saltwater tanks do not have the same delicate marine life as reef aquariums, but they still require regular maintenance to keep the water clean and healthy for fish. Fish waste and excess food can quickly build up in the tank, leading to poor water quality and potential health problems for the fish.

Some of the best filter media options for fish-only saltwater tanks include:

  • Mechanical filtration: Mechanical filtration helps remove larger particles from the water, including uneaten food and fish waste. This type of filtration typically involves a filter pad or sponge that traps debris before it can break down and pollute the water.
  • Biological filtration: Biological filtration is still essential in fish-only tanks, as it helps break down fish waste and other organic matter. Options for biological filter media include ceramic rings, bio-balls, and other porous materials that provide a surface area for beneficial bacteria to grow.
  • Chemical filtration: Chemical filtration can help remove impurities from the water, including ammonia and nitrite. Options for chemical filter media include zeolite, activated carbon, and other specialized filter media.

Overall, choosing the right filter media for a saltwater tank depends on the specific needs of the aquarium. By considering the type of tank, the bio-load, and the desired filtration method, hobbyists can create a healthy and thriving environment for their marine life.

Troubleshooting Common Issues

Saltwater aquariums can be a beautiful addition to any home, but they require regular maintenance to keep the water clear and healthy for the fish and other marine creatures. Here are some common issues that can arise with filter media and how to troubleshoot them.

Cloudy Water and Dust

If the water in the aquarium appears cloudy and there is dust settling on the substrate and decorations, it may be due to poor water quality. This can happen when the filter media becomes clogged with debris and is no longer able to effectively remove waste from the water.

To fix this issue, it is recommended to clean or replace the filter media. If the aquarium uses mechanical filtration, such as filter pads or floss, these should be cleaned or replaced regularly. Additionally, it is important to ensure that the water flow is not restricted and that the filter is properly sized for the aquarium.

Handling Algae and Silicates

Algae growth is a common issue in saltwater aquariums, and can be caused by a variety of factors including excess nutrients, poor water flow, and lighting. Silicates are another common culprit of algae growth, and can enter the aquarium through tap water or substrate.

To address algae growth, it is recommended to reduce nutrient levels through regular water changes and proper feeding practices. Increasing water flow and adjusting lighting schedules can also help to prevent algae growth. Silicates can be removed through the use of specialized filter media, such as silicate removing resin.

Overall, troubleshooting common issues with filter media in a saltwater aquarium requires regular maintenance and attention to water quality. By keeping the filter media clean and properly sized, and addressing any nutrient imbalances or other issues as they arise, a healthy and thriving aquarium can be maintained.

Filter Media by Brand

There are many brands of filter media available in the market for saltwater tanks. Here are some of the popular ones:

Seachem Products

Seachem is a well-known brand in the aquarium industry and offers a range of filter media products for saltwater tanks. One of their popular products is Seachem Purigen, which is a synthetic polymer that removes impurities and organic waste from the water. It is highly effective and can be regenerated multiple times, making it a cost-effective option.

Another product from Seachem is the Matrix, which is a high-porosity biofiltration media that provides a large surface area for beneficial bacteria to grow and thrive. This helps in breaking down harmful compounds in the water and maintaining a healthy environment for the fish and other aquatic life.

Brightwell and Boyd Offerings

Brightwell and Boyd are also popular brands in the aquarium industry and offer a range of filter media products for saltwater tanks. One of their popular products is Chemi-Pure, which is a blend of activated carbon and ion-exchange resins that removes impurities and toxic compounds from the water. It also helps in maintaining a stable pH level and reducing ammonia and nitrite levels.

Another product from Brightwell and Boyd is the Xport Bio Media, which is a high-performance biofiltration media that provides a large surface area for beneficial bacteria to grow and thrive. It is made from natural and inert materials and is highly effective in breaking down harmful compounds in the water.

Overall, these brands offer a range of effective filter media products for saltwater tanks. It is important to choose the right product based on the specific needs of the tank and the aquatic life in it.

DIY Filter Media Options

For those who prefer DIY filter media options, there are several choices available. These options can be cost-effective and allow for customization of the filtration process.

One option is using a media bag filled with biofilm. Biofilm is a dense colony of beneficial bacteria that can help break down waste and maintain water quality. The media bag can be placed in a sump or filter compartment and provides a surface area for the bacteria to colonize.

Another DIY option is using activated carbon filter media. Activated carbon can remove impurities, odors, and discoloration from the water. It is available in loose form or can be placed in a media bag. When using activated carbon, it is important to replace it regularly to prevent it from becoming saturated and losing its effectiveness.

For those with a larger tank, a DIY fluidized bed filter can be constructed using PVC pipes and media such as sand or crushed coral. This filter type creates an environment where beneficial bacteria can thrive and break down waste.

It is important to note that when using DIY filter media options, regular maintenance and monitoring of water parameters is necessary to ensure optimal water quality. Additionally, it is recommended to research and follow proper installation and usage instructions for any DIY filter media option.

Overall, DIY filter media options can provide a cost-effective and customizable solution for saltwater tank filtration.

Frequently Asked Questions

What type of biological filter media is most effective for marine aquariums?

There are several types of biological filter media that can be used in a saltwater aquarium. Some of the most effective options include live rock, ceramic rings, and bio balls. Live rock is a natural and effective form of biological filter media that can also provide shelter and food for various marine organisms. Ceramic rings and bio balls are artificial filter media that offer a high surface area for beneficial bacteria to grow and aid in the nitrogen cycle.

How often should filter media be replaced in a saltwater aquarium?

The frequency of filter media replacement depends on the type of media being used and the specific needs of the aquarium. Some filter media, such as live rock, may not need to be replaced at all. Ceramic rings and bio balls can last for several years before needing to be replaced. It is important to monitor the condition of the filter media regularly and replace it as needed to maintain optimal water quality.

Can the same filter media be used for both freshwater and saltwater tanks?

In general, the same filter media can be used for both freshwater and saltwater tanks. However, it is important to note that some filter media may be more effective in one type of aquarium over the other. For example, live rock is a highly effective form of biological filter media in a saltwater tank, but may not provide the same benefits in a freshwater tank. It is important to choose filter media that is appropriate for the specific needs of the aquarium.

What are the benefits of using live rock as filter media in a reef tank?

Live rock is a natural and effective form of biological filter media that can provide several benefits in a reef tank. It can help maintain stable water chemistry, provide shelter and food for various marine organisms, and enhance the overall aesthetic of the aquarium. Live rock can also aid in the development of a healthy and diverse microbial community.

What is the role of chemical filtration in maintaining a healthy saltwater tank?

Chemical filtration plays an important role in maintaining a healthy saltwater tank by removing impurities and toxins from the water. It can help remove excess nutrients, such as nitrates and phosphates, that can lead to algae growth and other issues. Activated carbon and protein skimmers are two common forms of chemical filtration used in saltwater aquariums.

How do I choose the right size and type of filter for my marine aquarium?

When choosing a filter for a marine aquarium, it is important to consider the size of the tank, the types of organisms being kept, and the specific needs of the aquarium. A good rule of thumb is to choose a filter that can handle at least 2-3 times the volume of the aquarium. It is also important to choose a filter that is appropriate for the specific type of aquarium, whether it be a reef tank, fish-only tank, or a combination of both.

WWC Bizarro Cyphastrea

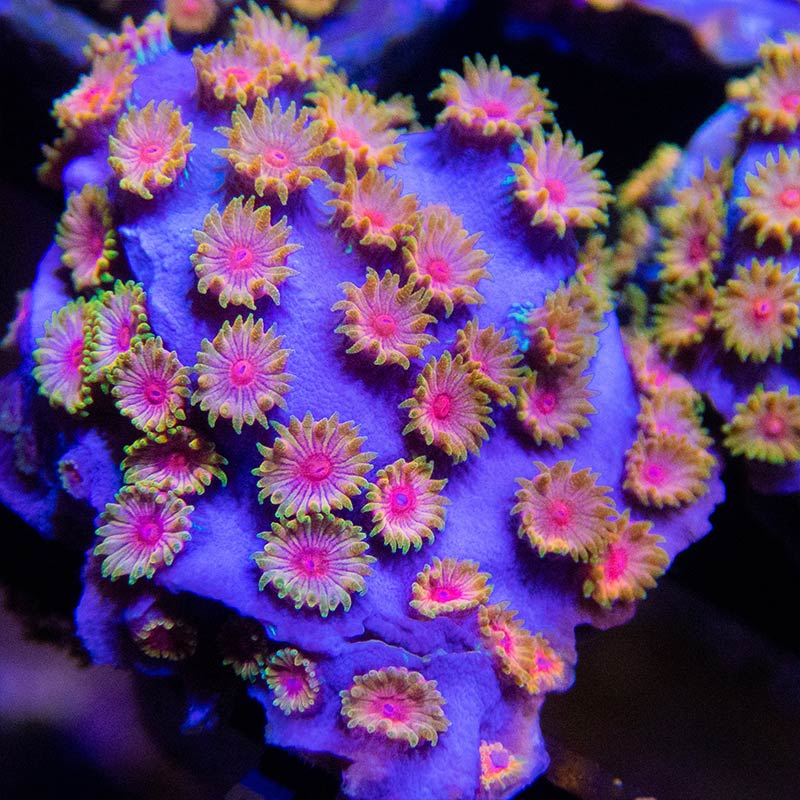
Cyphastrea Coral Care: A Comprehensive Guide

Cyphastrea coral is a popular choice among reef hobbyists for its colorful and hardy nature. This coral is a species of small polyp stony coral (SPS) that is native to the Indo-Pacific region. Cyphastrea coral is a good choice for beginners as it is easy to care for and adapts well to a variety of lighting and water flow conditions.

When it comes to cyphastrea coral care, lighting and water flow are the two most important factors to consider. Cyphastrea coral thrives in low to moderate light conditions, with a range of 50-125 PAR being ideal. It is important to avoid exposing the coral to too much light, as this can damage the coral and cause it to bleach. Water flow should be moderate, with a range of 5-15 times the tank volume per hour being ideal. This will help to ensure that the coral receives adequate nutrients and oxygen, while also preventing debris from settling on the coral’s surface.

Understanding Cyphastrea Coral

Cyphastrea is a stony coral that belongs to the family Merulinidae and the genus Cyphastrea. It is a popular choice among reefers who are new to hard coral care because it is easy to care for and has a unique appearance. Cyphastrea coral is native to the Indo-Pacific region, specifically Australia and Indonesia.

Classification and Natural Habitat

Cyphastrea coral is a member of the family Merulinidae, which includes other common corals such as the brain coral. It is an encrusting coral, meaning that it grows horizontally along the substrate. Cyphastrea coral is found in shallow reef environments, typically between 3 and 30 meters deep.

Physical Characteristics and Color Varieties

Cyphastrea coral has a unique appearance that sets it apart from other corals. It has small, cone-shaped corallites that are arranged in a distinct pattern, giving it the appearance of a meteor shower. Cyphastrea coral comes in a variety of color morphs, including green, brown, purple, and blue.

One of the most interesting aspects of Cyphastrea coral is its ability to change color depending on the lighting conditions. For example, under blue lighting, the coral may appear bright green, while under white lighting, it may appear brown. This makes it a popular choice among reefers who want to add some variety to their tank.

In summary, Cyphastrea coral is a unique and easy-to-care-for stony coral that is native to the Indo-Pacific region. It has a distinctive appearance, with cone-shaped corallites arranged in a meteor shower pattern. It is available in a range of color morphs and can change color depending on the lighting conditions.

Aquarium Setup for Cyphastrea

When setting up an aquarium for Cyphastrea coral, there are several factors to consider to ensure its optimal growth and health. These factors include tank requirements and placement, lighting and water flow, and water chemistry and stability.

Tank Requirements and Placement

Cyphastrea coral is a hardy species and can adapt to a variety of aquarium conditions. However, it is important to provide a stable environment for the coral to thrive. The aquarium should be at least 20 gallons in size and have a stable temperature between 75-82°F and salinity between 1.023-1.025. The placement of the coral in the aquarium should be on a stable substrate or rock structure to prevent it from falling over or getting damaged.

Lighting and Water Flow

Cyphastrea coral requires moderate to high lighting and moderate water flow to thrive. The lighting should be provided by LED or T5 fluorescent lights with a color temperature of 10,000K to 20,000K. The water flow should be moderate to provide the coral with adequate nutrients and oxygen without causing damage to the coral’s tissue.

Water Chemistry and Stability

Maintaining stable water conditions is crucial for the health and growth of Cyphastrea coral. The water parameters should be checked regularly using a reliable test kit. The ideal water chemistry for Cyphastrea coral includes a pH range of 8.0-8.4, alkalinity between 8-12 dKH, and calcium between 380-450 ppm. The use of a calcium reactor can help maintain stable calcium levels in the aquarium.

Filtration is also crucial for the health of Cyphastrea coral. The use of a protein skimmer and regular water changes can help maintain stable water conditions and remove any excess nutrients from the aquarium.

Overall, setting up an aquarium for Cyphastrea coral requires attention to detail and regular maintenance to ensure optimal growth and health. By providing the right tank requirements and placement, lighting and water flow, and water chemistry and stability, hobbyists can enjoy the beauty of this hardy coral species in their aquariums.

Water Parameters for Optimal Health

To keep Cyphastrea corals healthy, it is important to maintain stable water parameters. This section will cover the three major water parameters that are essential for the growth and survival of Cyphastrea corals.

Importance of Stable pH Levels

Maintaining stable pH levels is crucial for the health of Cyphastrea corals. The ideal pH range for Cyphastrea corals is between 8.0 and 8.4. Fluctuations in pH levels can cause stress to the corals and lead to bleaching or death. It is recommended to test pH levels regularly and adjust them as needed using a pH buffer.

Calcium, Alkalinity, and Magnesium

Cyphastrea corals require specific levels of calcium, alkalinity, and magnesium to build their stony skeletons. Calcium and alkalinity are particularly important for the formation of the calcium carbonate skeletons that make up the coral’s structure. The ideal calcium level for Cyphastrea corals is between 380 and 450 ppm, while the ideal alkalinity level is between 8 and 11 dKH. Magnesium is also important for the growth and health of Cyphastrea corals, with an ideal level of between 1200 and 1350 ppm. It is recommended to test these levels regularly and adjust them as needed using supplements or water changes.

Nutrient Management

Maintaining appropriate nutrient levels is important for the health of Cyphastrea corals. High levels of nitrates and phosphates can lead to poor coral growth and health, while low levels can cause stress to the corals. The ideal nitrate level for Cyphastrea corals is between 0 and 5 ppm, while the ideal phosphate level is between 0.01 and 0.05 ppm. Regular water changes, protein skimming, and the use of phosphate-removing media can help to manage nutrient levels and ensure the health of Cyphastrea corals.

In summary, maintaining stable water parameters is essential for the growth and health of Cyphastrea corals. By monitoring and adjusting pH levels, calcium, alkalinity, magnesium, and nutrient levels, aquarists can ensure the long-term success of these beautiful corals.

Feeding and Nutrition

Cyphastrea corals are photosynthetic and derive most of their nutrition from light. However, they also need to be fed regularly with phytoplankton and zooplankton, which can be added directly to the water column. Feeding the coral is crucial to its overall health and growth.

Feeding Techniques and Schedules

Cyphastrea corals should be fed small amounts of food regularly, rather than large amounts infrequently. This helps to prevent overfeeding and maintain water quality. A good feeding schedule is twice a week, with small amounts of food each time. It is important to avoid feeding the coral too much or too often, as this can lead to poor water quality and the growth of harmful algae.

Types of Food for Cyphastrea

Cyphastrea corals can be fed a variety of foods, including phytoplankton, zooplankton, and dissolved organic matter. Phytoplankton and zooplankton are the most common types of food used for feeding cyphastrea corals. These foods can be purchased in liquid or powder form and added directly to the water column.

Role of Photosynthesis in Nutrition

Photosynthesis is an important source of nutrition for cyphastrea corals. The coral contains zooxanthellae, which are photosynthetic algae that live inside the coral’s tissues. These algae produce sugars and other organic compounds through photosynthesis, which are then used by the coral for energy and growth.

In addition to photosynthesis, cyphastrea corals also require amino acids and other nutrients that are not produced through photosynthesis. These nutrients can be obtained through feeding and the uptake of dissolved organic matter.

Overall, maintaining a proper feeding schedule and providing a variety of foods can help to ensure the health and growth of cyphastrea corals.

Caring for Cyphastrea Coral

Daily and Weekly Care Routines

To keep Cyphastrea coral healthy, it is important to follow a regular care routine. This includes daily and weekly tasks such as monitoring water parameters, removing detritus, and checking for signs of stress. Cyphastrea coral is a hardy species that can tolerate a range of conditions, but it still requires proper care to thrive.

Daily care routines for Cyphastrea coral should include monitoring water temperature, salinity, and pH levels. It is also important to check for any signs of emaciation or algae blooms. Removing any detritus from the tank will help prevent the buildup of harmful substances that can harm the coral.

Weekly care routines should include checking the water quality and performing water changes as needed. It is also important to clean any detritus traps and remove any excess algae growth.

Identifying and Addressing Stress Signs

Cyphastrea coral is a peaceful species that can become stressed if its environment is not properly maintained. Signs of stress can include discoloration, tissue recession, and skeleton exposure. If any of these signs are present, it is important to identify the cause and address it as soon as possible.

One common cause of stress in Cyphastrea coral is poor water quality. High levels of nitrates, phosphates, or other harmful substances can harm the coral and cause it to become stressed. Ensuring that water quality is properly maintained can help prevent these issues.

Another common cause of stress in Cyphastrea coral is inadequate lighting. Cyphastrea coral requires low to moderate lighting levels, and exposure to too much light can cause it to become stressed. Ensuring that the lighting levels are appropriate can help prevent these issues.

Preventing and Treating Common Issues

Cyphastrea coral is a hardy species that can tolerate a range of conditions, but it is still susceptible to a number of common issues. One common issue is the buildup of detritus in the tank. This can lead to the growth of harmful bacteria and other substances that can harm the coral. Regularly removing detritus from the tank can help prevent these issues.

Another common issue is the growth of algae in the tank. This can be prevented by ensuring that lighting levels are appropriate and by removing excess algae growth as needed. In some cases, it may be necessary to use an algae control product to prevent the growth of algae.

Overall, caring for Cyphastrea coral requires proper care and maintenance. By following a regular care routine and addressing any issues as soon as they arise, it is possible to keep Cyphastrea coral healthy and thriving.

Propagation and Growth

Cyphastrea corals are a great choice for both commercial aquaculture and home propagation due to their fast growth rates and vibrant colors. Understanding their fragging techniques, growth patterns, and how to encourage healthy growth is essential for any coral enthusiast.

Fragging Techniques

Fragging is the process of breaking off a piece of coral and using it to propagate a new colony. Cyphastrea corals can be fragged easily with a chisel or bone cutter. It is important to ensure that the fragging tool is clean and sterilized to prevent any infections. Once the frag has been removed, it can be glued onto a frag plug or onto a piece of live rock.

Understanding Growth Patterns

Cyphastrea corals have a unique growth pattern where they grow in a circular shape and form a series of ridges. They can grow up to 1 inch per year and can reach a size of up to 6 inches in diameter. Cyphastrea corals are fast-growing and can quickly fill up space in a reef tank.

Encouraging Healthy Growth

To encourage healthy growth, it is important to provide the right conditions for Cyphastrea corals. They require moderate lighting and moderate water flow. The water parameters should be stable, with a temperature range of 74-82°F, a pH range of 8.1-8.4, and a salinity range of 1.023-1.025. Cyphastrea corals also require a source of nitrate and phosphate, which can be provided through regular feeding and water changes.

In summary, Cyphastrea corals are relatively easy to propagate and grow. Understanding their fragging techniques, growth patterns, and how to encourage healthy growth is essential for any coral enthusiast. With the right conditions and care, Cyphastrea corals can thrive and add a beautiful pop of color to any reef tank.

Cyphastrea in the Reef Keeping Community

Cyphastrea is a popular stony coral species among collectors and reef keeping enthusiasts. They are known for their bright colors and unique patterns, which make them a desirable addition to any reef tank. In this section, we will explore the popularity of Cyphastrea, their contributions to reef keeping, and the differences between aquacultured and wild colonies.

Popularity Among Collectors

Cyphastrea has gained popularity among collectors due to their unique patterns and vibrant colors. They are often used as a centerpiece in reef tanks and can be easily propagated, making them a popular choice for beginners and experienced reef keepers alike. The popularity of Cyphastrea has also led to an increase in the availability of aquacultured specimens, which are often preferred over wild colonies due to their hardiness and lower risk of disease.

Contributions to Reef Keeping

Cyphastrea is a hardy coral species that can adapt to a variety of tank conditions. They can thrive in both low and high light environments and can tolerate a range of water flow rates. Cyphastrea is also known for its ability to absorb excess nutrients in the water, which helps to maintain a healthy and stable environment in the tank. Additionally, the ease of propagation has made Cyphastrea a popular choice for aquaculture, which has contributed to the sustainability of the hobby.

Aquacultured vs. Wild Colonies

Aquacultured Cyphastrea colonies are often preferred over wild colonies due to their hardiness and lower risk of disease. Wild colonies are often collected from the ocean, which can lead to stress and disease in the coral. Aquacultured colonies, on the other hand, are raised in controlled environments and are less likely to be affected by environmental stressors. Additionally, aquaculture helps to reduce the impact of the hobby on wild populations of coral.

In summary, Cyphastrea is a popular and hardy coral species that has made significant contributions to the reef keeping community. Their unique patterns and vibrant colors make them a desirable addition to any reef tank, and their ability to adapt to a variety of tank conditions has made them a popular choice for both beginners and experienced reef keepers. Additionally, the availability of aquacultured specimens has contributed to the sustainability of the hobby and has helped to reduce the impact on wild populations of coral.

Frequently Asked Questions

What are the optimal water parameters for maintaining healthy Cyphastrea coral?

Maintaining stable water parameters is essential for the health of Cyphastrea coral. The ideal temperature range is between 75-80°F (24-27°C), with a salinity of 1.025. It is recommended to keep the pH level between 8.1-8.4, and alkalinity between 8-12 dKH. Nitrate levels should be kept between 5-10 ppm, and phosphate levels between 0.01-0.05 ppm. Any fluctuations in these parameters can stress the coral and lead to health problems.

How fast can I expect Cyphastrea coral to grow, and what factors influence its growth rate?

Cyphastrea coral is a slow-growing species, with an average growth rate of 1-2 inches per year. The growth rate can be influenced by several factors, including lighting, water flow, and water parameters. Cyphastrea coral can also be affected by predation from other organisms, such as snails and crabs.

What is the ideal placement for Cyphastrea coral within a reef aquarium?

Cyphastrea coral can be placed anywhere within a reef aquarium, as long as the lighting and water flow are appropriate. However, it is recommended to place the coral in a lower light area, as it prefers lower light conditions.

Can Cyphastrea coral coexist peacefully with other corals, or is it known to be aggressive?

Cyphastrea coral is generally considered a peaceful species and can coexist with other corals. However, it is important to provide enough space for the coral to grow and prevent it from touching other corals.

What type of lighting and flow conditions are necessary for Cyphastrea coral to thrive?

Cyphastrea coral prefers moderate to low lighting conditions. LED lighting is a good choice for this species. Water flow should be moderate, with enough water movement to prevent detritus buildup, but not so much that the coral is constantly being buffeted by water currents.

How does the care of Cyphastrea coral compare to the care of Leptoseris coral?

Cyphastrea coral is generally considered easier to care for than Leptoseris coral. Cyphastrea coral can tolerate a wider range of lighting and water flow conditions, and is generally more forgiving of fluctuations in water parameters. However, both species require stable water parameters and appropriate lighting and water flow conditions to thrive.

Elegance pink tip

Elegance Coral: Care Tips and Facts for Reef Aquariums

Elegance coral, also known as Catalaphyllia jardinei, is a beautiful, large polyp stony coral that is popular in the aquarium trade. This coral is native to the Indo-Pacific region and is found in both shallow and deep waters. It is closely related to other Euphyllia species such as frogspawn and torch corals.

Elegance coral is known for its long, flowing tentacles that resemble those of an anemone. Its polyps are extended during the day, showing off its vast array of color-tipped tentacles. This coral is truly unique and interesting, making it a popular choice for both beginner and experienced aquarists.

Due to its popularity in the aquarium trade, there are many resources available for those interested in keeping elegance coral. From care guides to online forums, there is no shortage of information on how to provide the best possible environment for this stunning coral.

Overview of Elegance Coral

Elegance coral is a unique and interesting species of coral that is highly sought after by aquarists. This coral is a large polyp stony (LPS) coral that belongs to the Catalaphyllia genus and is scientifically known as Catalaphyllia jardinei. It is commonly referred to as ridge coral, elegant coral, or wonder coral.

Scientific Name

As mentioned earlier, the scientific name of elegance coral is Catalaphyllia jardinei. This coral is closely linked to members of the Euphyllia species, including the frogspawn and torch corals. It has a distinct appearance and comes in various colors, including green, blue, purple, fluorescent green, brown, and lime green.

Natural Habitat

Elegance coral is found in the Indo-Pacific region, primarily in the waters surrounding Australia, Indonesia, and the Philippines. In the wild, it is commonly found in shallow waters, typically at depths of 10 to 25 meters. It prefers areas with moderate to high water flow and bright light.

Physical Characteristics

Elegance coral has a distinct appearance that sets it apart from other corals. It has long, flowing tentacles that resemble those of an anemone, although it is more closely related to the stony corals. The tentacles are tipped with small, sticky cells called nematocysts, which the coral uses to capture prey. The coral’s skeleton is also unique, with ridges and valleys that give it a textured appearance.

In terms of size, elegance coral can grow up to 12 inches in diameter, although most specimens are smaller than this. It is a slow-growing coral that can take several years to reach its full size. When kept in captivity, elegance coral requires a stable environment with consistent water quality and lighting. It is also important to provide the coral with moderate water flow and space to grow.

Overall, elegance coral is a fascinating and beautiful species of coral that can make a great addition to a reef aquarium. With proper care and attention, it can thrive and provide years of enjoyment for aquarists.

Aquarium Requirements

Tank Size

Elegance coral requires a minimum tank size of 30 gallons (114L) to thrive. A larger tank is always better as it provides more stability for the water parameters and allows for better placement of the coral.

Water Parameters

The ideal water parameters for elegance coral include a pH level between 8.0 and 8.4, a temperature between 75°F and 80°F, a KH level between 8 and 12 dKH, and a nitrate level below 5 ppm. It is also important to maintain stable levels of calcium, strontium, and iodine.

Substrate and Placement

Elegance coral prefers a sandy substrate, which allows it to anchor itself firmly. It is important to ensure that the coral is not placed too close to other corals, as it can extend sweeper tentacles that can harm its neighbors.

Lighting Conditions

Moderate lighting is sufficient for elegance coral. It is important to avoid placing the coral in direct sunlight or under excessively bright lighting, as this can cause the coral to bleach or lose its color.

Water Flow

Elegance coral prefers moderate water flow. Too much flow can cause the coral to retract its tentacles, while too little flow can cause debris to accumulate on the coral’s surface. It is important to ensure that the coral is not placed in a dead zone, where there is no water flow.

Overall, providing the correct aquarium requirements for elegance coral is essential for its health and longevity. By following the guidelines outlined above, aquarists can ensure that their elegance coral thrives in their reef tank.

Coral Care and Maintenance

Caring for elegance coral is essential for keeping them healthy and vibrant in a reef tank. Proper coral care includes feeding, growth and propagation, and dealing with common issues.

Feeding

Elegance coral is a photosynthetic coral that also feeds on small meaty foods such as brine shrimp, krill, and mysis shrimp. It is recommended to feed them twice a week. You can also target feed them by using a turkey baster to squirt the food directly onto the coral’s tentacles.

Growth and Propagation

Elegance coral growth rate is slow, and they can take up to a year to grow an inch. Propagation of elegance coral can be done through fragging. It is recommended to frag the coral during its dormant phase. When fragging, make sure to use a sharp, clean tool and to wear gloves.

Common Issues

Elegance coral syndrome is a condition that can affect elegance coral. It is characterized by tissue recession, loss of color, and excessive mucus production. To prevent elegance coral syndrome, it is recommended to quarantine new coral before adding them to the tank and to acclimate them slowly.

Another common issue is tissue recession, which can be caused by poor water quality, inadequate lighting, or improper feeding. To prevent tissue recession, make sure to maintain good water quality, provide adequate lighting, and feed the coral properly.

In conclusion, elegance coral care and maintenance require proper feeding, growth and propagation, and dealing with common issues. By following these guidelines, you can keep your elegance coral healthy and vibrant in your reef tank.

Compatibility and Interaction

Symbiotic Relationships

Elegance coral is known to form a symbiotic relationship with various marine organisms such as fish, clownfish, and polyps. The coral’s tentacles provide shelter for the fish, while the fish provide nutrients for the coral. The symbiotic relationship between the elegance coral and clownfish is particularly noteworthy, as it is similar to the relationship between the anemone and clownfish.

Reef Tank Companions

Elegance coral is compatible with other LPS corals such as frogspawn and torch coral. However, it is important to note that the coral can sometimes be aggressive towards other corals. It is recommended to keep the coral away from other aggressive corals such as those with sweeper tentacles.

Aggression and Defense

Elegance coral has a moderate level of aggression and defense. The coral’s tentacles have a moderate sting and can cause harm to other marine organisms that come in contact with them. However, the coral is not known to be overly aggressive and can coexist peacefully with other marine organisms when given enough space. It is important to keep the coral away from other aggressive corals to prevent any potential harm.

In summary, elegance coral forms symbiotic relationships with various marine organisms, is compatible with other LPS corals, and has a moderate level of aggression and defense. When placed in a reef tank, it is important to keep the coral away from other aggressive corals and give it enough space to thrive.

Special Considerations

Color Variations and Morphs

Elegance corals are known for their stunning colors and patterns. They come in a variety of colors such as green, brown, purple, and blue. The Australian elegance coral, in particular, is highly sought after for its vibrant green color. There are also several color morphs of the elegance coral, which are the result of selective breeding. These morphs include the gold torch, dragon soul, and hulk morphs.

Challenges and Solutions

While the elegance coral is a beautiful addition to any reef tank, it can be a challenging coral to care for. It is not recommended for beginner aquarists, as it requires stable water parameters and moderate to high lighting. Additionally, the elegance coral is a fragile coral and can be easily damaged during shipping or handling.

One of the biggest challenges with the elegance coral is its feeding habits. It requires regular feedings of small meaty foods such as mysis shrimp, brine shrimp, and krill. It is also important to ensure that the elegance coral is not placed near aggressive feeders, as they may steal its food.

To ensure the health and longevity of the elegance coral, it is important to maintain stable water parameters and provide it with the proper lighting and feeding regimen. It is also important to handle the coral with care and avoid damaging its delicate tentacles.

In summary, while the elegance coral is a stunning addition to any reef tank, it requires a certain level of expertise to care for. Aquarists should be prepared to provide the coral with the necessary lighting, feeding, and water parameters to ensure its health and longevity.

Environmental Impact

Elegance coral, scientifically known as Catalaphyllia jardinei, is a popular coral species in the aquarium trade due to its bright green polyps and long tentacles. However, the collection of wild elegance coral has resulted in a decline in their population in some areas, such as Japan, Micronesia, and Mozambique.

Aquaculture and Sustainability

To combat the negative impact of wild collection, some aquaculture facilities have started to breed elegance coral in captivity. This method of cultivation can help reduce the pressure on wild populations and ensure the sustainability of the species. In addition, some companies have developed sustainable practices for harvesting wild elegance coral, such as using hand nets and avoiding the use of chemicals that harm other marine organisms.

Aside from collection, the environmental impact of keeping elegance coral in aquariums also needs to be considered. Elegance coral requires specific conditions to thrive, including appropriate lighting and water quality. Some hobbyists use actinic lighting or LEDs to mimic the natural light conditions of the Pacific Ocean, where elegance coral is typically found. Additionally, adding marine algae or “reef roids” to the aquarium can provide the necessary nutrients for the coral to grow.

Live rock is another important factor in the sustainability of elegance coral in aquariums. Live rock serves as a natural filter and provides a habitat for beneficial microorganisms that help maintain water quality. However, the collection of live rock from wild reefs can have a negative impact on the overall health of the reef ecosystem. Some aquaculture facilities have started to produce artificial rock that can provide the same benefits as live rock without harming wild reefs.

Overall, while elegance coral is a beautiful and popular species in the aquarium trade, it is important to consider its environmental impact. Sustainable aquaculture practices and responsible aquarium keeping can help ensure the long-term health and survival of this species.

Frequently Asked Questions

How should Elegance Coral be acclimated to different water flows?

Elegance Coral is a hardy species that can tolerate a range of water flow conditions. However, it is important to acclimate the coral gradually to changes in water flow to prevent stress and damage. When introducing Elegance Coral to a new aquarium, it is recommended to start with a low to medium flow and gradually increase the flow rate over the course of several days. This will allow the coral to adjust to the new conditions and prevent it from detaching or closing up.

What type of skeletal structure does Elegance Coral have?

Elegance Coral is a Large Polyp Stony (LPS) coral, which means it has a hard calcareous skeleton. The skeleton is made up of calcium carbonate and provides the coral with a sturdy structure to support its soft tissue. The skeleton also protects the coral from predators and helps it to withstand changes in water conditions.

Can you explain Elegance Coral Syndrome and how to prevent it?

Elegance Coral Syndrome (ECS) is a condition that affects Elegance Coral and other species of coral. It is characterized by the loss of tissue and coloration, and can lead to the death of the coral. ECS is believed to be caused by a combination of environmental stressors, including changes in water quality, temperature, and flow. To prevent ECS, it is important to maintain stable water conditions and avoid sudden changes in temperature or flow. Regular water testing and maintenance can also help to prevent the onset of ECS.

What other marine life might be at risk from Elegance Coral stings?

Elegance Coral has long, fleshy tentacles that contain stinging cells called nematocysts. These stinging cells can be harmful to other marine life, including fish and invertebrates. It is important to provide enough space between Elegance Coral and other marine life to prevent accidental stings. It is also recommended to wear gloves when handling Elegance Coral to avoid getting stung.

What are the ideal lighting conditions and PAR levels for Elegance Coral?

Elegance Coral requires moderate to high lighting conditions to thrive. The ideal PAR levels for Elegance Coral are between 150 and 250 PAR. It is important to provide a consistent light source and avoid sudden changes in lighting conditions, as this can cause stress and damage to the coral.

What are the main factors contributing to the endangerment of Elegance Coral?

Elegance Coral is currently listed as a species of “Least Concern” by the International Union for Conservation of Nature (IUCN). However, like many species of coral, Elegance Coral is threatened by a range of environmental stressors, including ocean acidification, rising sea temperatures, and pollution. Overfishing and destructive fishing practices can also have a negative impact on coral reefs, including those where Elegance Coral is found. It is important to take steps to protect coral reefs and the marine life that depend on them to ensure the survival of species like Elegance Coral.

SSC Milky Way Acropora

Saltwater Tank PAR Meter: A Comprehensive Guide to Measuring Light in Your Aquarium

Saltwater tanks require a specific type of lighting to keep the inhabitants healthy and thriving. One of the most important aspects of lighting is the PAR (Photosynthetically Active Radiation) value, which measures the intensity of light that is available to photosynthetic organisms. A PAR meter is a device that measures the amount of PAR in a given area, and it is essential for maintaining a healthy and thriving saltwater tank.

Understanding how PAR meters work is crucial for maintaining a healthy and thriving saltwater tank. PAR meters measure the intensity of light in a given area and provide a numerical value that can be used to adjust the lighting in the tank. The PAR value is important because it affects the growth and health of photosynthetic organisms, such as corals and algae. By using a PAR meter, saltwater tank owners can ensure that their lighting is providing the right amount of PAR for their inhabitants.

Key Takeaways

  • PAR meters are essential for maintaining a healthy and thriving saltwater tank.
  • Understanding how PAR meters work is crucial for adjusting lighting in the tank.
  • PAR values affect the growth and health of photosynthetic organisms in the tank.

Understanding Par Meter

A PAR meter is a device that measures the amount of photosynthetically active radiation (PAR) in a given area. PAR is the range of light wavelengths that are used by plants for photosynthesis. The PAR meter is a valuable tool for saltwater tank owners to measure the light intensity in their aquariums.

The device measures the intensity of light in the range of 400-700 nm, which is the range of light that plants use for photosynthesis. The PAR meter provides an accurate measurement of the amount of light that is available for photosynthesis, which is essential for the growth and health of the aquatic plants and animals in the tank.

The PAR meter is a handheld device that is easy to use. To take a measurement, the user simply places the sensor at the desired location, and the device will display the PAR value. The PAR value is measured in micromoles per square meter per second (µmol/m²/s).

Using a PAR meter is essential for maintaining the health of the plants and animals in a saltwater tank. If the light is too intense, it can cause stress to the plants and animals, leading to poor growth and health. On the other hand, if the light is not intense enough, the plants may not be able to photosynthesize properly, leading to poor growth and health.

In conclusion, a PAR meter is a valuable tool for saltwater tank owners to measure the light intensity in their aquariums. The device measures the amount of photosynthetically active radiation (PAR) in a given area, which is essential for the growth and health of the aquatic plants and animals in the tank.

Importance of PAR in Saltwater Tanks

PAR or Photosynthetically Active Radiation is an essential factor for the growth and survival of corals and other photosynthetic organisms in a saltwater tank. PAR refers to the amount of light energy that is available for photosynthesis, which is the process by which plants and corals convert light into energy.

In a saltwater tank, corals and other photosynthetic organisms rely on light for their survival. Insufficient light can lead to stunted growth, discoloration, and even death of the organisms. On the other hand, too much light can also be harmful, leading to bleaching and tissue damage. Therefore, it is essential to maintain optimal PAR levels in a saltwater tank.

Using a PAR meter, one can measure the intensity of light in the tank and adjust the lighting systems accordingly. Different types of corals have different PAR requirements, and it is crucial to provide them with the right amount of light. For instance, soft corals and LPS corals require a PAR range of 75-150, while SPS corals require a PAR range of 200-350 [1].

In addition to maintaining optimal PAR levels, it is also essential to ensure that the light spectrum is suitable for the corals. Different light spectrums affect the growth and coloration of corals differently. For instance, blue light promotes the growth of zooxanthellae, which is essential for the survival of corals.

In conclusion, maintaining optimal PAR levels is crucial for the growth and survival of corals and other photosynthetic organisms in a saltwater tank. Using a PAR meter and providing the right spectrum of light can help create a healthy and thriving reef aquarium.

[1] Source: Bulk Reef Supply

Types of Par Meters

A PAR meter is a device that measures the amount of photosynthetically active radiation (PAR) that is available for photosynthesis in an aquarium. There are several types of PAR meters available in the market, each with its own unique features.

Handheld PAR Meters

Handheld PAR meters consist of a sensor and a display unit. The sensor is placed in the aquarium water, and the display unit shows the readings. The Apogee MQ-510 is a popular handheld PAR meter that provides accurate readings under LED lighting. It is widely considered to be the best PAR meter for reef aquariums. It is also an underwater LED PAR meter, making it ideal for use in saltwater tanks.

USB PAR Meters

USB PAR meters are similar to handheld PAR meters, but they are connected to a computer via USB. They are typically less expensive than handheld PAR meters and are ideal for those who want to record and analyze data. The USB PAR meter can be used to measure the PAR output of LED lights and can be used to tune the light output of the aquarium.

PAR Sensor

A PAR sensor is a device that measures the amount of PAR in an aquarium. It consists of a sensor and a display unit. The sensor is placed in the aquarium water, and the display unit shows the readings. The PAR sensor can be used to determine the amount of light that is needed for photosynthesis in the aquarium.

MQ-210X

The MQ-210X is a PAR sensor that is best used for metal halide and T5 fluorescent lights. It is not as accurate for LED lighting as the blue, full-spectrum sensor. The black sensor (MQ-210X and SQ-420) is the original sensor that provides accurate readings for metal halide and T5 fluorescent lights.

Best PAR Meter

The best PAR meter for reef aquariums is the Apogee MQ-510. It is an underwater LED PAR meter that offers the best accuracy and convenience. The included sensor is widely agreed by hobbyists to provide the most accurate readings under LED lighting, and the convenient handheld display allows you to quickly check PAR in multiple locations throughout the aquarium.

In conclusion, there are several types of PAR meters available in the market, each with its own unique features. The type of PAR meter that is best for an aquarium depends on the type of lighting used and the needs of the aquarium.

Role of Lighting in Saltwater Tanks

Lighting is a crucial factor in the growth and health of saltwater tanks. It is essential for the photosynthetic process of corals, invertebrates, and other marine life. Therefore, it is important to understand the role of lighting in saltwater tanks.

LED lighting is commonly used in saltwater tanks due to their energy efficiency and customizable spectrum. The spectrum of light affects the growth and coloration of corals and other marine life. The intensity of light is also important, as too much or too little light can harm marine life. A PAR meter can be used to measure the intensity of light in a saltwater tank.

In addition to intensity, the photoperiod or lighting schedule is also important. A consistent lighting schedule can help regulate the growth and health of marine life. For instance, a 12-hour light schedule is recommended for most saltwater tanks.

It is important to note that the lighting needs of a saltwater tank depend on the type of corals and marine life being kept. Some corals require high-intensity lighting, while others require low-intensity lighting. Therefore, research should be done to determine the specific lighting needs of the marine life in the tank.

Overall, lighting plays a critical role in the health and growth of saltwater tanks. The spectrum, intensity, and photoperiod of lighting should be carefully considered and customized to meet the specific needs of the marine life in the tank.

Understanding Light Measurements

When it comes to maintaining a healthy saltwater tank, understanding light measurements is essential. A PAR meter is a tool that can help measure the intensity of light in your tank. PAR stands for Photosynthetically Active Radiation, which is the portion of light that is used by plants and corals for photosynthesis.

There are several terms related to light measurements that are important to understand. Lux, for example, is a unit of measurement for illuminance, or the amount of light that falls on a surface. Kelvin is a unit of measurement for color temperature, which refers to the color of the light emitted by a source. A higher Kelvin value indicates a cooler, bluer light, while a lower value indicates a warmer, yellower light.

Brightness is another term that is often used when discussing light measurements. It refers to the perceived intensity of light by the human eye. While brightness is subjective, PAR measurements are objective and can provide accurate information about the intensity of light in your tank.

It is important to note that different types of corals have different light requirements. Some corals require low light, while others require high light. A PAR meter can help ensure that the light in your tank is at the appropriate level for the corals you are keeping.

Overall, understanding light measurements and using a PAR meter can help ensure that your saltwater tank is healthy and thriving.

Setting Up and Using a Par Meter

Setting up and using a PAR meter is a crucial step in ensuring that a saltwater aquarium is receiving the right amount of light. A PAR meter measures the amount of photosynthetically active radiation (PAR) that is available for photosynthesis, which is essential for the growth and health of corals and other photosynthetic organisms in the tank.

To set up a PAR meter, the user should first ensure that the meter is calibrated correctly. Calibration is important because it ensures that the readings are accurate and reliable. The user should follow the manufacturer’s instructions for calibration, which typically involves exposing the sensor to a known light source and adjusting the meter to read the correct value.

Once the PAR meter is calibrated, the user can begin monitoring the light levels in the aquarium. The user should take readings at different points in the tank, including at the substrate level and at different depths. This will help to ensure that the corals and other photosynthetic organisms are receiving the correct amount of light at all depths.

To take a reading, the user should hold the sensor at the desired depth in the tank for a few seconds until the reading stabilizes. The user should then record the value and compare it to the recommended PAR values for the specific types of corals and other organisms in the tank. These recommended values can be found in various sources such as aquarium forums, blogs, and manufacturer’s instructions.

There are different methods for determining the correct PAR values for different types of corals and other organisms. Some methods involve using the average PAR value for the specific type of coral or organism, while others involve using the maximum PAR value that the coral or organism can tolerate.

In conclusion, setting up and using a PAR meter is an important step in ensuring that a saltwater aquarium is receiving the correct amount of light. By following the manufacturer’s instructions for calibration and taking readings at different depths in the tank, the user can ensure that the corals and other photosynthetic organisms are receiving the correct amount of light for their specific needs.

Choosing the Right Par Range

When it comes to choosing the right Par range for your saltwater tank, there are a few things to consider. The Par range is the measurement of the amount of light that is available to photosynthetic organisms in your tank. This measurement is crucial to ensure that your corals and other photosynthetic organisms are receiving the right amount of light to thrive.

There are three main categories of Par range: low, moderate, and high. It is important to choose the right Par range for your tank based on the types of corals and other photosynthetic organisms that you have in your tank.

For low light corals such as mushrooms, zoanthids, and some soft corals, a Par range of 50-100 is recommended. These corals do not require as much light as other corals and can actually be harmed by too much light.

Moderate light corals such as LPS corals and some SPS corals require a Par range of 100-250. These corals require more light than low light corals but can still be harmed by too much light.

High light corals such as some SPS corals require a Par range of 250-500. These corals require the most light and can be harmed if they do not receive enough light.

It is important to note that different species of corals may require different Par ranges within these categories. Therefore, it is important to research the specific needs of the corals in your tank to ensure that you are providing them with the right amount of light.

Overall, choosing the right Par range for your saltwater tank is crucial to ensure the health and growth of your corals and other photosynthetic organisms. By taking the time to research the specific needs of your corals and choosing the appropriate Par range, you can create a thriving and beautiful saltwater tank.

Understanding the Impact of Water and Air on PAR

PAR (Photosynthetically Active Radiation) is an important metric for reef tank owners to measure, as it indicates the amount of light that corals receive and is essential for their growth and health. However, the PAR readings can be affected by the medium through which the light passes, such as water and air.

When measuring PAR, it is crucial to take into account the water level in the tank. The deeper the water, the more light is absorbed, and the lower the PAR reading will be. Therefore, it is essential to measure PAR at the same depth as the corals to ensure that they are receiving the correct amount of light.

Another factor that affects PAR measurements is the presence of air. When measuring PAR in air, the readings will be higher than when measuring underwater, as air is less dense than water, and less light is absorbed. Therefore, it is essential to measure PAR underwater to get an accurate reading of the amount of light that corals are receiving.

One study found that underwater PAR measurements are also affected by the “immersion effect.” This effect occurs when a translucent, diffusing material is submerged in water, resulting in a larger percentage of the incident radiant flux being backscattered into the water than would be backscattered into air [1]. Therefore, it is important to use a PAR meter that is specifically designed for underwater use to get accurate readings of the PAR levels in a reef tank.

In summary, when measuring PAR in a saltwater tank, it is crucial to take into account the water level, the presence of air, and the immersion effect. By using a PAR meter designed for underwater use and measuring at the same depth as the corals, reef tank owners can ensure that their corals are receiving the correct amount of light for optimal growth and health.

[1] Reef Builders. “Underwater PAR Measurement is Strongly Impacted by ‘Immersion Effect.'” Reef Builders, 26 Aug. 2016, reefbuilders.com/2016/08/26/underwater-par-measurement-is-strongly-impacted-by-immersion-effect/.

Return Policies and Warranties

When purchasing a PAR meter for a saltwater tank, it is important to understand the return policies and warranties offered by the manufacturer or retailer. One of the most common return policies is the 60-day return policy. This policy allows customers to return the product within 60 days of purchase for a refund, provided that the product is in its original condition and packaging. However, some retailers may charge a restocking fee for returns, which can range from $50 to $100. It is important to read the return policy carefully before making a purchase.

In addition to the return policy, it is also important to understand the warranty offered by the manufacturer. Many PAR meters come with a one-year warranty, which covers defects in materials and workmanship. Some manufacturers may offer an extended warranty for an additional fee. It is important to read the warranty carefully to understand what is covered and what is not.

When purchasing a PAR meter, it is recommended to buy from a reputable retailer that offers a clear and fair return policy and warranty. Retailers such as SaltwaterAquarium.com and Bulk Reef Supply offer a 60-day return policy and warranty on their PAR meters. SaltwaterAquarium.com does not refund coupons, coupon codes, gift cards, or reward points. Bulk Reef Supply offers a special 60-day return policy for select PAR meters, which allows customers to return a used PAR meter for a refund, less a $100 mandatory restocking fee.

Overall, it is important to do your research and understand the return policies and warranties offered before purchasing a PAR meter for your saltwater tank. By doing so, you can ensure that you are getting a quality product and that you are protected in case of any issues or defects.

Compatibility with Devices and Platforms

When it comes to using a PAR meter for a saltwater tank, compatibility with devices and platforms is an important consideration. Most PAR meters come with different connectivity options, including Bluetooth, USB, and wireless connectivity, to make it easier to connect with different devices and platforms.

For instance, the Apogee MQ-210X PAR meter comes with a USB port that allows you to connect it to your computer. You can then use the provided software to analyze and store your data. The ApogeeConnect app, available on both Android and iOS, allows you to connect to the PAR meter via Bluetooth and access real-time data on your smartphone or tablet.

Another popular PAR meter, the PARwise PAR Monitor for Saltwater, has a web-based app that requires a Chrome browser to access. This app allows you to monitor and adjust lighting settings from anywhere with an internet connection.

In terms of compatibility with different platforms, most PAR meters are compatible with both Mac and Windows operating systems. However, it is always important to check the manufacturer’s specifications to ensure compatibility with your specific device or platform.

Overall, when choosing a PAR meter for your saltwater tank, it is important to consider your connectivity needs and make sure that the meter you choose is compatible with your devices and platforms.

Specific Lighting for Different Corals

When it comes to lighting a saltwater tank, it is important to understand that different corals require different levels of light. This is where a PAR meter comes in handy, as it can measure the amount of light that is actually reaching your corals.

For LPS corals, such as brain corals and torch corals, a PAR reading of 50-150 is recommended. These corals require moderate lighting, but too much light can actually harm them. It is important to note that LPS corals are generally more adaptable to different lighting conditions than other types of corals.

Acropora corals, on the other hand, require much higher levels of light. A PAR reading of 250-350 is recommended for these corals, which are known for their intricate branching and beautiful colors. It is important to note that Acropora corals are not as adaptable as LPS corals, and require more specific lighting conditions.

When it comes to adapting to different lighting conditions, certain corals are more capable than others. For example, Montipora corals are known for their adaptability and can thrive under a wide range of lighting conditions. However, it is still important to monitor PAR levels and adjust lighting accordingly to ensure optimal growth and health.

Overall, understanding the specific lighting requirements of different corals is crucial for maintaining a healthy and thriving saltwater tank. By using a PAR meter to measure light levels and adjusting lighting accordingly, hobbyists can ensure that their corals are getting the light they need to grow and thrive.

Products and Brands

When it comes to selecting a PAR meter for a saltwater tank, there are several brands and models to choose from. Some of the most popular brands in the market include Apogee MQ-510, Seneye, and others.

The Apogee MQ-510 is a well-known PAR meter among reef aquarium enthusiasts. It is an underwater quantum PAR meter that measures photosynthetically active radiation (PAR) levels in water. This meter is designed to measure the light intensity of LED lights, T5, and metal halide lighting. It comes with a microCache Bluetooth LED PAR Meter Kit that allows users to store and transfer data to a computer or mobile device.

Seneye is another popular brand that offers a range of products, including a reef aquarium monitor and PAR meter. The Seneye Reef Monitor is an affordable and easy-to-use submersible electronic monitor that can track temperature, pH, water level, ammonia, as well as LUX, Kelvin, and PAR to gauge lighting inside the tank.

Other brands that offer PAR meters for saltwater tanks include ITC Reefculture, which offers the PARwise USB Light Meter, and others. Each brand and model has its own unique features and specifications, so it is important to research and compare different options before making a purchase.

In summary, when selecting a PAR meter for a saltwater tank, it is important to consider factors such as accuracy, durability, and ease of use. Popular brands in the market include Apogee MQ-510, Seneye, and ITC Reefculture, among others.

Factors Affecting PAR

Several factors can affect the amount of PAR that reaches the corals in a saltwater tank. Understanding these factors is crucial for maintaining a healthy and thriving coral reef ecosystem.

Spread and Coverage

The spread and coverage of the light source can have a significant impact on PAR. A light source with a narrow beam angle will have a higher PAR at the center and lower PAR at the edges, whereas a light source with a wider beam angle will have a more even PAR distribution. Additionally, the height of the light above the water surface and the depth of the tank can also affect the spread and coverage of PAR.

Ammonia

Ammonia levels in a saltwater tank can also affect PAR. High levels of ammonia can lead to the growth of algae, which can block the light and reduce PAR. Therefore, it is crucial to maintain proper ammonia levels in the tank by carrying out regular water changes and monitoring the ammonia levels.

Natural Factors

Natural factors such as the position of the tank, the amount of natural light, and the presence of other light sources in the room can also affect PAR. For instance, a tank placed near a window that receives direct sunlight will have a higher PAR during the day and a lower PAR at night.

Human Eye

It is important to note that the human eye is not an accurate tool for measuring PAR. The human eye is most sensitive to green light, whereas corals require light in the blue and red spectrum. Therefore, a PAR meter is essential for accurately measuring the amount of PAR in a saltwater tank.

In summary, several factors can affect the amount of PAR that reaches the corals in a saltwater tank. Maintaining proper spread and coverage of the light source, monitoring ammonia levels, considering natural factors, and using a PAR meter for accurate measurements are all crucial for maintaining a healthy and thriving coral reef ecosystem.

Frequently Asked Questions

Do you need a PAR meter for a saltwater tank?

A PAR meter is not a necessity for a saltwater tank, but it is highly recommended. A PAR meter measures the intensity of light in the water, which is important for the health and growth of corals and other photosynthetic organisms. Without a PAR meter, it is difficult to determine if the lighting is adequate for the organisms in the tank.

What is the best PAR meter for a saltwater tank?

There are several PAR meters available in the market, but the Apogee MQ-510 Full-Spectrum Underwater LED PAR Meter is considered the best for saltwater tanks. This PAR meter is specifically designed for underwater use with LED lights and has a refined spectral response of 389 to 692 nm making it ideal for all light sources including LEDs.

What is the optimal PAR for a saltwater tank?

The optimal PAR for a saltwater tank depends on the organisms in the tank. Generally, soft corals and LPS corals require 75-150 PAR, while SPS corals require 200-350 PAR. However, it is important to research the specific PAR requirements of the organisms in the tank and adjust the lighting accordingly.

How does a Seneye PAR meter work?

The Seneye PAR meter is a device that measures the intensity of light in the water using a photodiode sensor. The sensor detects the amount of light at different wavelengths and calculates the PAR value. The Seneye PAR meter also measures temperature and water level in the tank.

Can I rent a PAR meter for my saltwater tank?

Yes, some aquarium stores and online retailers offer PAR meter rental services. Renting a PAR meter can be a cost-effective solution for those who do not want to invest in a PAR meter but want to ensure their lighting is adequate for their organisms.

Is there a reliable aquarium PAR meter app available?

There are several aquarium PAR meter apps available, but their reliability varies. It is recommended to use a physical PAR meter for accurate readings. However, some apps can provide a rough estimate of the PAR value and can be used as a supplement to a physical PAR meter.

Rock Flower Anemone: Care Tips and Best Practices

Rock flower anemones are a popular choice for saltwater aquarium enthusiasts due to their colorful appearance and low maintenance needs. These anemones, also known as flower anemones, are members of the Phymanthidae family and are found in a variety of colors. They have short, stubby tentacles that are tipped in pink, purple, orange, or green hues, and their tentacles sway gently in the current rather than trailing long.

Rock flower anemones are hardy creatures that can handle varying conditions once acclimated to their environment. They are easy to care for, making them a great option for beginners. They are not overly particular when it comes to lighting and flow, and they will stay put and don’t move around as much as other species of anemones. They are reef safe and have a lifespan of up to 10 years if cared for properly.

Understanding Rock Flower Anemones

Rock Flower Anemones are one of the most popular species of anemones kept in home aquariums. They are known for their bright colors and unique shape. These anemones belong to the Phymanthidae family and are scientifically known as Phymanthus crucifer.

Scientific Name and Classification

Rock Flower Anemones are classified under the Phylum Cnidaria, which includes jellyfish, corals, and sea anemones. They are part of the Phymanthidae family, which is a small family of anemones that includes only two genera: Phymanthus and Epicystis. The scientific name of Rock Flower Anemones is Phymanthus crucifer.

Physical Description

Rock Flower Anemones have a unique shape that sets them apart from other anemones. They have a flat, circular oral disc with short tentacles that are arranged in a radial pattern. The tentacles are typically green, brown, or white and have a speckled or mottled appearance. The oral disc is surrounded by a series of bumps or ridges that give the anemone a flower-like appearance.

Rock Flower Anemones come in a variety of colors, including green, brown, purple, blue, and red. They can also have a mix of colors or be completely white. The colors of the anemone can vary depending on the lighting conditions in the aquarium.

Natural Habitat

Rock Flower Anemones are found in the shallow waters of the Indo-Pacific region. They are typically found on rocky or sandy substrates and can be found at depths of up to 100 feet. In the wild, they can form symbiotic relationships with certain species of shrimp and crabs.

Aquarium Care

Rock Flower Anemones are a great addition to any reef tank. They are relatively easy to care for and can add a pop of color to your aquarium. Here are some tips on how to care for your Rock Flower Anemone.

Tank Requirements

Rock Flower Anemones are small in size, reaching only 4-8 inches in diameter. Therefore, a minimum tank size of 5 gallons is sufficient for one or two anemones. It is important to provide enough space for them to move around and find their preferred spot.

Water Parameters

Maintaining proper water parameters is essential for the health of your Rock Flower Anemone. The pH level should be between 8.1 to 8.4, alkalinity between 8 to 12 DKH, and calcium between 400 to 450 PPM. Magnesium should be between 1250 to 1350 PPM. The water temperature should be kept between 72°F to 78°F (22°C to 25°C).

Substrate and Placement

Rock Flower Anemones attach themselves to rocks or substrate, so it is important to provide them with a suitable surface to attach to. A sand bed or rockwork can be used as a substrate. It is important to avoid placing them too close to other corals or anemones, as they can sting each other.

Lighting Conditions

Rock Flower Anemones prefer moderate lighting conditions. They can thrive under a range of lighting conditions, including LED, T5, and metal halide lighting. It is important to acclimate them to the lighting gradually to avoid any stress.

Flow and Filtration

Rock Flower Anemones prefer moderate water flow. Too much water flow can cause them to detach from their substrate, while too little flow can lead to accumulation of waste. A moderate flow rate of 10-20 times the volume of the tank per hour is recommended. It is important to maintain good water quality by using a protein skimmer and performing regular water changes.

Overall, Rock Flower Anemones are easy to care for and can add a beautiful touch to your reef tank. By providing them with suitable tank requirements, maintaining proper water parameters, and ensuring good water flow and filtration, you can enjoy their beauty for years to come.

Feeding and Nutrition

Dietary Needs

Rock flower anemones are carnivores and require a diet of meaty foods to thrive. They can be fed with a variety of small-sized, meaty foods such as shrimp, krill, and small pieces of fish. It is important to note that they do not have a strong digestive system and can easily be overfed. Overfeeding can lead to poor water quality and even death. Therefore, it is recommended to feed them once or twice a week with small portions of food.

Feeding Techniques

Feeding rock flower anemones is relatively easy. They can be fed directly by using a pipette or a turkey baster to target the food directly onto their tentacles. Alternatively, the food can be placed near the anemone and allowed to drift towards it. It is important to ensure that the food is small enough for the anemone to consume and does not remain in the tank to pollute the water.

It is also important to note that rock flower anemones can source food through photosynthesis. Therefore, providing them with proper lighting is essential for their overall health and nutrition. They require moderate to high lighting conditions to thrive and maintain their vibrant colors.

In summary, rock flower anemones are carnivores that require a diet of meaty foods. They should be fed once or twice a week with small portions to avoid overfeeding. Feeding can be done directly or by placing the food near the anemone. Proper lighting conditions are also important for their overall health and nutrition.

Compatibility and Interaction

Symbiotic Relationships

Rock flower anemones are known to have symbiotic relationships with various invertebrates, such as porcelain crabs, anemone shrimp, and sexy shrimp. These small creatures benefit from the protection provided by the anemone’s stinging tentacles while the anemone benefits from the scraps of food left behind by the crustaceans.

Tank Mates and Aggression

When it comes to tank mates, rock flower anemones are generally peaceful, but there are some compatibility issues to keep in mind. They are aggressive towards other anemones, especially those of the same species. They should be kept away from coral and other invertebrates that they may sting. Clownfish are not recommended as tank mates, as they may try to host in the anemone and get stung in the process.

It is important to note that rock flower anemones can be aggressive towards each other, especially if they are different colors. Therefore, it is recommended to keep only one anemone per rock or substrate.

In conclusion, rock flower anemones are peaceful creatures that can coexist with a variety of tank mates, as long as they are not aggressive or likely to be stung. It is important to research and carefully select compatible tank mates to ensure a harmonious aquarium environment.

Reproduction and Growth

Reproductive Behavior

Rock flower anemones are hermaphroditic, meaning they have both male and female reproductive organs. However, they cannot self-fertilize, and they require a partner to reproduce. According to Saltwater Aquarium Blog, rock flower anemones reproduce sexually, and it’s difficult to tell which individuals are male and which are female. The best way to ensure that rock flower anemones will reproduce in a tank is to have multiple individuals. When they do spawn, the baby rock flower anemones can often be found underneath the petals or tentacles of the adults.

Growth Patterns

Rock flower anemones have a slow growth rate, and their size can range from 4-8 inches (10.2-20.3cm). According to Relax Gardening, rock flower anemones can reproduce readily through pedal laceration, which is when a piece of the anemone breaks off and forms a new individual. They can also give clownfish a host, as some clowns form mutualistic bonds with anemones. Rock flower anemones are an indicator of tank health, as they expand and color up when conditions are right. They complement other corals and inverts, adding diversity to the tank.

In summary, rock flower anemones have a slow growth rate and require a partner to reproduce. They are hermaphroditic, cannot self-fertilize, and reproduce sexually. When they do spawn, the baby rock flower anemones can often be found underneath the petals or tentacles of the adults. They can reproduce readily through pedal laceration and give clownfish a host. They are an indicator of tank health and complement other corals and inverts.

Common Varieties and Colors

Color Variations

Rock flower anemones are known for their vibrant and colorful appearance, making them a popular choice for aquarium enthusiasts. These anemones come in a variety of colors, including orange, green, purple, and pink. Some rock flower anemones even have ultra-colored tentacles that are sure to add a pop of color to any tank.

Popular Species

There are around 11 different species of rock flower anemones, all of which are native to the tropical Caribbean waters World Wide Corals. Some of the most popular species include the Phymanthus crucifer, which has a green oral disc and bright pink tentacles. Another popular species is the Phymanthus sp. Ultra, which has ultra-colored tentacles that range from blue to purple.

In addition to these popular species, there are also beaded anemones, which have a unique beaded appearance on their oral disc. These anemones come in a variety of colors, including orange, green, and purple.

Overall, rock flower anemones are a colorful and unique addition to any aquarium. With their wide range of colors and species, there is sure to be a rock flower anemone that fits any aquarist’s preferences.

Health and Maintenance

Rock flower anemones are generally healthy and hardy creatures that can live for several years if they are provided with the right conditions. However, they are still susceptible to certain diseases and environmental factors that can harm them. In this section, we will discuss some common issues that rock flower anemones face and how to prevent them.

Common Issues

One of the most common issues that rock flower anemones face is bleaching, which occurs when they lose their vibrant colors and turn white. This can be caused by a variety of factors, including poor water conditions, inadequate lighting, and stress. To prevent bleaching, it is important to provide your rock flower anemone with the right water conditions, including a stable pH level, alkalinity, and calcium levels. It is also important to provide adequate lighting, as rock flower anemones require moderate to high intensity illumination for 10-12 hours per day.

Another common issue that rock flower anemones face is infection by parasites or bacteria. This can cause them to become lethargic, lose their appetite, and develop visible signs of disease such as lesions or discoloration. To prevent infection, it is important to maintain good water quality and provide your rock flower anemone with a balanced diet that includes both meaty and vegetable-based foods. It is also important to quarantine any new additions to your tank to prevent the spread of disease.

Preventive Care

To keep your rock flower anemone healthy and happy, it is important to provide them with the right conditions and perform regular maintenance on your tank. This includes monitoring water conditions such as pH, alkalinity, and calcium levels, as well as performing regular water changes to remove any accumulated waste or debris. It is also important to provide your rock flower anemone with a balanced diet that includes both meaty and vegetable-based foods, as well as supplementing their diet with vitamins and minerals as needed.

In addition to regular maintenance, it is also important to observe your rock flower anemone for any signs of stress or disease, such as lethargy, loss of appetite, or visible signs of infection. If you notice any of these symptoms, it is important to take action immediately to prevent further harm to your rock flower anemone. With proper care and attention, your rock flower anemone can live a long and healthy life in your aquarium.

Acclimation and Handling

Initial Acclimation

When introducing a Rock Flower Anemone to a new tank, it is important to acclimate it properly to prevent stress and ensure a smooth transition. Drip acclimation is recommended for 30 minutes to 1 hour to allow time for the anemone to adjust to the new tank’s conditions. This process involves slowly introducing small amounts of the new tank’s water into the bag containing the anemone. The water is added drop by drop, allowing the anemone to gradually adjust to the new water chemistry, temperature, and salinity.

It is also important to note that Rock Flower Anemones should not be placed in direct contact with other anemones, as they may not be compatible and could cause harm to each other. In addition, they are not compatible with clownfish as they may sting and possibly eat the fish.

Ongoing Care

Rock Flower Anemones are generally low maintenance and easy to care for. However, they do require specific water parameters to thrive. The pH level should be 8.1 to 8.14, the alkaline level should be 8 to 12 DKH, calcium should be at 400 to 450 PPM, and magnesium needs to be at 1250 to 1350 PPM. Water temperature should be maintained between 72°F to 78°F (22°C to 25°C).

When handling Rock Flower Anemones, it is important to be gentle and avoid damaging their delicate tentacles. Their mild venom makes direct hand contact or gloveless handling an option for very brief periods. With slow and careful handling, Rock Flower Anemones can be moved safely when needed.

In summary, acclimating and handling Rock Flower Anemones require patience and care. By following the recommended acclimation process and maintaining proper water parameters, these anemones can thrive in a home aquarium.

Frequently Asked Questions

How do you care for a rock flower anemone in an aquarium?

Rock flower anemones are generally easy to care for and require minimal maintenance. They thrive in varying water flow and lighting conditions, making them versatile additions to your tank. While they can tolerate different placements, they appreciate moderate water flow and a substrate like a sand bed or rockwork for stability. Rock flower anemones are carnivorous and should be fed a varied diet of meaty foods such as brine shrimp, mysis shrimp, and small pieces of fish or shrimp.

What size tank is recommended for a rock flower anemone?

Rock flower anemones are relatively small and can be kept in tanks as small as 5 gallons (19L). However, it is recommended to keep them in at least a 10-gallon (38L) tank to ensure they have enough space to move around and establish their territory.

Are rock flower anemones compatible with clownfish?

Rock flower anemones are generally compatible with clownfish. However, it is important to note that not all clownfish will host in a rock flower anemone. The pairing may take some time and patience to establish. It is also important to ensure that the size of the anemone is appropriate for the size of the clownfish.

Can rock flower anemones coexist with coral in a reef aquarium?

Rock flower anemones are generally peaceful and can coexist with coral in a reef aquarium. However, it is important to ensure that they are not placed too close to other anemones or aggressive corals, as they may sting each other.

What is the maximum size a rock flower anemone can reach?

Rock flower anemones can reach a maximum size of 4-8 inches (10.2-20.3cm). They are relatively small compared to other types of anemones, making them a great addition to smaller tanks.

Is it necessary to dip rock flower anemones before introducing them to a tank?

It is recommended to dip rock flower anemones before introducing them to a tank to prevent the introduction of pests or parasites. A freshwater dip or coral dip can be used to remove any unwanted hitchhikers. It is important to follow the instructions on the dip solution carefully and to acclimate the anemone slowly to the tank.

Wavemaker vs Powerheads: Which is the Better Option for Your Aquarium?

Aquarium powerheads and wavemakers are both important tools for maintaining a healthy aquatic environment. While they are often used interchangeably, there are key differences between the two that can impact their effectiveness in an aquarium. Understanding these differences and the role that each piece of equipment plays can help aquarium owners make informed decisions when choosing the right equipment for their tank.

Powerheads are typically designed to create strong, directional water flow in an aquarium. They are often used to create currents that help to circulate water and oxygenate the tank. In contrast, wavemakers are designed to generate more natural, back-and-forth water movement that simulates the ebb and flow of ocean waves. While both powerheads and wavemakers can be used to create water circulation and oxygenation, wavemakers may be better suited for certain types of aquatic life that benefit from more gentle, natural flow patterns.

Understanding the differences between powerheads and wavemakers is critical for maintaining a healthy and thriving aquarium. By considering factors like circulation and oxygenation, nutrient distribution, and waste management, aquarium owners can choose the right equipment for their specific needs. With the right equipment in place, they can create a healthy and vibrant aquatic environment for their fish and other aquatic life.

Key Takeaways

  • Powerheads and wavemakers have different designs and intended purposes in an aquarium.
  • Proper water circulation and oxygenation are critical for maintaining a healthy aquatic environment.
  • By choosing the right equipment for their specific needs, aquarium owners can create a thriving ecosystem for their aquatic life.

Understanding Aquarium Powerheads and Wavemakers

Aquarium powerheads and wavemakers are two popular devices used to create water movement in an aquarium. They are often used in both marine and freshwater setups to improve water circulation and oxygenation, which is essential for the health of fish and other aquatic animals.

Powerheads

A powerhead is a type of water pump that is used to create water flow in an aquarium. It is typically positioned inside the tank and can be used to create a directional flow of water or to circulate water throughout the entire aquarium. Powerheads are often used in conjunction with a filtration system to help remove debris and other unwanted particles from the water.

Wavemakers

A wavemaker is a device that generates waves in an aquarium, simulating the natural movement of water in the ocean or a river. It is typically used to create a more natural and dynamic environment for fish and other aquatic animals. Wavemakers can be programmed to create different types of waves, such as surging or pulsing waves, and can be used in both marine and freshwater aquariums.

When choosing between a powerhead and a wavemaker, it is important to consider the specific needs of your aquarium and the types of fish and other aquatic animals you have. Some fish require strong currents, while others prefer calmer waters. Additionally, some aquariums may require a combination of both powerheads and wavemakers to achieve the desired water movement.

Overall, both powerheads and wavemakers are valuable tools for maintaining a healthy and dynamic aquarium environment. With the right setup and programming, they can help create a more natural and stimulating environment for your fish and other aquatic animals.

The Role of Powerheads and Wavemakers in an Aquarium

Powerheads and wavemakers are both important devices used in aquariums to create water movement and circulation. They play a crucial role in maintaining a healthy and thriving aquatic environment for fish, corals, and other aquatic creatures.

Powerheads are designed to move water throughout the aquarium, creating a current flow that helps to circulate water and oxygenate it. They are typically placed at the bottom of the tank and are used to create a laminar flow, which is a smooth and steady flow of water. Powerheads are often used in combination with other types of filtration systems to maintain optimal water quality in the aquarium.

Wavemakers, on the other hand, are used to create waves and simulate natural water movement. They are installed inside the aquarium and generate waves by oscillating back and forth at high speed. Wavemakers create a more natural and random flow of water, which is essential for fish and animals that come from rivers and oceans. They create wide, gentle flow patterns that are safer and much more efficient for creating current throughout the entire aquarium.

In summary, powerheads and wavemakers both play important roles in maintaining a healthy and thriving aquatic environment. Powerheads are used to create a steady flow of water to circulate and oxygenate it, while wavemakers are used to create a more natural and random flow of water to simulate waves and currents. Both devices are essential for maintaining optimal water quality and ensuring the health and well-being of aquatic creatures in the aquarium.

Key Differences Between Powerheads and Wavemakers

Aquarium water movement is critical for maintaining healthy aquatic life. Powerheads and wavemakers are two popular devices used to circulate water in an aquarium. While both devices move water, there are some key differences between them.

Motor and Pump Design

Powerheads use an AC motor to drive a submersible pump. These pumps are designed to move water in a single direction, creating a strong, directional flow. On the other hand, wavemakers use a controller to drive wave pumps, which are designed to generate waves that spread out and offer enhanced water circulation.

Water Flow

Powerheads provide a strong and directional flow of water, which can be useful for creating currents in specific areas of the aquarium. In contrast, wavemakers generate waves that move water throughout the entire aquarium, creating a more natural and random flow pattern.

Detritus Management

Powerheads are effective at moving detritus up from the bottom of the aquarium, making it easier for filters to remove it. In contrast, wavemakers may not move detritus up as effectively, but they do help prevent it from settling on the bottom of the tank by creating a more random flow pattern.

Controller Options

Many wavemakers come with a controller that allows the user to adjust the intensity and frequency of the waves. This can be useful for simulating natural ocean currents and creating a more dynamic environment for aquatic life. While some powerheads also come with a controller, it is not as common.

Types of Pumps

There are different types of pumps available for both powerheads and wavemakers. For example, gyre pumps are a type of wavemaker that creates a circular flow pattern, while return pumps are used to circulate water back to the aquarium after it has been filtered. Ecotech Marine Vortech pumps are a popular brand of wavemaker that use a unique propeller design to generate waves.

Overall, the choice between a powerhead and a wavemaker depends on the needs of the aquarium and the preferences of the owner. Powerheads are better suited for creating strong directional currents, while wavemakers are ideal for creating a more natural and random flow pattern.

Circulation and Oxygenation in Aquariums

Maintaining proper circulation and oxygenation in an aquarium is crucial for the health and well-being of its inhabitants. Both wavemakers and powerheads are designed to circulate water in aquariums, but they do so in different ways.

A wavemaker generates waves that mimic ocean currents, creating a more natural flow of water in the aquarium. This helps to circulate water throughout the tank, which is essential for maintaining a healthy environment for fish and other aquatic creatures. The wavemaker’s gentle waves also help to oxygenate the water by promoting gas exchange at the surface.

On the other hand, a powerhead is designed to create a strong and directional flow of water in the aquarium. This can be useful for creating more turbulence in the water, which can help to remove debris and prevent dead spots in the tank. However, it is important to note that powerheads can consume more electricity and may not be suitable for smaller aquariums.

Both wavemakers and powerheads can be effective at oxygenating the water in an aquarium. However, it is important to note that proper oxygenation requires more than just water movement. Other factors such as the number of fish in the tank and the amount of surface area available for gas exchange also play a role.

In summary, wavemakers and powerheads are both effective at circulating water in an aquarium, but they do so in different ways. The choice between the two depends on the specific needs of the aquarium and its inhabitants. Proper oxygenation requires more than just water movement and should be considered when selecting a circulation device for the aquarium.

The Impact on Aquatic Life

Both wavemakers and powerheads play an important role in maintaining the natural habitat of aquatic life in an aquarium. They promote water circulation and help to create a more natural environment, which is essential for the health and well-being of corals and fish.

Corals are particularly sensitive to changes in water flow, and the right amount of water movement is crucial for their survival. A lack of water movement can cause corals to become stressed, which can lead to bleaching and even death. On the other hand, too much water movement can damage corals and prevent them from feeding properly. Wavemakers and powerheads can help to create the perfect balance of water movement for corals, which is essential for their growth and survival.

Fish also benefit from the water circulation created by wavemakers and powerheads. In the wild, fish are used to swimming against currents, and without the right amount of water movement, they can become stressed and lethargic. Wavemakers and powerheads can help to create a more natural environment for fish, which can promote their health and well-being.

In addition to promoting the health of corals and fish, wavemakers and powerheads can also help to maintain the health of reefs. Reefs are home to a diverse range of aquatic life, and the right amount of water movement is essential for the survival of this ecosystem. Wavemakers and powerheads can help to create the perfect balance of water movement for reefs, which is essential for their health and well-being.

Overall, both wavemakers and powerheads can have a positive impact on aquatic life in an aquarium. They promote water circulation, which is essential for the health and well-being of corals and fish, and they can help to maintain the health of reefs.

Nutrient Distribution and Waste Management

When it comes to nutrient distribution and waste management, both powerheads and wavemakers have their own advantages and disadvantages. Powerheads are known for their ability to create strong directional flow, which can help distribute food and nutrients throughout the tank. However, this can also lead to debris and detritus accumulating in certain areas of the tank, which can be difficult to remove without disrupting the flow.

Wavemakers, on the other hand, are designed to create a more natural, back-and-forth motion in the water, which can help distribute food and nutrients more evenly throughout the tank. This can also help prevent debris and detritus from accumulating in certain areas, as the motion of the water can help keep it suspended in the water column where it can be more easily removed by the filtration system.

When it comes to waste management, both powerheads and wavemakers can be effective, but they work in different ways. Powerheads typically use an impeller to create strong directional flow, which can help move waste towards the filtration system. Wavemakers, on the other hand, create a more random motion in the water, which can help keep waste suspended in the water column where it can be more easily removed by the filtration system.

Overall, both powerheads and wavemakers can be effective tools for nutrient distribution and waste management in a saltwater aquarium. The choice between the two will depend on the specific needs of the tank and the preferences of the aquarist.

Understanding Flow Patterns

Water flow is an essential element in any aquarium. It helps to provide oxygen to the fish, distribute nutrients and maintain a healthy environment. The flow pattern in an aquarium depends on the type of pumps used, such as powerheads and wavemakers.

Varied Flow Patterns

Powerheads are designed to create a uniform direction of water flow, while wavemakers generate varied flow patterns, imitating natural water currents. Wavemakers can create standing waves, which are waves that oscillate in one place. They can also produce turbulent flow, which creates random, chaotic water movement.

Uniform Direction

Powerheads are best suited for aquariums that require a uniform direction of water flow. They are ideal for tanks with delicate corals, which require a consistent flow of water to prevent damage. Powerheads can also be used to create a laminar flow pattern, which is a smooth, constant flow of water.

Standing Waves

Wavemakers, on the other hand, are best suited for aquariums that require varied flow patterns. They can create standing waves, which are ideal for tanks with soft corals, anemones, and other invertebrates. Standing waves help to simulate natural water currents, which can improve the health of the marine life in the tank.

In conclusion, understanding the flow patterns in an aquarium is critical to maintaining a healthy environment for the fish and other marine life. Powerheads are best suited for tanks that require a uniform flow of water, while wavemakers are ideal for tanks that require varied flow patterns. By choosing the right pump for your aquarium, you can create a healthy and thriving environment for your marine life.

Choosing the Right Equipment for Your Aquarium

When it comes to creating the perfect environment for your aquatic pets, choosing the right equipment is essential. There are many factors to consider, including the type of aquarium, the size of the tank, and the inhabitants. One of the most important decisions you will need to make is whether to use a powerhead or a wavemaker.

Both powerheads and wavemakers serve the same purpose, which is to create water movement in your aquarium. However, there are some key differences between the two. One of the main advantages of a wavemaker is that it is more versatile than a powerhead. A wavemaker can create a variety of different flow patterns, which can help to simulate natural ocean currents. This can be beneficial for many types of aquatic life, including corals and fish.

Another advantage of a wavemaker is that it is more controllable than a powerhead. Many wavemakers come with adjustable settings, allowing you to customize the flow pattern and intensity to suit the needs of your aquarium. This can be particularly useful for hobbyists who are looking to create a display aquarium, as it allows for greater control over the water movement.

However, it is worth noting that wavemakers can be more expensive than powerheads. This is because they typically come with more advanced features and settings. If you are on a tight budget, a powerhead may be a more cost-effective option.

When choosing a wavemaker or powerhead, it is important to consider the intake and outlet of the equipment. Some models come with a cage to prevent fish and other aquatic life from getting sucked into the equipment, while others do not. It is also important to consider the size of the equipment, as larger tanks may require more powerful equipment.

Ultimately, the decision of whether to use a powerhead or a wavemaker will depend on your individual needs and preferences. By considering the factors outlined above, you can make an informed decision that will help to create a healthy and thriving environment for your aquatic pets.

Frequently Asked Questions

What are the advantages of using a wavemaker in an aquarium?

A wavemaker generates waves in an aquarium, mimicking the natural flow of water in the ocean. This helps create a more natural environment for the aquatic life in the aquarium. The waves created by a wavemaker can also help distribute nutrients and oxygen more evenly throughout the aquarium, promoting better health for the inhabitants.

What is the difference between a wavemaker and a powerhead?

A powerhead is a device that moves water in a specific direction, while a wavemaker generates waves that move water back and forth. While both devices help circulate water in the aquarium, a wavemaker is designed to create a more natural flow that mimics the ocean, while a powerhead is better suited for directing water flow in a specific direction.

How do I choose between a wavemaker and a powerhead?

Choosing between a wavemaker and a powerhead depends on the specific needs of your aquarium and its inhabitants. If you want to create a more natural environment that mimics the ocean, a wavemaker is the better choice. If you need to direct water flow in a specific direction, a powerhead is the better option.

Can I use a wavemaker and a powerhead together in my aquarium?

Yes, you can use a wavemaker and a powerhead together in your aquarium. In fact, many aquarium enthusiasts use both devices to create a more natural flow while still directing water flow in specific areas of the aquarium.

What are the benefits of using a powerhead in an aquarium?

A powerhead helps circulate water in the aquarium, which is essential for maintaining a healthy environment for aquatic life. It also helps distribute nutrients and oxygen more evenly throughout the aquarium, promoting better health for the inhabitants.

How do I properly install and maintain a wavemaker or powerhead in my aquarium?

Proper installation and maintenance of a wavemaker or powerhead is essential for ensuring it functions properly and doesn’t harm the inhabitants of your aquarium. It’s important to follow the manufacturer’s instructions for installation and maintenance, and to regularly clean the device to prevent the buildup of debris or algae.

Candy Cane Coral Care: Tips for Keeping Your Coral Healthy

Candy cane coral, also known as Caulastrea furcata, is a popular choice for reef tank enthusiasts due to its vibrant colors and relatively easy care requirements. This beginner-friendly LPS coral can be found in shallow waters of the Great Barrier Reef, Coral Sea, and the Scott Reefs. Candy cane coral is a hardy coral that can thrive in a variety of lighting and flow conditions.

When it comes to candy cane coral care, proper placement is key. This coral prefers moderate lighting and flow, but can also thrive in low light and flow environments. It is recommended to place candy cane coral at the bottom of the tank, directly on the sand bed, as sand is its preferred substrate. Target feeding of small, meaty zoo-plankton-like foods is also recommended when feeding polyps are extended. Calcium supplementation is also necessary to maintain calcium levels above 400 ppm.

For beginners looking to add some color and variety to their saltwater aquarium, candy cane coral is a great option. With its easy care requirements and vibrant colors, it is sure to be a standout addition to any reef tank.

Understanding Candy Cane Coral

Scientific and Common Names

Candy Cane Coral is a type of stony coral that belongs to the family Merulinidae. Its scientific name is Caulastrea furcata. It is also commonly known as Trumpet Coral or Bullseye Coral due to its appearance.

Growth Patterns and Structure

Candy Cane Coral is a large polyp stony coral (LPS) and has a calcium carbonate skeleton. It is found in the Indo-Pacific region, particularly in the Great Barrier Reef. It has a distinct appearance with branches that resemble candy canes, hence the name. The coral comes in various colors, including fluorescent colors.

Candy Cane Coral has a moderate growth rate and can grow up to 6 inches (15 cm) in size. It has a branching growth pattern and can form colonies that can cover a significant area. The coral is known to have a sturdy structure and can withstand moderate water flow.

In conclusion, understanding the scientific and common names, natural habitat, appearance, and growth patterns of Candy Cane Coral is essential for proper care.

Aquarium Setup and Requirements

Candy Cane Coral is a hardy and relatively easy coral to care for, but it still requires a suitable aquarium setup to thrive. In this section, we will discuss the tank size and placement, water parameters and quality, lighting and flow requirements for Candy Cane Coral.

Tank Size and Placement

Candy Cane Coral can be kept in both reef tanks and nano reefs. The ideal tank size for this coral is at least 20 gallons. It is recommended to place the coral on a sandy substrate or sand bed, which will allow it to anchor itself and grow.

When placing the Candy Cane Coral in the tank, it is important to consider its symbiotic relationship with zooxanthellae, which are photosynthetic algae that live inside the coral’s tissues. The coral relies on the zooxanthellae for food, and the algae rely on the coral for shelter and nutrients. Therefore, it is important to place the coral in an area where it can receive adequate light for photosynthesis.

Water Parameters and Quality

Maintaining proper water parameters and quality is crucial for the health and well-being of Candy Cane Coral. The ideal water parameters for this coral are a pH of 8.1-8.4, alkalinity of 8-12 dKH, salinity of 1.023-1.025, calcium of 400-450 ppm, and magnesium of 1280-1350 ppm. It is also important to keep nitrates and phosphates low to prevent algae growth and maintain water quality.

To monitor these parameters, it is recommended to use a test kit and check them regularly. It is also important to maintain specific gravity and hardness levels within the appropriate range.

Lighting and Flow Requirements

Candy Cane Coral requires moderate to low lighting, with a PAR range of 30-150. It is important to avoid exposing the coral to high light intensity, which can bleach or irritate the coral. Placing the coral towards the edges of the tank can help to soften the intensity it’s exposed to.

In terms of water flow, Candy Cane Coral prefers low to moderate water flow. It is important to provide adequate water flow to prevent debris from settling on the coral, but not too much flow that it damages the coral.

By following the aquarium setup and requirements discussed in this section, you can create a suitable environment for Candy Cane Coral to thrive in your tank.

Caring for Candy Cane Corals

Candy Cane Corals (Caulastrea furcata) are a hardy and easy-to-care-for LPS coral species that can thrive in a variety of aquarium environments. Here are some important considerations to keep in mind when caring for candy cane corals.

Feeding and Nutrition

Candy Cane Corals are primarily photosynthetic, but they also benefit from supplemental feeding. Target feeding small, meaty zoo-plankton-like foods such as Mysis shrimp, krill, or brine shrimp directly to the feeding tentacles of the coral can help ensure that it receives adequate nutrition. It is recommended to feed the coral about twice a week.

Compatibility and Aggression

Candy Cane Corals are generally peaceful and can coexist with other peaceful coral species. However, they can extend sweeper tentacles that can harm nearby corals. It is important to provide enough space between candy cane corals and other coral species to prevent tissue damage and stress. Additionally, they may be aggressive towards small fish and shrimp, so it is important to consider compatibility when adding new tank mates.

Common Issues and Solutions

Candy Cane Corals are generally hardy and can tolerate a range of water parameters. However, they can be susceptible to pests and diseases if water quality is not maintained. Regular water changes can help prevent stress and bleaching. If pests or diseases are present, it is important to take action promptly to prevent further damage to the coral and other tank inhabitants.

In summary, candy cane corals are happy and healthy when provided with adequate nutrition, adequate space, and a clean and stable environment. With proper care, they can be a beautiful and rewarding addition to any reef aquarium.

Propagation and Growth

Candy Cane coral is a beginner-friendly coral that can be propagated through fragging. Fragging is the process of cutting a piece of coral and allowing it to grow into a new colony.

Fragging Techniques

Fragging is done by using a sharp pair of scissors or a bone cutter to cut the coral. The cut should be made at the base of the coral, where it meets the substrate. The frag should then be glued onto a frag plug or a piece of rock.

It is important to use gloves when fragging as the coral can release toxins that can cause skin irritation. It is also important to sterilize the tools before and after fragging to prevent the spread of disease.

Growth Monitoring and Maintenance

Candy Cane coral has a moderate growth rate and can reach a size of up to 6 inches. It is important to monitor the growth of the coral and ensure that it has enough space to grow.

Candy Cane coral requires moderate lighting and water flow. It is important to maintain the water parameters, including temperature, pH, and salinity, to ensure the coral’s health.

Regular water changes and the addition of trace elements can also help promote the growth of the coral. It is important to avoid overfeeding the coral as this can lead to an increase in nutrients in the water, which can cause algae growth.

In summary, Candy Cane coral is a great addition to any reef tank. It is beginner-friendly and can be propagated through fragging. It has a moderate growth rate and requires moderate lighting and water flow. Regular maintenance and monitoring of water parameters can help ensure the coral’s health and promote its growth.

Frequently Asked Questions

What care requirements are essential for maintaining a healthy candy cane coral colony?

Candy cane corals are relatively easy to care for, but they do require specific conditions to thrive. They prefer low-to-moderate water flow, low-to-moderate light intensity, and routine feeding. Maintaining calcium levels above 400 ppm is also recommended [1]. Additionally, it’s important to avoid exposing them to light intensity that’s too high, as this can bleach or irritate the coral [2].

How often do candy cane corals typically split, and what conditions facilitate this?

Candy cane corals can split easily, and they can do so as often as every few months [3]. The conditions that facilitate splitting include low-to-medium water flow, medium lighting, and weekly feeding [1].

Can you describe the range of colors found in candy cane corals and what influences their pigmentation?

Candy cane corals come in a range of colors, including green, red, purple, pink, and orange. The pigmentation of the coral is influenced by the amount of light it receives, as well as the presence of certain pigments in the coral’s tissue [4].

What is the significance of sweeper tentacles in candy cane corals, and how should they be managed in an aquarium?

Sweeper tentacles are used by candy cane corals to defend their territory and can extend up to six inches beyond the coral’s base. They can be harmful to other corals in the tank, so it’s important to leave enough space between them and other corals. If sweeper tentacles are causing issues, they can be trimmed with scissors or a sharp blade [5].

What are the ideal lighting conditions for promoting the growth of neon green and Kryptonite candy cane corals?

Neon green and Kryptonite candy cane corals require low-to-medium lighting conditions. A PAR range of 50-70 is recommended, and anything above 150 can bleach or irritate the coral [2].

Are there specific water parameters that need to be monitored to ensure the well-being of candy cane corals?

Candy cane corals require stable water conditions, with a pH between 8.0 and 8.4, salinity between 1.023 and 1.025, and temperature between 75°F and 80°F. It’s also important to maintain low levels of nitrates and phosphates, as high levels can harm the coral [6].

UC Venus Gonipora

Goniapora Coral Care: Tips and Guidelines for Keeping Your Coral Healthy

Goniopora is a beautiful and popular coral species that can add a unique touch to any reef aquarium. However, caring for them can be challenging, and it is essential to have the right knowledge and tools to keep them healthy and thriving. This article will provide an overview of Goniopora coral care, including their habitat, feeding, and placement requirements.

Goniopora corals are large polyp stony corals (LPS) that are known for their flower-like appearance. They come in a variety of colors and have long, flowing tentacles that sway in the current. These corals are popular among reef aquarium enthusiasts because of their unique appearance and ability to add a pop of color to any tank.

To keep Goniopora corals healthy, it is essential to provide them with the right environment. This includes maintaining stable water chemistry, providing adequate lighting, and ensuring proper water flow. Additionally, feeding Goniopora corals the right food is crucial to their health and growth. Overall, Goniopora coral care requires attention to detail and a deep understanding of their unique needs.

Understanding Goniopora Corals

Species Overview

Goniopora corals, also known as flower pot corals or sunflower corals, are a type of large polyp stony coral belonging to the family Poritidae. These corals are native to the waters surrounding Australia and Indonesia, where they can be found growing on reef slopes and flats. The scientific name for this coral is Goniopora sp.

Goniopora corals are highly valued for their beautiful, flower-like appearance. They have long, thin polyps with numerous tentacles that extend out from a central skeleton. The polyps come in a variety of colors, including tan, green, purple, and red, and can be arranged in a circular or branching pattern.

Physical Characteristics

The physical characteristics of Goniopora corals make them a unique addition to any reef tank. These corals are relatively large, with a maximum size of 5 ½ inches. They have a moderate level of care and can be kept by intermediate to advanced aquarists.

Goniopora corals require moderate lighting and water flow to thrive. They are photosynthetic corals, meaning they can produce their own food through photosynthesis, but they also require small particulate food to supplement their diet. The water chemistry must be precise, and regular maintenance is important to ensure the well-being of these corals.

In conclusion, Goniopora corals are a beautiful and unique addition to any reef tank. Their flower-like appearance and variety of colors make them highly sought after by aquarists. With proper care and attention to water chemistry, lighting, and tank placement, Goniopora corals can thrive in a reef tank environment.

Aquarium Setup

When setting up an aquarium for Goniopora corals, there are several important factors to consider. This section will cover the tank requirements, water parameters, lighting, and flow necessary for the successful care of Goniopora corals.

Tank Requirements

Goniopora corals require a well-established reef aquarium with stable water chemistry. The tank should be at least 50 gallons in size to provide enough space for the coral to grow. Proper filtration is also essential to maintain water quality and remove waste.

Water Parameters

Maintaining stable water parameters is crucial for the health of Goniopora corals. The ideal water temperature should be between 75-80°F, with a salinity level of 1.025. Water flow should be moderate, with a current that is not too strong, as this can damage the coral. The pH should be between 8.1-8.4, with an alkalinity level of 8-12 dKH, and calcium and magnesium levels of 400-450 ppm and 1290-1350 ppm, respectively. Ammonia, nitrite, nitrate, and phosphate levels should be kept as close to zero as possible.

Lighting and Flow

Goniopora corals require moderate to high lighting levels, with a PAR value of 100-200. It is important to avoid exposing the coral to too much light, as this can cause bleaching and damage to the coral. The flow should be moderate, with a gentle current that is not too strong. This will help to distribute nutrients and oxygen throughout the tank and prevent debris from settling on the coral.

In summary, setting up an aquarium for Goniopora corals requires careful attention to water chemistry, tank size, water flow, filtration, and lighting. Maintaining stable water parameters and providing the coral with the proper environment will ensure its health and longevity in the aquarium.

Feeding and Nutrition

Feeding Techniques

Goniopora corals are photosynthetic and derive some of their nutritional requirements from light. However, they also require small particle foods to survive and thrive. The feeding technique for Goniopora corals is broadcast feeding. This involves adding small particle foods to the water column in the reef tank, where the coral can capture them.

Broadcast feeding can be done using a variety of coral foods, including phytoplankton, zooplankton, amino acids, and proteins. Some popular types of coral food that can be used for broadcast feeding are brine shrimp, rotifers, oyster eggs, mysis shrimp, and cyclops.

Dietary Needs

To ensure that Goniopora corals receive the proper nutrition, it is important to provide a varied diet that includes both small particle foods and light. It is recommended to feed Goniopora corals every other day or even every day.

While Goniopora corals can capture nutrients from the water, they will do best when supplied with a healthy amount of food. It is important to monitor the water quality in the reef tank to ensure that the coral is not being overfed. Overfeeding can lead to poor water quality, which can harm the coral and other inhabitants of the tank.

In summary, Goniopora corals require small particle foods for survival and thrive on a varied diet that includes both light and small particle foods. Broadcast feeding is the recommended feeding technique, and it is important to monitor the water quality in the reef tank to avoid overfeeding.

Caring for Goniopora

Goniopora corals, also known as flower pot corals, are a beautiful addition to any reef tank. However, they require specific care to thrive. In this section, we will discuss the placement and aggression of Goniopora, as well as common issues that may arise.

Placement and Aggression

When it comes to placement, Goniopora corals prefer the upper half of the tank, depending on the intensity of the lighting and height of the aquarium. They require moderate water flow and lighting, making them a great addition to LPS coral tanks. However, they should not be placed too close to other corals, as they can be aggressive towards neighboring corals. It is important to provide enough space between Goniopora and other corals to avoid any potential aggression.

Common Issues

Goniopora corals are susceptible to brown jelly disease, which can quickly spread and kill the coral. To prevent this, it is important to maintain proper water chemistry and avoid any sudden changes in temperature or salinity. Additionally, Goniopora corals may lose coloration if they are not receiving enough light or proper nutrition. It is recommended to feed small particle foods, such as phytoplankton and zooplankton, to ensure their survival.

Overall, Goniopora coral care requires precise attention to water chemistry, lighting, and tank placement. Providing proper nutrition and suitable tank mates is essential for the well-being of these corals. Regular maintenance and monitoring of the aquarium environment ensure healthy growth and propagation of Goniopora corals.

Propagation and Growth

Fragging Techniques

Goniopora corals can be propagated through several methods, including fragging, trimming, and colony division. Fragging is the most common technique used for propagating Goniopora corals. It involves cutting a small piece of coral tissue from the parent colony and attaching it to a new substrate. The new coral will grow into a clone of the parent colony over time.

There are several fragging techniques that can be used for Goniopora corals, including using a bone cutter or a scalpel. It is important to use sterile tools and to take care when fragging the coral to avoid damaging the parent colony. Once the frag has been cut, it can be attached to a new substrate using a glue or epoxy.

Colony Development

Goniopora corals can also be propagated through colony division. This involves separating a large colony into smaller fragments, which can then be grown into new colonies. This technique is commonly used in aquaculture to produce large numbers of Goniopora corals for the aquarium trade.

As Goniopora corals grow, they produce daughter colonies, which can be removed from the parent colony and grown into new colonies. This process can be repeated multiple times, resulting in a large number of new colonies from a single parent colony.

Overall, Goniopora corals are relatively easy to propagate and can be grown successfully in both home and commercial aquariums. With proper care and maintenance, Goniopora corals can thrive and provide a beautiful addition to any reef tank.

Compatibility and Tank Mates

When it comes to Goniopora coral care, it is important to consider the compatibility of these corals with other marine organisms in the reef aquarium. Goniopora corals are large polyp stony (LPS) corals that require specific care to thrive.

Suitable Tank Mates

Goniopora corals can coexist with a range of other marine organisms, including other LPS corals, zoanthids, and porites. They also tend to do well with peaceful fish species, such as clownfish and gobies.

One important factor to consider when selecting tank mates for Goniopora corals is aggression. Aggressive fish species, such as triggerfish and puffers, can damage or even kill these delicate corals. Therefore, it is best to avoid keeping these types of fish with Goniopora corals.

Avoiding Conflict

In addition to selecting suitable tank mates, it is also important to avoid conflict between Goniopora corals and other organisms in the reef aquarium. For example, Goniopora corals should be placed away from other corals that may sting or damage them.

It is also important to ensure that Goniopora corals are not placed too close to each other. When Goniopora corals are placed too close together, they may compete for space and resources, which can lead to stress and poor health.

Overall, selecting suitable tank mates and avoiding conflict is essential for the health and well-being of Goniopora corals in the reef aquarium. By following these guidelines, aquarists can ensure that their Goniopora corals thrive and contribute to the beauty of their aquarium.

Advanced Care Topics

Symbiotic Relationships

Goniopora coral, like many other coral species, have a symbiotic relationship with zooxanthellae. These are tiny photosynthetic organisms that live in the coral’s tissues. The zooxanthellae provide the coral with energy through photosynthesis, while the coral provides the zooxanthellae with a protected environment and nutrients. However, if the coral is stressed or the water conditions are poor, the coral may expel the zooxanthellae, which can lead to bleaching and even death.

In addition to zooxanthellae, Goniopora coral can also form symbiotic relationships with dinoflagellates. These are single-celled organisms that can help the coral with nutrient uptake and waste removal. However, if the dinoflagellates become too abundant, they can cause the coral to become overgrown and smothered.

Color Variations

Goniopora coral can come in a variety of colors, including pinks, greens, creams, tans, and grays. The coloration of the coral can be affected by a number of factors, including lighting, water flow, and nutrient levels. For example, if the coral is not receiving enough light, it may appear more brown or gray in color. Conversely, if the coral is receiving too much light, it may appear more bleached or white.

It is important to note that some Goniopora species, such as G. stokesi, are more sensitive to changes in water chemistry and lighting than others. Therefore, it is important to research the specific needs of your particular Goniopora coral species in order to provide the best care possible.

Overall, advanced care topics for Goniopora coral involve understanding the symbiotic relationships that the coral forms and the various factors that can affect its coloration. By providing the right conditions and closely monitoring the coral’s health, you can help ensure that your Goniopora coral thrives in your reef tank.

Frequently Asked Questions

What specific care requirements are needed for purple Goniopora coral?

Purple Goniopora corals require a moderate to high water flow, as well as moderate lighting. They are also sensitive to changes in water chemistry, so it is important to maintain stable water parameters. In addition, these corals require regular feeding to thrive.

What is the ideal lighting and PAR level for Goniopora corals?

The ideal lighting for Goniopora corals is moderate, with a PAR level of 100-200. It is important to avoid exposing these corals to too much light, as this can damage their delicate tissues.

How can you determine the growth rate of Goniopora coral?

The growth rate of Goniopora coral can be determined by measuring the size of the coral over time. This can be done by taking regular measurements of the coral’s diameter or height, and comparing these measurements over time.

Are there any special feeding frequencies or diets for Goniopora corals?

Goniopora corals require regular feeding, and should be fed at least twice a week. They prefer small, meaty foods such as brine shrimp or mysis shrimp. It is also important to feed these corals a variety of foods to ensure they receive a balanced diet.

What is the ideal placement for Goniopora in a reef aquarium?

Goniopora corals should be placed in a lower to middle area of the aquarium, with moderate water flow. They should be placed on a stable surface, such as a rock or coral frag plug, and should not be allowed to touch other corals.

How difficult is it to maintain Goniopora corals in a home aquarium?

Goniopora corals can be difficult to maintain in a home aquarium, and are best suited to experienced reef keepers. They require stable water parameters, regular feeding, and moderate lighting and water flow. In addition, these corals can be sensitive to changes in water chemistry, and may require additional care and attention.

Saltwater Protein Skimmer: What You Need to Know

Saltwater protein skimmers are a vital component of any saltwater aquarium setup. They help maintain the water quality by removing organic waste, excess nutrients, and other harmful substances from the water. Protein skimmers work by creating a column of tiny bubbles that attract and trap organic waste, which is then removed from the water.

Understanding protein skimmers is essential for any saltwater aquarium owner, as they play a crucial role in maintaining the health of the aquarium. There are different types of protein skimmers available, each with its own advantages and disadvantages. Some of the most common types include hang-on-back (HOB) skimmers, in-sump skimmers, and external skimmers. The choice of which type of skimmer to use depends on several factors, such as the size of the aquarium, the type of livestock, and the budget.

Key Takeaways

  • Protein skimmers are an essential component of any saltwater aquarium setup.
  • There are different types of protein skimmers available, each with its own advantages and disadvantages.
  • Choosing the right type of skimmer depends on several factors, such as the size of the aquarium, the type of livestock, and the budget.

Understanding Protein Skimmers

A protein skimmer is an essential piece of equipment for any saltwater aquarium. It is designed to remove organic waste, such as fish poop and uneaten food, from the water with minimal effort. The protein skimmer works by mixing air and water together to create a foam that traps the organic waste. The foam is then collected in a cup, which can be easily removed and emptied.

There are many different types of protein skimmers available on the market, including Reef Octopus, Bubble Magus, BRS, Aquamaxx, Royal Exclusiv, Tunze, and Ultra Reef. Each brand has its own unique features and benefits, so it’s important to do your research before choosing the right protein skimmer for your aquarium.

One popular brand of protein skimmer is the Reef Octopus Classic series, which includes models like the Reef Octopus Classic 100 and Reef Octopus Classic 1000. These skimmers are known for their quiet operation and efficient performance. The Aquamaxx protein skimmer is another popular choice, offering a compact design and high-quality construction.

When selecting a protein skimmer, it’s important to consider the size of your aquarium and the amount of organic waste produced by your fish and other marine life. A larger aquarium will require a more powerful skimmer, while a smaller aquarium may only need a basic model.

Overall, a protein skimmer is a valuable investment for any saltwater aquarium owner. It helps to maintain a healthy and stable environment for your aquatic pets, reducing the risk of poor water quality and harmful conditions.

Types of Protein Skimmers

Protein skimmers are an essential component of any saltwater aquarium filtration system. They remove organic waste before it has a chance to break down and negatively impact the water quality. There are three main types of protein skimmers: internal, external, and hang-on-back (HOB) skimmers. Each type has its own unique features and advantages.

Internal Skimmers

Internal protein skimmers are designed to be installed inside the sump of the aquarium. They are compact and efficient, making them a popular choice for aquarium owners who want to save space. Internal skimmers work by using a needle wheel impeller to create a fine mist of bubbles that attract and trap organic waste. The waste is then removed from the water by the skimmer’s collection cup. Internal skimmers are ideal for larger aquariums because they can handle a higher volume of water.

External Skimmers

External protein skimmers are installed outside of the aquarium, usually in the sump or a separate filtration chamber. They are larger than internal skimmers and can handle a higher volume of water. External skimmers work by drawing water from the aquarium into the skimmer, where it is mixed with air to create a frothy mixture. The froth rises to the top of the skimmer, where it is removed by the collection cup. External skimmers are ideal for aquariums with limited sump space or for those who want to keep their skimmer out of sight.

Hang-On-Back Skimmers

Hang-on-back (HOB) protein skimmers are designed to be mounted on the back of the aquarium. They are easy to install and maintain and are a popular choice for smaller aquariums. HOB skimmers work by drawing water from the aquarium into the skimmer, where it is mixed with air to create a frothy mixture. The froth rises to the top of the skimmer, where it is removed by the collection cup. HOB skimmers are not as efficient as internal or external skimmers, but they are a cost-effective option for those on a budget.

In summary, internal, external, and hang-on-back protein skimmers are the three main types of skimmers available for saltwater aquariums. Each type has its own unique features and advantages, making it important to choose the right type of skimmer based on the size of your aquarium, your filtration needs, and your budget.

Key Components of a Protein Skimmer

A protein skimmer is an essential component of a saltwater aquarium filtration system. It removes organic waste and other impurities from the water, keeping the aquarium healthy for fish and corals. The key components of a protein skimmer include the pump, collection cup, air valve, and venturi.

The Pump

The pump is the heart of a protein skimmer. It creates the water flow needed to remove waste from the aquarium. There are two types of pumps available for protein skimmers: DC pumps and AC pumps. DC pumps are more energy-efficient and have variable speed control, while AC pumps are less expensive but have a fixed speed. A skimmer pump is specially designed for protein skimmers, and it is recommended to use a DC water pump for better control.

The Collection Cup

The collection cup is where the waste is collected and removed from the aquarium. It is a detachable container that sits on top of the skimmer body. The cup is designed to be easy to remove and clean. It is recommended to empty the collection cup regularly to prevent any overflow and to keep the skimmer working efficiently.

The Air Valve

The air valve controls the airflow to the protein skimmer. It regulates the amount of air that enters the skimmer body, creating the foam necessary for waste removal. An air silencer can be added to reduce the noise created by the airflow.

The Venturi

The venturi is a narrow tube that creates a vacuum, drawing in air and water into the protein skimmer. It mixes the air and water, creating a frothy foam that removes waste from the aquarium. The airflow can be adjusted by turning the air valve, creating different levels of foam.

In conclusion, understanding the key components of a protein skimmer is essential for maintaining a healthy saltwater aquarium. By choosing the right pump, collection cup, air valve, and venturi, the skimmer can efficiently remove waste and impurities from the aquarium water, keeping the aquarium healthy for fish and corals.

Performance and Quality

When it comes to selecting a protein skimmer for a saltwater aquarium, performance and quality are the two most important factors to consider. A high-quality protein skimmer should be able to remove organic waste effectively, leaving the water clean and clear. The skimmer should also be able to maintain consistent performance over time.

One of the key aspects of a protein skimmer’s performance is its ability to produce a dense foam. The foam is produced by injecting air into the water, which causes organic waste to stick to the bubbles and rise to the surface. The skimmer then removes the foam, along with the waste, from the water. A high-quality protein skimmer should be able to produce a dense foam consistently, even under varying conditions such as changes in water flow or salinity.

Another important factor to consider is the skimmer’s build quality. A well-built protein skimmer should be durable and able to withstand the harsh environment of a saltwater aquarium. It should also be easy to clean and maintain. Some skimmers come with removable parts, making it easier to access and clean the components.

When it comes to selecting a protein skimmer, it is important to choose a model that is appropriate for the size of the aquarium. A skimmer that is too small will not be able to remove enough waste from the water, while a skimmer that is too large may be overkill and waste energy.

Overall, a high-performance and high-quality protein skimmer is essential for maintaining a healthy and clean saltwater aquarium. By selecting a skimmer that is appropriate for the size of the aquarium and has a proven track record of consistent performance, hobbyists can ensure that their aquarium remains in top condition.

Sizing and Placement

Choosing the appropriate size of a protein skimmer is essential for its proper functioning. A skimmer that is too small for the tank will not be able to remove all the organic waste, while an oversized skimmer will be too powerful and may remove essential nutrients from the water.

When selecting a protein skimmer, it is important to consider the size of the tank and the bioload of the inhabitants. As a general rule, the skimmer should be able to process at least 1.5 to 2 times the volume of the tank per hour. For example, a 100-gallon tank should have a skimmer that can process at least 150-200 gallons of water per hour.

It is better to oversize than undersize a skimmer. An undersized skimmer will not be able to keep up with the waste production, leading to poor water quality and potential harm to the inhabitants. On the other hand, an oversized skimmer may remove essential nutrients from the water, leading to poor coral growth and health.

When it comes to placement, the protein skimmer should be installed in the sump or filtration compartment of the tank. The skimmer should be positioned in a way that allows for easy access and maintenance. The height of the skimmer should be tall enough to hang without interference from the stand, and the mount should fit the rim thickness of the tank. If the tank has a plastic rim, it may need to be modified.

In summary, choosing the appropriate size of a protein skimmer and placing it in the right location is essential for maintaining a healthy saltwater aquarium. By selecting an appropriately sized skimmer and ensuring proper placement, hobbyists can ensure that their tank remains clean and healthy for their aquatic inhabitants.

Maintenance and Cleaning

Protein skimmers are an essential component of a saltwater aquarium, and maintenance is crucial to ensure they function efficiently. Regular cleaning can prevent clogs and extend the life of the skimmer.

To clean a protein skimmer, it is essential to turn off the pump and remove the collection cup. The collection cup should be emptied and rinsed with fresh water. It is recommended to clean the collection cup weekly to prevent the buildup of organic waste.

The neck of the skimmer should also be cleaned regularly to prevent clogs. A toothbrush can be used to scrub the neck and remove any buildup. It is recommended to clean the neck every two weeks.

In addition to regular cleaning, protein skimmers should also be maintained. The air intake valve should be checked regularly to ensure it is not clogged. The pump should also be inspected to ensure it is functioning correctly.

It is important to note that protein skimmers require a break-in period, and it may take several weeks for them to function efficiently. Once the skimmer is functioning correctly, it should be cleaned and maintained regularly to prevent clogs and extend its lifespan.

Overall, regular cleaning and maintenance are essential to ensure the protein skimmer functions efficiently. By following these simple steps, aquarium owners can keep their protein skimmers in top condition and enjoy a healthy and thriving saltwater aquarium.

Water Levels and Filtration

Maintaining the correct water level is crucial for the efficient operation of a protein skimmer. The water level inside the skimmer’s reaction chamber must be maintained at a consistent level, which is usually indicated by a mark on the skimmer body. If the water level is too high or too low, the skimmer’s performance will be affected. A high water level will cause the skimmer to overflow, while a low water level will reduce the skimmer’s efficiency.

In addition to maintaining the water level inside the skimmer, it is also important to maintain the water level in the sump. The sump water level should be kept at a consistent level to ensure that the skimmer is receiving a steady flow of water. If the sump water level drops too low, the skimmer may not be able to function properly, while a high water level can cause the skimmer to overflow.

Protein skimmers are an essential component of saltwater aquarium filtration systems. They are used to remove organic waste, such as dissolved organic compounds and proteins, from the water column. Mechanical filtration, such as filter socks, can remove larger particles, but protein skimmers are more effective at removing dissolved organic compounds.

Regular water changes are also important for maintaining water quality in a saltwater aquarium. Water changes help to dilute harmful substances and replenish trace elements that are essential for the health of the aquarium inhabitants. The frequency and volume of water changes will depend on the size of the aquarium, the bio-load, and other factors.

In summary, maintaining the correct water level and ensuring proper filtration are essential for the efficient operation of a protein skimmer in a saltwater aquarium. Regular water changes are also important for maintaining water quality and the health of the aquarium inhabitants.

Budget and Upgrades

When it comes to setting up a saltwater aquarium, the protein skimmer is an essential piece of equipment. However, not everyone has the budget to purchase a high-end model. Fortunately, there are budget-friendly options available that still offer reliable performance.

One such option is the Reef Glass Protein Skimmer. This skimmer relies on an air pump to create foam, which makes it highly effective and affordable. Its simple design also makes it easy to use. Starting at just $4.99, it’s a great choice for those on a tight budget.

For those looking to upgrade their protein skimmer, the Bubble Magus Curve 5 is a popular choice. It offers superior performance and a compact design that can fit in most sumps. The Curve 5 is also easy to clean and maintain, making it a great option for those who want to upgrade without breaking the bank.

Another upgrade option is the Nyos Quantum 120 Protein Skimmer. This skimmer is designed to provide superior performance, with a unique “hybrid wheel” that combines the benefits of a needle wheel and a mesh wheel. It also features a compact design that can fit in most sumps, and is easy to clean and maintain.

Overall, there are plenty of budget-friendly and upgrade options available when it comes to protein skimmers for saltwater aquariums. It’s important to choose a skimmer that fits your budget and meets your specific needs, whether you’re just starting out or looking to upgrade your existing equipment.

Waste Removal and Skimming

One of the primary functions of a protein skimmer is to remove waste from the aquarium. Waste can come in many forms, including dissolved organic waste and debris. Protein skimming is a highly effective method of waste removal, as it targets the waste before it has a chance to break down and release harmful compounds into the water.

There are two main types of protein skimming: wet skim and dry skim. Wet skim involves producing a large volume of bubbles in the skimmer, which creates a thick layer of foam. The foam contains the waste, which is then removed from the aquarium in the form of skimmate. Dry skim, on the other hand, involves producing a smaller volume of bubbles, which results in a drier skimmate.

Skimmate is the waste material that is removed from the aquarium by the protein skimmer. It can vary in color and consistency, depending on the type and amount of waste present in the water. Skimmate should be removed from the skimmer cup regularly to prevent it from decomposing and releasing harmful compounds back into the water.

In addition to removing waste, protein skimming can also help to improve water clarity and reduce the need for frequent water changes. By removing dissolved organic waste and debris, protein skimming can help to maintain a healthy and stable aquarium environment.

Overall, protein skimming is a highly effective method of waste removal in saltwater aquariums. Whether using wet skim or dry skim, regular skimmate removal is essential for maintaining a healthy and stable aquarium environment.

Impacts on Aquarium Health

A protein skimmer is an essential piece of equipment for maintaining a healthy and thriving saltwater aquarium. By removing dissolved organics, nutrients, and other harmful substances from the water column, a protein skimmer helps to reduce the amount of algae growth and prevent the buildup of nitrates and phosphates, which can be harmful to fish and corals.

Fish and corals in a saltwater aquarium require a clean and stable environment to thrive. When dissolved organics and other harmful substances are allowed to accumulate in the water, it can lead to poor water quality, which can cause stress and disease in fish and corals. A protein skimmer helps to prevent this by removing these harmful substances before they can cause problems.

In addition to improving water quality, a protein skimmer can also help to reduce the amount of algae growth in a saltwater aquarium. Algae growth can be a major problem in a reef tank, as it can compete with corals for nutrients and light. By removing excess nutrients from the water column, a protein skimmer can help to prevent algae growth and keep the tank looking clean and healthy.

Overall, a protein skimmer is a crucial component of a healthy and thriving saltwater aquarium. It helps to maintain water quality, prevent algae growth, and provide a clean and stable environment for fish and corals to thrive.

Aquarium Guides and Communities

When it comes to maintaining a saltwater aquarium, there are a variety of resources available to help aquarists of all levels. One popular resource is the Saltwater Aquarium Guide, which provides detailed information on everything from setting up a tank to selecting the right equipment. This guide is a great starting point for beginners, as it covers all the basics of saltwater aquarium care.

Another valuable resource for saltwater aquarists is online communities such as the #askbrstv Facebook group. This group is a great place to ask questions, share tips, and connect with other saltwater aquarists. Members of the group are always willing to offer advice and share their experiences, making it a valuable resource for anyone looking to learn more about saltwater aquariums.

In addition to online communities, there are also a variety of aquarium guides and books available. These resources offer in-depth information on topics such as water chemistry, fish and coral care, and equipment selection. Some popular guides include “The Reef Aquarium” by J. Charles Delbeek and Julian Sprung and “The Conscientious Marine Aquarist” by Robert M. Fenner.

Overall, whether you are a beginner or an experienced saltwater aquarist, there are plenty of resources available to help you maintain a healthy and thriving aquarium. By utilizing these resources, you can ensure that your aquarium is always in top condition and that your fish and coral are happy and healthy.

Frequently Asked Questions

What are the benefits of using a protein skimmer in a saltwater aquarium?

A protein skimmer is an essential piece of equipment for any saltwater aquarium. It helps to remove organic waste and other harmful substances from the water, which can help to prevent algae growth, maintain water clarity, and promote healthy fish and coral growth. A protein skimmer works by creating a foam that traps organic waste, which is then removed from the tank. This process helps to reduce the amount of waste that accumulates in the tank, reducing the need for water changes and other maintenance tasks.

Which type of protein skimmer is best for a 55 gallon saltwater tank?

The type of protein skimmer that is best for a 55 gallon saltwater tank depends on a number of factors, including the size and type of tank, the type of fish and coral being kept, and the level of maintenance required. However, in general, an in-sump protein skimmer is the best option for a 55 gallon saltwater tank. This type of skimmer is designed to be installed in the sump of the tank, where it can work efficiently to remove organic waste from the water.

What is the difference between an external and HOB protein skimmer?

An external protein skimmer is designed to be installed outside of the tank, while a hang-on-back (HOB) protein skimmer is designed to be installed on the back of the tank. Both types of skimmers work in a similar way, by creating a foam that traps organic waste. However, external skimmers are generally more efficient and effective than HOB skimmers, as they have a larger capacity and can process more water.

How often should I clean my protein skimmer?

The frequency with which you should clean your protein skimmer depends on a number of factors, including the size of the tank, the type of skimmer, and the amount of waste that is being produced. In general, it is recommended that you clean your protein skimmer once a week, or as needed. This will help to ensure that it is working efficiently and effectively, and will help to prevent any buildup of waste or other harmful substances in the tank.

What is the recommended brand for a protein skimmer for a reef tank?

There are many different brands of protein skimmers available on the market, and the best one for your reef tank will depend on a number of factors, including the size of the tank, the type of fish and coral being kept, and your personal preferences. Some of the most popular brands of protein skimmers for reef tanks include AquaC, Reef Octopus, and Bubble Magus.

Can a protein skimmer replace the need for water changes in a saltwater tank?

While a protein skimmer can help to reduce the need for water changes in a saltwater tank, it cannot completely replace them. Water changes are still necessary to remove other harmful substances from the tank, such as nitrate and phosphate, and to replenish trace elements and other essential nutrients. However, a protein skimmer can help to reduce the frequency and amount of water changes required, making it an essential tool for maintaining a healthy saltwater aquarium.

Beginner’s Guide to LPS Coral: Everything You Need to Know

LPS corals are a great addition to any beginner’s saltwater aquarium. These corals are easy to care for and come in a variety of colors and shapes, making them a popular choice for hobbyists. However, it’s important to have a basic understanding of LPS corals before adding them to your tank.

Understanding LPS corals involves knowing their unique characteristics and requirements. LPS stands for Large Polyp Stony corals, which means they have a hard skeleton made of calcium carbonate and large fleshy polyps. They require moderate to high lighting and moderate water flow, and they also need to be fed regularly. With proper care, LPS corals can thrive and add beauty to your aquarium.

Key Takeaways

  • LPS corals are a great addition to any beginner’s saltwater aquarium.
  • Understanding LPS corals involves knowing their unique characteristics and requirements.
  • With proper care, LPS corals can thrive and add beauty to your aquarium.

Understanding LPS Corals

LPS corals, also known as Large Polyp Stony Corals, are a type of stony coral that have fleshy polyps and a calcium carbonate skeleton. They are known for their large polyps, which can be seen during the day when the coral is fully extended. LPS corals are popular among beginner aquarists because of their ease of care and relatively fast growth rate.

LPS corals come in a variety of shapes and sizes, including brain corals, bubble corals, and torch corals. Some of the most popular LPS corals for beginners include the Frogspawn coral, Candy Cane coral, Hammer coral, and Torch coral. These corals are relatively hardy and can tolerate a range of water conditions.

Feeding LPS corals is relatively easy, as they are able to obtain much of their nutrition from photosynthesis. However, they will also benefit from supplemental feedings of small meaty foods such as brine shrimp or mysis shrimp. It is important to avoid overfeeding LPS corals, as this can lead to poor water quality and algae growth.

LPS corals have a moderate growth rate, which can be accelerated by providing them with optimal water conditions and regular feedings. It is important to note that LPS corals can grow quite large, so it is important to provide them with enough space in the aquarium.

In summary, LPS corals are a great choice for beginner aquarists looking to add some color and variety to their reef aquarium. They are relatively easy to care for, have a moderate growth rate, and come in a variety of shapes and sizes. With proper care and attention, LPS corals can thrive in a home aquarium for many years.

Setting Up Your Aquarium

When setting up an aquarium for LPS corals, it is important to pay close attention to water quality and parameters. A reef tank or saltwater aquarium is the ideal environment for LPS corals to thrive.

Water Quality and Parameters

The first step in setting up an LPS coral aquarium is to ensure that the water quality is suitable for the corals. The stability of the water parameters is crucial for the health of the corals, so it is important to monitor them regularly.

The following water parameters should be monitored:

  • Temperature: LPS corals require a stable water temperature between 75 and 80 degrees Fahrenheit. A heater can be used to maintain the desired temperature.
  • Salinity/Specific Gravity: The specific gravity levels should be kept between 1.023 and 1.025. A refractometer can be used to measure the specific gravity accurately.
  • pH: The ideal pH range for LPS corals is between 8.1 and 8.4. A pH test kit can be used to monitor the pH levels.
  • Alkalinity: The alkalinity levels should be between 8 and 12 dKH. Alkalinity helps to maintain the pH stability in the aquarium.
  • Calcium: LPS corals require calcium for healthy growth. The calcium levels should be between 400 and 450 ppm. A calcium test kit can be used to monitor the calcium levels.
  • Magnesium: Magnesium levels should be between 1200 and 1400 ppm. Magnesium is important for the growth and health of LPS corals.

To maintain the water quality, regular water changes should be performed. A good rule of thumb is to change 10% of the water every two weeks. The water changes help to remove excess nutrients and maintain the water quality.

In addition to monitoring the water parameters, the placement of the rocks and sand in the aquarium is also important. The rocks and live rock should be arranged to create caves and hiding places for the LPS corals. The sand bed should be at least 1 inch deep to provide a suitable substrate for the corals.

To maintain stability and water flow in the aquarium, a protein skimmer and powerhead can be used. The protein skimmer helps to remove excess organic matter from the water, while the powerhead provides water flow and circulation in the aquarium.

In summary, setting up an LPS coral aquarium requires careful attention to water quality and parameters. By monitoring the water parameters, performing regular water changes, and using appropriate equipment, the aquarium can provide a suitable environment for LPS corals to thrive.

Feeding and Care for LPS Corals

Feeding and caring for LPS corals is relatively easy, making them ideal for beginners. LPS corals have large polyps and are capable of feeding directly on meaty foods. They also require low to moderate light and water flow, making them less demanding than other coral types.

Feeding LPS Corals

LPS corals can be fed with a variety of foods, including mysis, phytoplankton, and meaty foods. Mysis shrimp are small crustaceans that are a great source of nutrition for LPS corals. Phytoplankton is also a good food source for LPS corals, as it contains essential nutrients and trace elements. Meaty foods, such as shrimp, fish, and squid, can also be fed to LPS corals.

When feeding LPS corals, it is important to avoid overfeeding, as this can lead to poor water quality and other issues. It is recommended to feed LPS corals once or twice a week, depending on the size of the coral and the amount of food being offered.

Care Level

LPS corals are known for their hardiness and ease of care, making them ideal for beginners. They require low to moderate light and water flow, and can tolerate a wide range of water conditions. However, it is important to maintain stable water parameters, including nitrate, nitrite, phosphate, and ammonia levels, to ensure the health and well-being of LPS corals.

Meaty Foods

Meaty foods are an important part of the diet for LPS corals. They contain essential nutrients and trace elements that are necessary for the growth and health of the coral. Meaty foods can be fed to LPS corals in a variety of forms, including frozen, fresh, and dried. It is important to choose high-quality foods that are free of contaminants and additives.

In conclusion, feeding and caring for LPS corals is relatively easy, making them ideal for beginners. LPS corals require low to moderate light and water flow, and can be fed with a variety of foods, including mysis, phytoplankton, and meaty foods. It is important to avoid overfeeding, maintain stable water parameters, and choose high-quality foods to ensure the health and well-being of LPS corals.

Common Types of LPS Corals for Beginners

For beginners, it is important to start with LPS corals that are easy to care for and can adapt to different water conditions. Some of the most popular LPS corals for beginners include Candy Cane Coral, Hammer Coral, Torch Coral, Frogspawn Coral, Bubble Coral, and Brain Coral.

Candy Cane Coral

Candy Cane Coral is one of the most popular LPS corals for beginners. It is easy to care for and can adapt to different water conditions. Candy Cane Coral is peaceful and won’t sting neighboring corals, making it a great choice for beginners who are just starting to build their reef tank.

Hammer Coral

Hammer Coral is another great choice for beginners. It is easy to care for and can adapt to different water conditions. Hammer Coral comes in a variety of colors and shapes, making it a popular choice for reef tank enthusiasts.

Torch Coral

Torch Coral is a beautiful LPS coral that is easy to care for and can adapt to different water conditions. It has long, flowing tentacles that sway in the water, making it a stunning addition to any reef tank.

Frogspawn Coral

Frogspawn Coral is a popular LPS coral for beginners. It is easy to care for and can adapt to different water conditions. Frogspawn Coral has a unique shape and comes in a variety of colors, making it a great choice for reef tank enthusiasts.

Bubble Coral

Bubble Coral is a unique LPS coral that is easy to care for and can adapt to different water conditions. It has a bubbly appearance and comes in a variety of colors, making it a popular choice for reef tank enthusiasts.

Brain Coral

Brain Coral is a popular LPS coral that is easy to care for and can adapt to different water conditions. It has a unique shape and comes in a variety of colors, making it a great choice for reef tank enthusiasts.

Overall, these LPS corals are great choices for beginners who are just starting to build their reef tank. They are easy to care for, can adapt to different water conditions, and come in a variety of colors and shapes. With proper care and attention, these corals can thrive in any reef tank setup.

Potential Challenges and Solutions

While LPS corals are generally hardy and easy to care for, there are some potential challenges that beginners may encounter. Here are some common issues and solutions to help ensure the health and longevity of your LPS corals.

Sweeper Tentacles

LPS corals can have long sweeper tentacles that they use to defend their territory. These tentacles can sting and harm nearby corals, so it’s important to keep them at a safe distance from other corals. If you notice your LPS coral’s sweeper tentacles extending too far, you can try reducing the flow or rearranging the placement of your corals to give them more space.

Lighting

LPS corals require moderate lighting, but too much or too little can cause problems. If your coral appears to be bleaching or losing color, it may be receiving too much light. On the other hand, if it appears to be shrinking or not opening fully, it may not be receiving enough light. It’s important to find the right balance and adjust your lighting accordingly.

Flow

LPS corals prefer low to moderate flow. If the flow is too strong, it can damage the coral’s delicate tissue and prevent it from fully expanding. If the flow is too weak, it can prevent the coral from receiving the nutrients it needs to thrive. It’s important to find the right flow rate for your LPS coral and adjust it as needed.

Nutrient Levels

LPS corals require low to moderate nutrient levels, so it’s important to monitor your water parameters and keep them within the appropriate range. High nutrient levels can lead to algae growth and other issues, while low nutrient levels can prevent your coral from receiving the nutrients it needs to grow and thrive. Regular water changes and proper feeding can help maintain the proper nutrient levels for your LPS coral.

In summary, while LPS corals are generally easy to care for, there are some potential challenges that beginners may encounter. By monitoring your coral’s sweeper tentacles, lighting, flow, and nutrient levels, you can help ensure the health and longevity of your LPS coral.

Frequently Asked Questions

What is the easiest LPS coral?

For beginners, the easiest LPS coral to keep is the hammer coral. They are hardy and can tolerate a range of water parameters. Hammer corals also come in a variety of colors, making them a popular choice for beginner reef keepers.

What is the best starter coral?

The best starter coral for beginners is the mushroom coral. They are easy to care for and can thrive in a wide range of lighting and water conditions. Mushroom corals also come in a variety of colors and shapes, making them a great addition to any reef tank.

What corals should beginners avoid?

Beginners should avoid corals that require specific water parameters or intense lighting. This includes SPS corals, which require high lighting and stable water conditions. Other corals to avoid include those that are known to be difficult to keep, such as the Acropora coral.

Are LPS corals hard to keep?

LPS corals are generally considered to be easier to keep than SPS corals. However, they still require stable water conditions and proper lighting. It is important to research the specific needs of each LPS coral species before adding them to a reef tank.

What are some easy corals for beginners?

In addition to hammer and mushroom corals, other easy corals for beginners include the torch coral, frogspawn coral, and candy cane coral. These corals are hardy and can tolerate a range of water conditions.

What are the types of LPS corals?

There are several types of LPS corals, including brain corals, open brain corals, trumpet corals, and bubble corals. Each type has its own specific care requirements, so it is important to research the needs of each species before adding them to a reef tank.

old tank syndrome

Saltwater Old Tank Syndrome: Causes and Solutions

Old Tank Syndrome (OTS) is a condition that can occur in saltwater aquariums. It is a term that describes the gradual decline in the health of a reef tank over time. This decline can be attributed to a variety of factors, including poor water quality, inadequate maintenance, and overcrowding.

Understanding Old Tank Syndrome is key to preventing it. One of the main causes of OTS is the buildup of nitrates and other waste products in the water. This can lead to a drop in pH levels and a decrease in oxygen levels, which can be harmful to the inhabitants of the tank. It is important to regularly test the water in the tank to ensure that the levels of nitrates and other waste products are within acceptable limits.

Role of Aquarium Maintenance is crucial in preventing Old Tank Syndrome. Regular water changes, cleaning the tank, and maintaining the equipment are all important aspects of maintaining a healthy saltwater aquarium. Neglecting these tasks can lead to the buildup of waste products and other harmful substances in the water, which can lead to the onset of OTS.

Key Takeaways

  • Old Tank Syndrome is a condition that can occur in saltwater aquariums due to a variety of factors.
  • Understanding OTS, regular maintenance, and monitoring water quality can help prevent the onset of this condition.
  • Regular water changes, cleaning the tank, and maintaining equipment are all crucial in preventing Old Tank Syndrome.

Understanding Old Tank Syndrome

Old Tank Syndrome (OTS) is a condition that commonly occurs in saltwater aquariums that have been established for a long time. It is characterized by a decline in water quality, which can lead to a range of problems for the fish and other marine life in the tank.

Recognizing Symptoms

The symptoms of OTS can be easy to miss, as they often develop gradually over time. However, there are a few key signs that can indicate that your tank is experiencing this condition. One of the most common symptoms is a buildup of nitrates in the water. This can cause the water to become cloudy and can also lead to algae growth on the walls of the tank. Other symptoms may include a drop in pH levels, which can make the water more acidic, and an increase in ammonia or phosphate levels.

Causes and Effects

There are several factors that can contribute to the development of OTS. One of the main causes is a buildup of waste and other organic matter in the tank. This can occur if the tank is overstocked or if the filtration system is not working properly. Another factor that can contribute to OTS is a lack of water changes. Over time, the water in the tank can become depleted of essential minerals and trace elements, which can lead to a decline in water quality.

The effects of OTS can be serious and can include the death of fish and other marine life in the tank. In addition, the condition can be difficult to treat once it has developed. However, there are steps that can be taken to prevent OTS from occurring in the first place. These include regular water changes, maintaining proper pH and nitrate levels, and ensuring that the tank is not overstocked.

Overall, it is important for saltwater aquarium owners to be aware of the symptoms and causes of OTS in order to prevent this condition from developing in their tanks. By taking steps to maintain proper water quality and regularly monitoring the health of the tank, it is possible to prevent OTS and ensure that the marine life in the tank remains healthy and thriving.

Role of Aquarium Maintenance

Importance of Regular Cleaning

When it comes to maintaining a saltwater aquarium, regular cleaning is crucial to ensure the health and well-being of the fish and other marine creatures living in the tank. Neglecting the aquarium maintenance can lead to the buildup of harmful substances like nitrate and ammonia, which can cause Old Tank Syndrome.

To prevent Old Tank Syndrome, it is necessary to perform regular cleaning of the aquarium. This includes cleaning the aquarium walls, substrate, and decorations, as well as removing any uneaten food or debris. A good way to keep track of the cleaning schedule is to create a checklist and follow it regularly.

Water Change Practices

One of the most important aspects of aquarium maintenance is performing regular water changes. This helps to maintain the water quality and keep the water parameters within acceptable limits for the marine life.

Partial water changes are recommended, as they help to remove any accumulated waste and pollutants from the water. It is recommended to perform partial water changes every two weeks, or as necessary, depending on the size of the aquarium and the number of inhabitants.

In addition to regular water changes, it is important to perform water tests to monitor the water quality and ensure that the water parameters are within acceptable limits. This includes testing for pH, ammonia, nitrate, nitrite, and salinity levels.

Overall, regular aquarium maintenance and water change practices are essential to prevent Old Tank Syndrome and ensure the health and well-being of the marine life in the saltwater aquarium.

Aquarium Inhabitants and OTS

Old Tank Syndrome can have a significant impact on the health and well-being of the inhabitants of a saltwater aquarium. This section will discuss the effects of OTS on fish, invertebrates, and corals.

Effects on Fish and Invertebrates

OTS can cause a decline in water quality, which can negatively affect the health of fish and invertebrates. High levels of nitrates and phosphates can lead to algae overgrowth, which can cause oxygen depletion and create an unhealthy environment for fish and invertebrates. In addition, OTS can cause a build-up of heavy metals, which can be toxic to fish and invertebrates.

New fish added to an aquarium suffering from OTS may be more susceptible to disease and stress due to the poor water quality. Invertebrates may also be negatively affected by OTS, as they are more sensitive to changes in water chemistry.

Impact on Corals

Large corals and live rock can help to mitigate the effects of OTS by serving as biological filters. However, OTS can still have a negative impact on corals. As the water quality declines, corals may become stressed and lose their coloration. In severe cases, corals may die.

OTS can also lead to the growth of nuisance algae, which can outcompete corals for space and nutrients. This can lead to a decline in the health and growth of corals.

In conclusion, OTS can have a significant impact on the health and well-being of the inhabitants of a saltwater aquarium. It is important to maintain good water quality and to regularly monitor and adjust water parameters to prevent the onset of OTS.

Preventing Old Tank Syndrome

Old Tank Syndrome is a condition that can be prevented with proper maintenance of the saltwater tank. Here are some tips to prevent Old Tank Syndrome:

Proper Filtration

One of the most important factors in preventing Old Tank Syndrome is proper filtration. A good filtration system will help remove harmful substances from the water, such as excess nutrients, fish waste, and uneaten food. A protein skimmer is an excellent tool for removing organic waste from the water. It works by creating bubbles that attract organic waste, which is then removed from the water. Additionally, using filter media like activated carbon can help purify the water by removing impurities and toxins.

Maintaining Water Flow and Oxygen Levels

Maintaining proper water flow and oxygen levels is also essential in preventing Old Tank Syndrome. A powerhead or wavemaker can help create water flow, which is necessary for the health of corals and other invertebrates. Additionally, proper oxygen levels can be maintained by using an air stone or air pump. This will help oxygenate the water and prevent the buildup of harmful substances.

Regular water changes are also important in preventing Old Tank Syndrome. Changing 10-20% of the water every two weeks can help remove excess nutrients and other harmful substances from the water. It is also important to monitor the water parameters regularly and adjust the filtration system accordingly.

In conclusion, preventing Old Tank Syndrome in a saltwater tank requires proper filtration, maintaining water flow and oxygen levels, and regular water changes. By following these tips, saltwater tank owners can maintain a healthy and thriving aquatic environment for their fish and other aquatic life.

Conclusion

Old Tank Syndrome is a common problem that many saltwater aquarists face. It is caused by a buildup of organic waste in the aquarium environment, which can lead to high levels of nitrate and phosphate. This can cause a variety of problems, including algae growth, coral bleaching, and fish disease.

Prevention is the key to avoiding Old Tank Syndrome. Maintaining a diverse ecosystem is essential, as it can help to keep the nitrogen cycle in balance. This means having a variety of fish and invertebrates, as well as live rock and sand. In addition, regular water changes and proper filtration can help to remove excess nutrients from the water.

The lazy aquarist is often the one who falls victim to Old Tank Syndrome. Neglecting regular maintenance and water changes can lead to a buildup of organic load in the aquarium, which can cause a variety of problems. It is important to stay on top of maintenance and keep the aquarium environment clean and healthy.

In conclusion, Old Tank Syndrome is a preventable problem that can be avoided with proper care and maintenance. By maintaining a diverse ecosystem, staying on top of maintenance, and keeping the nitrogen cycle in balance, saltwater aquarists can avoid the problems associated with Old Tank Syndrome and enjoy a healthy and thriving aquarium.

Frequently Asked Questions

What are the signs of an unhealthy saltwater tank?

There are several signs that indicate an unhealthy saltwater tank. Some of the common signs include cloudy water, algae growth, bad odor, and fish behaving abnormally. If you notice any of these signs, it is important to take immediate action to prevent further damage to your saltwater tank.

What steps can be taken to prevent old tank syndrome?

To prevent old tank syndrome, it is important to maintain a regular water change schedule. It is recommended to change 10-20% of the water every two weeks. Additionally, it is important to avoid overfeeding the fish and to monitor the water parameters regularly. It is also important to keep the tank clean and to remove any uneaten food or debris.

How can you tell if your saltwater tank has old tank syndrome?

The most common sign of old tank syndrome is a sudden decline in water quality. This can be indicated by high levels of nitrates, phosphates, and other pollutants. Other signs include fish behaving abnormally, algae growth, and bad odor.

What are some common causes of saltwater tank problems?

Some common causes of saltwater tank problems include overfeeding, inadequate filtration, and poor water quality. Other factors that can contribute to saltwater tank problems include overcrowding, improper lighting, and excessive algae growth.

How long does it take for old tank syndrome to develop?

Old tank syndrome can develop over time, typically after several months or years of neglecting proper tank maintenance. However, it is important to note that the timeline can vary depending on the size of the tank, the number of fish, and other factors that can affect water quality.

What is the best way to treat a saltwater tank with old tank syndrome?

The best way to treat a saltwater tank with old tank syndrome is to perform a series of large water changes to remove pollutants and restore water quality. It is also important to clean the tank thoroughly and to remove any uneaten food or debris. Additionally, it may be necessary to add beneficial bacteria supplements to help restore the tank’s natural balance.

Buying Coral Online: Tips and Recommendations

If you’re a reef tank enthusiast, you know that corals are the cornerstone of your aquarium’s ecosystem. However, finding the perfect coral in your local pet store can be challenging. That’s why buying coral online has become increasingly popular. Not only does it offer a wider selection of corals, but it also allows you to purchase them from reputable vendors across the country.

When it comes to buying coral online, it’s crucial to do your research first. You want to make sure you’re purchasing from a reliable and trustworthy source. Fortunately, there are many reputable online coral vendors that offer a diverse range of corals, from softies to SPS. At Sunnyside corals we provide detailed descriptions of each coral, including its care requirements and photos of the actual coral you’ll receive.Fortunately this is also typical of most vendors. This way, you can make an informed decision and find the perfect coral for your tank.

Benefits of Buying Coral Online

When it comes to buying coral, there are many benefits to shopping online. Here are some of the advantages of buying coral online:

Wide Selection

Online coral stores often have a much wider selection than local fish stores. They can offer a variety of coral species, colors, and sizes. This means that you have more options to choose from and can find the perfect coral for your reef tank.

Convenience

Shopping for coral online is convenient because you can do it from the comfort of your own home. You don’t have to worry about driving to a local store, finding parking, and dealing with crowds. Plus, online stores are usually open 24/7, so you can shop whenever it’s convenient for you.

Competitive Pricing

Online coral stores often offer competitive pricing because they don’t have the overhead costs of a physical store. This means that you can often find great deals on high-quality coral. 

Quality Assurance

Reputable online coral stores often have strict quality assurance measures in place. This means that you can be confident that the coral you receive will be healthy and free from disease. At Sunnyside Corals we have several processes in place to ensure the health of our coral before it enters our systems as well as while it’s in our care. These processes allow us to be sure that we are delivering the best possible product. 

Expert Advice

Many online coral stores have experts on staff who can offer advice and answer any questions you may have about caring for your coral. This can be especially helpful if you are new to reef keeping or are unsure about which coral species to choose. 

Overall, buying coral online can be a great option for those looking for a wide selection, competitive pricing, convenience, quality assurance, and expert advice.

Factors to Consider Before Buying Coral Online

When it comes to buying coral online, there are several factors to consider to ensure that you get the best possible experience. In this section, we will discuss some of the most important factors to consider before making a purchase.

Types of Coral Available Online

One of the most significant advantages of buying coral online is the wide variety of species and types available. From soft corals to hard corals, there are many different types of coral to choose from. Before making a purchase, it’s essential to research the different types of coral available to ensure that you get the right species for your aquarium. 

Seller Reputation

The reputation of the seller is an important factor to consider when buying coral online. It’s essential to choose a reputable seller with a history of providing high-quality coral. You can research the seller’s reputation by reading reviews and asking for recommendations from other aquarium hobbyists.

Shipping and Handling

Shipping and handling are crucial factors to consider when buying coral online. Coral is a delicate organism that requires careful handling to ensure that it arrives in good condition. It’s important to choose a seller that uses high-quality packaging materials and has experience shipping coral.

Pricing

Pricing is another important factor to consider when buying coral online. While it’s essential to find a good deal, it’s important not to sacrifice quality for price. It’s important to research the market price of the coral you want to buy to ensure that you’re getting a fair price.

In conclusion, buying coral online can be a great way to expand your aquarium’s diversity. However, it’s essential to consider factors such as the types of coral available, the seller’s reputation, shipping and handling, and pricing to ensure that you get the best possible experience.

How to Buy Coral Online

If you’re new to buying coral online, it can be overwhelming to navigate through the many online stores and select the right coral for your tank. Here’s a simple guide on how to buy coral online.

Research and Compare Online Coral Stores

The first step in buying coral online is to research and compare online coral stores. There are many online stores that sell coral, so it’s important to find a reputable store that offers high-quality coral and good customer service. Look for online reviews and ratings to help you find a reliable store.

Compare the prices of the coral you’re interested in across different online stores. Make sure to also check the shipping costs and policies of each store.

Selecting the Right Coral

Once you’ve found a reputable online store, it’s time to select the right coral for your tank. Consider the following factors:

  • Compatibility with your tank: Make sure the coral you’re interested in is compatible with your tank’s water parameters and lighting.
  • Size: Consider the size of the coral and whether it will fit in your tank.
  • Color and appearance: Choose a coral that matches your aesthetic preferences.

After you’ve selected the right coral, it’s time to place your order!

Tips for Maintaining Your Online-Purchased Coral

When it comes to maintaining your online-purchased coral, there are several things you need to keep in mind. In this section, we will discuss the acclimation process, lighting and water quality, as well as feeding and nutrient requirements.

Acclimation Process

Acclimation is an important step in ensuring the health and survival of your new coral. Here are some tips to follow during the acclimation process:

  • Slowly acclimate the coral to your tank’s water temperature by floating the bag in the tank for at least 15 minutes.
  • Gradually add small amounts of your tank water to the bag over the course of an hour or two.
  • Use a coral dip to help prevent the introduction of any unwanted pests or diseases.

For a more detailed guide check out our Acclimation Process Guide here. 

Lighting and Water Quality

Proper lighting and water quality are essential for the growth and survival of our coral. Here are some things to keep in mind:

  • Make sure your lighting is appropriate for the type of coral you have purchased. Some corals require high-intensity lighting, while others require less.
  • Test your water regularly to ensure that the pH, salinity, and nutrient levels are within the appropriate range for your coral.
  • Consider using a protein skimmer to help remove excess nutrients from your tank’s water.

For a more detailed guide check our tank lighting post. 

Feeding and Nutrient Requirements

Feeding our coral is important to ensure that they receive the nutrients they need to grow and thrive. Here are some tips to follow:

  • Research the specific feeding requirements of your coral. Some corals require regular feedings, while others do not.
  • Feed your coral a variety of foods, such as phytoplankton and zooplankton, to ensure that they receive a balanced diet.
  • Do not overfeed your coral, as this can lead to excess nutrient levels in your tank’s water.

For more information on different types of coral and their necessary care, check out our category pages.

By following these tips, we can help ensure the health and survival of our online-purchased coral. Remember to always research the specific needs of your coral and make adjustments as necessary to provide the best possible environment for them to thrive in.

Torch with Clown fish

Saltwater Fish for Beginners: A Guide to Starting Your Own Aquarium

Are you interested in starting a saltwater aquarium but don’t know where to begin? We understand how overwhelming it can be to navigate the world of saltwater fish as a beginner. That’s why we’ve put together this article to help you get started with the best saltwater fish for beginners.

When it comes to saltwater fish, there are a variety of species to choose from, each with their own unique characteristics and care requirements. As a beginner, it’s important to choose fish that are easy to care for and won’t require a lot of maintenance. In this article, we’ll introduce you to some of the best saltwater fish for beginners, including their characteristics, care requirements, and tips for keeping them happy and healthy. With this information, you’ll be able to confidently choose the right fish for your saltwater aquarium and enjoy watching them thrive.

Choosing the Right Saltwater Fish

When it comes to choosing the right saltwater fish for your aquarium, there are several factors to consider. We need to think about the fish’s temperament, diet, tank size, and compatibility with other fish. In this section, we’ll discuss some of the best beginner, colorful, hardy, peaceful, and aggressive saltwater fish.

Beginner Saltwater Fish

For beginners, it’s best to start with hardy and easy-to-care-for fish. Ocellaris Clownfish, Blue-Green Chromis, and Royal Gramma are excellent choices. These fish are relatively hardy and can tolerate a wide range of water conditions. They are also easy to feed and can live in smaller tanks.

Colorful Saltwater Fish

If you’re looking for colorful fish to add to your aquarium, there are several options to choose from. Flame Angelfish, Mandarin Dragonet, and Yellow Tang are all beautiful and vibrant fish. However, they can be a bit more challenging to care for and require a larger tank.

Hardy Saltwater Fish

If you’re worried about your fish surviving the cycling process or any water parameter fluctuations, there are many hardy saltwater fish that can adapt well. Green Chromis, Yellow Coris Wrasse, and Chalk Bass are all hardy fish that can handle a range of water conditions.

Peaceful Saltwater Fish

For a peaceful aquarium, it’s best to choose fish that are not too aggressive. Banggai Cardinalfish, Clown Goby, and Pajama Cardinalfish are all peaceful fish that can live with other fish in a community tank. They are also relatively easy to care for and can live in smaller tanks.

Aggressive Saltwater Fish

If you’re looking for a more aggressive fish to add to your aquarium, there are several options, but it is important to remember that these fish require large tanks and specific tank mates. Blue Neon Goby, Striped Fang Blenny, and Yellow Watchman Goby are all aggressive fish that can be kept in larger tanks with other aggressive fish.

In conclusion, choosing the right saltwater fish for your aquarium requires careful consideration of several factors. We need to think about the fish’s temperament, diet, tank size, and compatibility with other fish. By following these guidelines and doing proper research, we can create a thriving and beautiful saltwater aquarium.

Feeding Your Saltwater Fish

Feeding your saltwater fish is an important part of keeping them healthy and happy. Different fish have different dietary needs, so it’s important to know what type of fish you have and what they need to eat.

Carnivores

Carnivorous fish, such as lionfish and groupers, need a diet that is high in protein. They typically eat other fish, crustaceans, and mollusks in the wild. In captivity, you can feed them a variety of foods, including:

  • Krill
  • Mysis shrimp
  • Brine shrimp
  • Frozen or live feeder fish
  • Pellets or flakes designed for carnivorous fish

When feeding carnivorous fish, it’s important not to overfeed them, as this can lead to health problems and water quality issues.

Herbivores

Herbivorous fish, such as tangs and rabbitfish, need a diet that is high in plant matter. They typically eat algae and other plant material in the wild. In captivity, you can feed them a variety of foods, including:

  • Algae sheets
  • Blanched vegetables, such as zucchini and spinach
  • Pellets or flakes designed for herbivorous fish

It’s important to provide herbivorous fish with plenty of plant matter to keep them healthy and prevent them from becoming malnourished.

Omnivores

Omnivorous fish, such as clownfish and angelfish, eat a combination of plant and animal matter in the wild. In captivity, you can feed them a variety of foods, including:

  • Pellets or flakes designed for omnivorous fish
  • Frozen or live brine shrimp
  • Mysis shrimp
  • Krill
  • Algae sheets

It’s important to provide omnivorous fish with a balanced diet that includes both plant and animal matter.

In conclusion, feeding your saltwater fish requires an understanding of their dietary needs. By providing your fish with a balanced diet that meets their nutritional needs, you can help ensure that they stay healthy and happy. Remember to feed your fish in moderation and avoid overfeeding, as this can lead to health problems and water quality issues.

Firefish
Scopas Tang

Saltwater Fish for Beginners

If you’re just starting out with saltwater fishkeeping, it can be overwhelming to decide which fish to choose for your aquarium. We’ve compiled a list of popular saltwater fish for beginners, along with some basic information about each fish to help you make an informed decision.

Clownfish

Clownfish are a popular choice for beginners due to their hardiness and ease of care. They come in a variety of colors and patterns, such as the ocellaris clownfish (also known as the false percula clownfish or common clownfish), which is one of the most popular and easiest marine fish to have in an aquarium. These fish are relatively small and can be kept in smaller tanks, making them a great choice for beginners.

Damsel Fish

Damsel fish are another popular choice for beginners due to their hardiness and ease of care. They come in a variety of colors and patterns and are relatively small, making them a great choice for smaller tanks. However, it’s important to note that some species of damsel fish can be quite aggressive and territorial, so it’s important to research the specific species before adding them to your tank.

Gobies

Gobies are a popular choice for beginners due to their peaceful nature and small size. They come in a variety of colors and patterns and are known for their unique behaviors, such as the pistol shrimp and goby pair, where the shrimp and goby form a symbiotic relationship. Some popular species of gobies for beginners include the yellow watchman goby, diamond goby, and neon blue goby.

Cardinalfish

Cardinalfish are a peaceful and easy-to-care-for fish that come in a variety of colors and patterns. They are relatively small and can be kept in smaller tanks, making them a great choice for beginners. Some popular species of cardinalfish for beginners include the pajama cardinalfish and the banggai cardinalfish.

Tangs

Tangs are a popular choice for beginners due to their bright colors and unique shapes. They come in a variety of colors and patterns and are known for their active swimming behavior. However, it’s important to note that some species of tangs can grow quite large and require a larger tank. Some popular species of tangs for beginners include the yellow tang and the blue tang.

Blennies

Blennies are a peaceful and easy-to-care-for fish that come in a variety of colors and patterns. They are relatively small and can be kept in smaller tanks, making them a great choice for beginners. Some popular species of blennies for beginners include the bicolor blenny and the lawnmower blenny.

Wrasses

Wrasses are a popular choice for beginners due to their bright colors and unique shapes. They come in a variety of colors and patterns and are known for their active swimming behavior. Some popular species of wrasses for beginners include the six line wrasse and the yellow coris wrasse.

Angelfish

Angelfish are a popular choice for beginners due to their unique shapes and bright colors. They come in a variety of colors and patterns and can be quite hardy if kept in the right conditions. Some popular species of angelfish for beginners include the flame angelfish and the coral beauty angelfish.

Hawkfish

Hawkfish are a peaceful and easy-to-care-for fish that come in a variety of colors and patterns. They are relatively small and can be kept in smaller tanks, making them a great choice for beginners. Some popular species of hawkfish for beginners include the longnose hawkfish and the flame hawkfish.

Dottybacks

Dottybacks are a popular choice for beginners due to their hardiness and ease of care. They come in a variety of colors and patterns and are relatively small, making them a great choice for smaller tanks. Some popular species of dottybacks for beginners include the orchid dottyback and the neon dottyback.

While there are many popular saltwater fish for beginners to choose from, it’s important to research each species before adding them to your tank to ensure that they are compatible with your other fish and the conditions in your tank. With the right care and attention, these fish can provide years of enjoyment and beauty in your aquarium.

Tank Mates for Your Saltwater Fish

When it comes to setting up a saltwater aquarium, choosing the right tank mates is crucial. The right combination of fish can help create a beautiful and harmonious underwater environment. In this section, we will discuss the different types of saltwater fish that make good tank mates and how to pair them.

Pairing Saltwater Fish

Pairing saltwater fish involves selecting two fish that will coexist peacefully in the same tank. Some popular pairings include:

  • Clownfish and damselfish
  • Gobies and blennies
  • Angelfish and tangs

When pairing saltwater fish, it’s important to consider their size, temperament, and dietary needs. It’s also a good idea to introduce both fish to the tank at the same time to reduce aggression.

Schooling Saltwater Fish

Schooling saltwater fish are those that live in groups of three or more. These fish are often more social and active than solitary fish. Some popular schooling fish include:

  • Anthias
  • Chromis
  • Cardinalfish

When adding schooling fish to your tank, it’s important to provide enough space for them to swim and hide. You should also avoid overcrowding the tank, as this can lead to stress and aggression.

Non-Aggressive Saltwater Fish

Non-aggressive saltwater fish are those that are peaceful and unlikely to cause problems with other fish in the tank. Some popular non-aggressive fish include:

  • Firefish
  • Royal Gramma
  • Yellow Watchman Goby

When adding non-aggressive fish to your tank, it’s important to consider their size and dietary needs. You should also avoid adding aggressive fish to the tank, as this can lead to conflict.

Reef-Safe Saltwater Fish

Reef-safe saltwater fish are those that are unlikely to harm coral or other invertebrates in the tank. Some popular reef-safe fish include:

  • Clownfish
  • Tangs
  • Blennies

When adding reef-safe fish to your tank, it’s important to consider their size and dietary needs. You should also avoid adding fish that are known to eat coral or other invertebrates.

Aggressive Saltwater Fish

Aggressive saltwater fish are those that are likely to cause problems with other fish in the tank. Some popular aggressive fish include:

  • Triggerfish
  • Lionfish
  • Groupers

When adding aggressive fish to your tank, it’s important to provide enough space for them to swim and hide. You should also avoid adding other aggressive fish to the tank, as this can lead to conflict.

In summary, choosing the right tank mates for your saltwater fish is crucial for creating a harmonious underwater environment. When selecting fish, it’s important to consider their size, temperament, and dietary needs. By following these guidelines, you can create a beautiful and thriving saltwater aquarium.

Conclusion

In conclusion, we hope this article has provided you with valuable information on selecting the best saltwater fish for beginners. We understand that starting a saltwater aquarium can be challenging, but with the right knowledge, you can create a beautiful and thriving underwater world.

When selecting fish for your aquarium, it is important to consider their temperament, size, and compatibility with other fish. We recommend starting with peaceful fish that are easy to care for, such as Ocellaris Clownfish, Blue-Green Chromis, and Starry Blenny.

It is also important to maintain optimal water quality, temperature, salinity, pH, lighting, and filtration to ensure the health and well-being of your fish. Regular water changes and testing of water parameters are crucial in maintaining a healthy environment for your fish.

We encourage you to do further research and consult with experts to ensure the success of your saltwater aquarium. Remember, patience and dedication are key in creating a beautiful and thriving underwater world. Happy fishkeeping!

Frequently Asked Questions

What saltwater fish to start with?

Most of the time, the best saltwater fish for beginners include inexpensive and hardy fish such as; damselfish, clownfish, and chromis.

How long should a saltwater tank run before adding fish?

You’ll want to allow for a least six weeks for your tank to cycle before purchasing all the fish you want. Only add fish a few at a time to not overwhelm your tanks system

What saltwater fish can go together in a tank?

This varies from tank to tank, but there are a few fish that are known to be peaceful. Clownfish, Royal Gamma, Gobies, etc.

How many saltwater fish can I put in a 55 gallon tank?

a 55-gallon aquarium would best house only about 12 inches of fish, so to be safe, limit it to holding three 4-inch fish or two 6-inch long fish. A vast majority of reef fishes require a “house” or someplace to hide either to sleep or to retreat to when they feel threatened.

Aiptasia: The Unwanted Pest in Your Aquarium

Aiptasia is a type of sea anemone that can cause problems for those who keep saltwater aquariums. These anemones are known for their ability to reproduce rapidly and for their tendency to compete with other corals for food. Additionally, they can sting their neighbors and be very difficult to eradicate once they have established themselves in a tank.

Despite their small size, Aiptasia can have a big impact on the health of a saltwater aquarium. They can spread quickly and take over a tank, causing damage to other corals and even killing them. Because of this, it is important for aquarium owners to be able to recognize and deal with Aiptasia infestations quickly and effectively.

There are several methods that can be used to eliminate Aiptasia from a tank, including chemical treatments and manual removal. However, prevention is often the best approach. By taking steps to maintain a healthy and balanced aquarium environment, owners can reduce the risk of Aiptasia infestations and keep their tanks looking beautiful and thriving.

-What is Aiptasia?

-How to Identify Aiptasia

-Methods of Aiptasia Control

-Preventing Aiptasia Infestations

What is Aiptasia?

Aiptasia is a type of invasive sea anemone that is commonly found in saltwater aquariums. It is known for its fast-spreading nature and aggressive behavior, making it a common pest among aquarium enthusiasts. Aiptasia anemones can be identified by their long, stinging tentacles and clear or brownish body coloration.

There are around a dozen species of Aiptasia, all of which can cause problems in a saltwater aquarium. They are opportunistic creatures that can quickly monopolize a tank, competing for food and space with other corals and organisms. Aiptasia can also sting their neighbors, causing damage to other creatures in the aquarium.

It is important to remove Aiptasia as soon as it is detected in an aquarium to prevent infestations. Removal methods can include physical removal, chemical treatments, and biological control.

How to Identify Aiptasia

Aiptasia is a type of sea anemone that is commonly found in saltwater aquariums. They are known for their ability to reproduce rapidly and can quickly become a pest if left unchecked. Here are some ways to identify Aiptasia:

Physical Characteristics

Aiptasia looks like a small yellow, brown, or colorless coral. It has a stalk with a head like a sunflower with tentacles coming out. They can first appear small but grow to over 2″ tall. Once mature they can reproduce rapidly as they move and leave tissue behind to grow into another stalk.

These opportunistic anemones can be identified by their resemblance to miniature palm trees, with a polyp body and an oral disc bordered by tentacles. There are many different species of Aiptasia; some varieties are transparent, while others are mostly light brown or tan in color, ranging in size from a few centimeters to a few inches.

Behavior

Aiptasia is known for its aggressive behavior and can sting other corals in the aquarium. They are opportunistic feeders and can consume small organisms like copepods and amphipods. They are also known to consume leftover food and other organic matter in the aquarium.

Aiptasia can reproduce both sexually and asexually. They can release eggs and sperm into the water column, which will fertilize and create larvae. The larvae will settle on a surface and create a new Aiptasia colony. They can also reproduce asexually by budding, where a new Aiptasia polyp will grow from the parent polyp.

It is important to identify Aiptasia early on and take action to prevent them from spreading in the aquarium. Aiptasia can be difficult to remove once established, so it is best to take preventative measures such as quarantining new corals and monitoring the aquarium for signs of Aiptasia.

Methods of Aiptasia Control

Aiptasia, also known as glass anemones, can quickly become a nuisance in a reef aquarium. Fortunately, there are several methods for controlling and eliminating these pests.

Natural Predators

One effective method for controlling Aiptasia is to introduce natural predators into the aquarium. Peppermint shrimp, hermit crabs, and sea slugs from the Berghia genera are all known to feed on Aiptasia. These invertebrates can be a great option for those who prefer natural and chemical-free methods of control.

Chemical Treatments

There are several chemical treatments available for eliminating Aiptasia. Products such as Aiptasia X from Red Sea, Joe’s Juice, and the Majano Wand are designed specifically for this purpose. These products work by killing the Aiptasia on contact. However, they may require multiple applications to fully eliminate the infestation.

Physical Removal

Physical removal of Aiptasia can be done using a variety of methods. One method involves injecting scalding hot RO water into the polyp with a hypodermic needle. Lemon juice may also be used to inject the Aiptasia. Another method involves using a tool such as the Majano Wand to physically remove the Aiptasia from the aquarium.

Electrical Methods

Electrical methods can also be effective for eliminating Aiptasia. The use of a low voltage electrical current can kill the Aiptasia without harming other inhabitants in the aquarium. However, this method should only be attempted by experienced aquarists.

Biological Treatments

Biological treatments involve the use of beneficial bacteria to eliminate Aiptasia. One such product is called Aiptasia-Eating Filefish. These fish are known to feed on Aiptasia and can be a great addition to a reef aquarium. However, it is important to note that these fish may also eat other types of polyps and should be used with caution.

Preventing Aiptasia Infestations

Quarantine Procedures

One of the most effective ways to prevent an aiptasia infestation is to quarantine all new corals and invertebrates before introducing them to the main tank. This allows you to inspect them for any signs of aiptasia or other pests before they have a chance to spread.

When quarantining new specimens, it is important to keep them in a separate tank or container that is free of aiptasia and other pests. The water in the quarantine tank should also be free of any contaminants or pollutants that could harm the new arrivals.

Quarantine periods can vary depending on the size and type of the specimen, but a minimum of two weeks is recommended to ensure that any pests or diseases are identified and treated before introducing the new arrivals to the main tank.

Proper Tank Maintenance

Proper tank maintenance is also crucial in preventing aiptasia infestations. This includes regular water changes, maintaining proper water chemistry, and ensuring that any new additions to the tank are thoroughly cleaned and inspected before being introduced.

It is also important to remove any dead or dying coral or invertebrates from the tank as soon as possible, as these can attract pests and contribute to poor water quality.

In addition, it is recommended to avoid overfeeding the tank, as excess food can contribute to poor water quality and create a breeding ground for pests like aiptasia.

By following these quarantine procedures and maintaining proper tank maintenance, hobbyists can significantly reduce the risk of aiptasia infestations in their reef tanks.

FAQ’s

Here are some frequently asked questions about aiptasia:

What is aiptasia?

Aiptasia is an invasive species of coral that is one of the most common pests in a saltwater aquarium. It can spread rapidly, compete against other corals for food, sting its neighbors, and can be very tough to eradicate. Removal when it first appears is the best chance to prevent infestations.

How do you identify aiptasia?

Aiptasia can be identified by its long, thin, translucent tentacles and its tube-like body. It can be difficult to spot because it can blend in with live rock and other corals. Aiptasia can also reproduce quickly, so it is important to remove it as soon as possible.

What are some natural ways to control aiptasia?

There are several natural ways to control aiptasia, including introducing aiptasia-eating organisms like peppermint shrimp, filefish, and butterflyfish into the aquarium. Another natural method is to use aiptasia-killing products like lemon juice, vinegar, or boiling water. However, caution should be exercised when using these methods as they can harm other inhabitants of the aquarium.

What are some chemical methods to control aiptasia?

Chemical methods to control aiptasia include using products like Aiptasia-X, JoesJuice, and Kalkwasser paste. These products are specifically designed to kill aiptasia without harming other inhabitants of the aquarium. However, it is important to follow the instructions carefully and to avoid overdosing the aquarium.

How can aiptasia be prevented?

Aiptasia can be prevented by practicing good aquarium maintenance, including regular water changes, cleaning the aquarium equipment, and avoiding overfeeding. Quarantining new additions to the aquarium can also help prevent the introduction of aiptasia and other pests.

Torch Coral

Can Torch Corals Touch? What You Need to Know

Torch corals are a popular addition to many saltwater aquariums. These corals are known for their long, flowing tentacles that sway in the current, creating a mesmerizing effect. However, many aquarium owners wonder if it is safe for torch corals to touch and be kept together, or if they need to be kept separate from each other and other corals.

According to experts, torch corals can be kept together in the same aquarium, but it is important to provide them with enough space to spread out. It is recommended to keep them separate from other corals in the aquarium and allow plenty of space between different species, including other Euphyllia species. This is because torch corals are sometimes known to cause chaos inside aquariums.

In addition to providing enough space, it is important to ensure that torch corals have the right water parameters. By following general guidelines, aquarium owners can successfully keep torch corals in their aquariums and enjoy their beautiful, swaying tentacles.

-Understanding Corals

-Torch Corals

-Effects of Torch Corals Touching

-Preventing Damage

Blue Tip Indo Gold Torch - Cut To Order
Pink Tip Green Center Torch

Torch Corals

Torch corals, also known as Euphyllia glabrescens, are a popular choice for reef aquarium enthusiasts due to their vibrant colors and unique appearance. They are a large polyp stony (LPS) coral that can grow up to 12 inches in length and have long, flowing tentacles that move gracefully in the water.

Characteristics

Torch corals are known for their bright, fluorescent colors, which can range from green to pink to orange. They have a hard, calcified skeleton that provides them with structure and protection. Their tentacles are equipped with stinging cells called nematocysts, which they use to capture prey.

One interesting characteristic of torch corals is that they can retract their tentacles into their body when they feel threatened or stressed. This is a defense mechanism that allows them to protect themselves from predators or other corals that may be encroaching on their space.

Care Requirements

When it comes to caring for torch corals, there are a few things to keep in mind. First and foremost, they require a moderate to high level of light, as they are photosynthetic and rely on light to produce energy. They also require a moderate level of water flow, as stagnant water can lead to algae growth and other issues.

It is important to note that torch corals can be aggressive towards other corals, and may sting neighboring corals if they come into contact. As such, it is recommended to keep them separate from other corals in the aquarium, and allow plenty of space between different species.

In terms of feeding, torch corals are primarily photosynthetic, but they can also benefit from supplemental feeding. They can be fed small pieces of meaty foods, such as brine shrimp or mysis shrimp, once or twice a week.

Overall, torch corals are a beautiful and fascinating addition to any reef aquarium. With proper care and attention, they can thrive and provide years of enjoyment for their owners.

Torch with Clown fish

Effects of Torch Corals Touching 

Physical Damage

When two torch corals touch each other, they can cause physical damage to each other. The long stinging tentacles of the torch coral can touch and damage the tissue of the neighboring coral. This can lead to tissue necrosis, which can be fatal for the coral. If the corals are too close to each other, they can also compete for space and light, which can further stress them and cause damage.

It is important to ensure that torch corals are placed at a safe distance from each other to prevent physical damage. If the corals are already touching, they should be carefully separated to prevent further damage.

Chemical Interactions

Torch corals can also have chemical interactions when they touch each other. They release chemicals that can be harmful to other corals, especially if they are different species. This can lead to a phenomenon known as chemical warfare, where corals release toxins to compete for space and resources.

It is important to keep torch corals at a safe distance from other corals to prevent chemical interactions. If torch corals are placed too close to other corals, they can release toxins that can harm the other corals. It is also important to avoid placing torch corals next to sensitive corals such as SPS or LPS corals.

In summary, torch corals touching each other can lead to physical damage and chemical interactions that can be harmful to the corals. It is important to keep torch corals at a safe distance from each other and other sensitive corals to prevent damage and ensure the health of the aquarium.

Preventing Damage

Torch corals are beautiful and fascinating creatures that can add a lot of character to a reef aquarium. However, they can also be quite aggressive towards neighboring corals, and if not properly cared for, they can cause significant damage to other aquatic life. Here are some tips to help prevent damage caused by torch corals.

Proper Placement

One of the most important things to consider when keeping torch corals is their placement within the aquarium. They should be placed in a location where they have plenty of space to grow without coming into contact with other corals. It is best to keep them away from other Euphyllia species, as well as other aggressive corals.

Torch corals should also be placed in an area of the aquarium where they can receive moderate water flow. This will help to prevent debris from accumulating on their tentacles, which can cause irritation and damage to nearby corals.

Regular Monitoring

Regular monitoring of the aquarium is essential when keeping torch corals. This includes monitoring water quality, temperature, and salinity levels to ensure that they remain within the appropriate range for the species.

It is also important to keep an eye on the growth of the torch coral and any neighboring corals. If the torch coral begins to encroach on other corals, it may be necessary to move it to a different location within the aquarium.

By following these tips, aquarists can help prevent damage caused by torch corals and ensure that they remain a beautiful and healthy addition to their reef aquarium.

Conclusion

In conclusion, it is important to consider the placement of torch corals in an aquarium to avoid any potential issues with neighboring corals. Torch corals are aggressive and will sting other corals, except for other Euphyllia corals. Therefore, it is best to keep them away from other types of corals.

Moderate water flow is ideal for torch corals, and they require moderate to high lighting. They can also benefit from regular feeding, especially with meaty foods like mysis shrimp or brine shrimp.

When adding torch corals to an aquarium, it is important to acclimate them slowly to their new environment. This can be done by placing them in a separate container and gradually adding small amounts of water from the aquarium over a period of several hours.

Overall, torch corals are a beautiful and unique addition to a saltwater aquarium, but it is important to take precautions when placing them in the tank to ensure the health and safety of all the inhabitants.

Frequently Asked Questions

Can torch corals touch other types of coral?

Torch corals are known to be aggressive and can sting other types of coral. It is not recommended to place torch corals next to other corals in the aquarium. Some corals that are particularly sensitive to the sting of torch corals include acroporas, montiporas, and other small polyp stony corals.

Is it safe for torch corals to touch rocks?

Torch corals can touch rocks without any problem. They will not harm the rocks or be harmed by them. In fact, rocks can provide a good anchor for the torch coral.

Should torch corals be placed near other corals?

It is not recommended to place torch corals near other corals. Torch corals are known to be aggressive and can sting other corals. They should be given enough space so that they do not come into contact with other corals.

Will torch corals sting fish in the aquarium?

Torch corals are not known to sting fish in the aquarium. However, it is important to note that some fish may nip at the torch coral, which can cause it to become stressed and potentially die.

Can different types of hammer corals touch each other?

Different types of hammer corals can touch each other without any problem. They will not harm each other or be harmed by each other. In fact, they can even grow together and form a beautiful colony.

What corals are compatible with frogspawn coral?

Frogspawn coral is compatible with a variety of other corals, including other large polyp stony corals such as torch corals, hammer corals, and bubble corals. However, it is important to keep in mind that some corals may be more sensitive than others and may not be able to tolerate the sting of the frogspawn coral. It is always best to research the compatibility of different corals before placing them together in the aquarium.

Cleaning Aquarium Sand: A Beginner’s Guide

Aquarium sand is an essential component of any aquarium. It not only enhances the aesthetic appeal of the aquarium but also provides a natural environment for the fish to thrive. However, over time, the sand can accumulate debris and waste material, which can be harmful to the fish and other aquatic creatures. Therefore, it is essential to clean the aquarium sand regularly.

Cleaning aquarium sand may seem like a daunting task, but it is relatively easy if done correctly. There are several ways to clean aquarium sand, including using a siphon or a gravel vacuum, agitation of the sand so that the filter picks up the residue, and putting sand cleaning pets in the tank. Each method has its advantages and disadvantages, and the choice of the method depends on the type of sand and the size of the aquarium. It is crucial to choose the right method to ensure that the sand is cleaned effectively without harming the fish or other aquatic creatures.

In this article, we will discuss the different methods of cleaning aquarium sand and provide step-by-step instructions on how to clean aquarium sand effectively. We will also discuss the benefits of cleaning aquarium sand and the importance of maintaining a clean aquarium. Whether you are a seasoned aquarium owner or a beginner, this article will provide you with all the information you need to keep your aquarium sand clean and your fish healthy.

Understanding Aquarium Sand

Aquarium sand is a popular substrate choice for fish tanks. It is aesthetically pleasing, affordable, and practical. Sand is especially useful when there are bottom-feeding or burrowing inhabitants in the tank.

Types of Aquarium Sand

There are different types of aquarium sand available in the market. It is important to choose the right type of sand for your aquarium based on the type of fish and plants you have. Here are some common types of aquarium sand:

  • Play sand: This type of sand is commonly used in children’s sandboxes. It is inexpensive and readily available. However, it can be high in silica, which can cause harm to some fish species.
  • Pool filter sand: This type of sand is used in swimming pool filters. It is affordable and has a uniform grain size. It is also safe for most fish species.
  • Aragonite sand: This type of sand is made from calcium carbonate. It is a popular choice for marine aquariums as it helps to maintain a stable pH level. (This is what we use)
  • Coral sand: This type of sand is made from crushed coral. It is commonly used in marine aquariums as it helps to maintain a stable pH level and provides a natural habitat for marine organisms.

Benefits of Aquarium Sand

Aquarium sand provides several benefits to your fish tank. Here are some of the benefits:

  • Aesthetically pleasing: Sand provides a natural and attractive look to your aquarium. It comes in different colors and grain sizes, allowing you to customize the look of your tank.
  • Natural habitat: Sand provides a natural habitat for bottom-dwelling fish and invertebrates. It allows them to burrow and hide, which reduces stress and promotes natural behavior.
  • Biological filtration: Sand provides a surface area for beneficial bacteria to grow, which helps to break down waste and maintain a healthy environment for your fish and plants.

Cleaning Aquarium Sand

Cleaning aquarium sand is an essential part of maintaining a healthy and clean environment for your fish and plants. It is recommended to clean the sand once a month or as needed. Here are some tips for cleaning aquarium sand:

  • Use a siphon to remove debris and waste from the sand.
  • Consider replacing the sand every few years to prevent buildup of harmful chemicals and waste.

By understanding the different types of aquarium sand, the benefits it provides, and how to clean it properly, you can provide a healthy and natural environment for your fish and plants.

Choosing the Right Aquarium Sand

When it comes to choosing the right aquarium sand, there are a few things to consider. The type of sand you choose will not only affect the aesthetics of your aquarium but also the well-being of your aquatic pets. Here are some factors to keep in mind while selecting the right aquarium sand:

Particle Size

The particle size of the sand is an important factor to consider. Sand with larger particles is easier to clean and maintain but may not be suitable for all types of fish. For example, fish that dig or burrow in the sand require finer sand to prevent injury to their gills. On the other hand, larger particles may be ideal for fish that prefer a rocky substrate.

Color

The color of sand can affect the overall look of your aquarium. There are various colors of sand available, ranging from natural beige to black. It is important to choose a color that complements the color of your fish and other aquatic plants. For example, black sand can make the colors of your fish pop, while beige sand can create a natural and serene environment.

Material

The material of the sand can also affect the well-being of your aquatic pets. Some types of sand can alter the pH levels of the water, which can be harmful to certain species of fish. It is important to choose sand that is specifically designed for aquarium use and has been tested for safety. Some popular materials for aquarium sand include silica, aragonite, and crushed coral.

Quantity

The quantity of sand you need depends on the size of your aquarium and the depth of the sand bed you desire. A general rule of thumb is to have a sand bed that is at least 2 inches deep. This not only provides a natural environment for your fish but also allows beneficial bacteria to thrive and maintain a healthy ecosystem.

Overall, choosing the right aquarium sand is an important decision that affects both the aesthetics and well-being of your aquatic pets. By considering factors such as particle size, color, material, and quantity, you can create a beautiful and safe environment for your fish to thrive in.

Preparation for Cleaning

Before cleaning aquarium sand, one needs to prepare for it properly. Here are some steps to follow:

  • Turn off all electrical appliances: Turn off the filters, heaters, and all pumps. It is important to ensure that no electrical appliance stays in the tank while cleaning it.
  • Remove plants and decorations: Remove all plants and decorations from the tank. If one prefers, they can clean around the decorations instead of removing them.
  • Prepare a large bucket: Prepare a large bucket that is big enough to hold all the sand and to fully submerge the sand in water.
  • Fill the bucket with water: Fill the bucket with water and swirl the sand around with your hand. This will help to loosen any debris or waste trapped in the sand.
  • Siphon the water: Put the hose end of the siphon in a large bucket positioned below the tank. Lower the suction end of the siphon into the water, being careful to avoid any small fish. Pinch the manual pump five times or so to start the water flowing into the bucket.
  • Clean the sand: Hover the suction nozzle over the surface of the sand. Work methodically across the sand to pick up all the debris.

By following these steps, one can prepare for cleaning aquarium sand properly.

Maintaining Clean Aquarium Sand

Maintaining clean aquarium sand is essential for the health and well-being of aquatic pets. Dirty sand can lead to the accumulation of harmful bacteria and toxins, which can cause various health problems for fish, snails, and other aquatic creatures. Here are some tips to help keep aquarium sand clean:

Regular Cleaning

The easiest way to keep aquarium sand clean is by performing regular cleaning. This involves using a gravel vacuum to remove debris and waste from the sand. The gravel vacuum works by siphoning water out of the tank and through a tube, which also sucks up any debris and waste that has settled on the sand. By performing regular cleaning, you can prevent the buildup of harmful bacteria and toxins in the sand, which can help keep your aquatic pets healthy.

Use of Sand Sifter

Another way to keep aquarium sand clean is by using a sand sifter. This is a small device that can be placed on the sand and used to sift through the sand, removing any debris or waste that has settled on it. Sand sifters are especially useful for removing uneaten food, which can quickly decompose and lead to the buildup of harmful bacteria and toxins in the sand.

Proper Water Circulation

Proper water circulation is also essential for maintaining clean aquarium sand. A lack of water circulation can cause debris and waste to settle on the sand, which can lead to the buildup of harmful bacteria and toxins. To ensure proper water circulation, it is important to have a good filtration system in place. This can help remove debris and waste from the water, preventing it from settling on the sand.

Avoid Overfeeding

Overfeeding can also contribute to the buildup of harmful bacteria and toxins in aquarium sand. Uneaten food can quickly decompose and lead to the accumulation of waste and debris on the sand. To prevent this, it is important to feed aquatic pets only what they need and to remove any uneaten food from the tank as soon as possible.

By following these tips, aquarium owners can help maintain clean and healthy sand in their tanks. Regular cleaning, the use of sand sifters, proper water circulation, and avoiding overfeeding can all contribute to a healthy and thriving aquatic environment.

Common Mistakes to Avoid

Cleaning aquarium sand can be a daunting task, especially for beginners. However, there are some common mistakes that people make that can make the process even more difficult. Here are a few things to avoid when cleaning your aquarium sand:

Not Turning off Filters and Pumps

One of the most common mistakes people make when cleaning their aquarium sand is not turning off the filters and pumps. This can cause the water levels to lower and the filters to run dry, which can damage them. Before starting the cleaning process, make sure to turn off all filters and pumps to prevent any damage.

Removing Too Much Water

Another mistake people make is removing too much water from the tank. While it’s important to remove some water to clean the sand, removing too much can be harmful to the fish and other aquatic life in the tank. A good rule of thumb is to remove no more than 25% of the water at a time.

Conclusion

Cleaning aquarium sand is an essential part of maintaining a healthy aquarium. It is important to clean the sand regularly to remove debris, uneaten food, and fish waste. This will prevent the buildup of harmful toxins and bacteria, ensuring a healthy environment for the fish and other aquatic creatures.

In addition to cleaning the sand, it is also important to maintain the overall cleanliness of the aquarium. This includes regularly changing the water, cleaning the filter, and removing any dead or decaying coral or animals.

Overall, cleaning aquarium sand is a simple and straightforward process that can be easily incorporated into a regular aquarium maintenance routine. By following the proper cleaning procedures and maintaining a clean and healthy aquarium environment, hobbyists can enjoy the beauty and tranquility of their aquatic pets for years to come.

FAQ’s

How do I clean fish poop from aquarium sand?

Fish poop can accumulate in aquarium sand over time, making it look dirty and unpleasant. The best way to clean fish poop from aquarium sand is to use a gravel vacuum. This device uses suction to remove debris from the sand without disturbing the sand itself. Simply place the end of the vacuum in the sand and move it around to suck up the poop and other debris.

What is the best way to clean aquarium sand?

The best way to clean aquarium sand is to use a gravel vacuum. This device uses suction to remove debris from the sand without disturbing the sand itself. Simply place the end of the vacuum in the sand and move it around to suck up any debris. 

How often should I clean my aquarium sand?

The frequency with which you clean your aquarium sand depends on a variety of factors, including the size of your tank, the number of fish you have, and how much they eat. You should clean the surface of your sand when doing water changes at least bi-weekly. 

How do I prevent sand from getting dirty in my aquarium?

To prevent sand from getting dirty in your aquarium, it’s important to keep your tank clean and well-maintained. This means performing regular water changes, cleaning the filter, and removing any uneaten food or debris from the tank. You can also consider adding a bottom-dwelling fish or snail to help keep the sand clean.

Bam Bam Zoanthid

Coral Poisoning in Aquariums: Causes and Prevention

Coral poisoning is one of those parts of the hoby that everyone needs to be aware of in order to stay safe. However, your chances of ever having an issues with coral poisoning are very slim as long as you are taking precautions. Unless you are directly agitating then zoanthids then touching your eyes or mouth or boiling rocks with zoanthids, you will most likely never have an issue. This blog will go over all the different circumstances you should be mindful of just so you are educated.

While coral poisoning is rare, it is important for aquarium owners to be aware of the potential dangers. It is recommended that owners wear gloves and protective gear when handling coral, and that they keep their aquariums well-ventilated to prevent the buildup of toxic fumes. By taking these precautions, aquarium owners can enjoy the beauty of coral without putting their health at risk.

-Understanding Coral Poisoning

-Causes of Coral Poisoning

-Symptoms of Coral Poisoning

-Prevention and Treatment

Blondie Zoanthid

Understanding Coral Poisoning

Coral poisoning can be a serious concern for aquarium owners who keep certain species of coral in their tanks. The toxins produced by these corals can be harmful to both humans and other marine life. In this section, we will explore the causes, symptoms, and prevention of coral poisoning.

Causes

Coral poisoning is caused by the release of toxins from certain species of coral. These toxins can be released when the coral is disturbed or stressed, such as during handling or cleaning. The most common toxins associated with coral poisoning are palytoxin and ciguatoxin.

Palytoxin is found in certain species of Zoanthid coral, including Palythoa and Zoanthus. Ciguatoxin is found in certain species of fish, including barracuda, grouper, and snapper, that feed on toxic algae. When these fish are consumed, the toxins are transferred to the human body.

It is important to NEVER boil rock as this is the most dangerous way of getting palytoxin poisoning. This is not a safe method of removing zoas or palys. In most instances it is safe to scrape or scrub zoanthids, just be careful not to touch your eyes or mouth after directly touching them in order to make sure you are safe.

Symptoms

Symptoms of coral poisoning can vary depending on the type and amount of toxin ingested. Common symptoms include nausea, vomiting, diarrhea, muscle weakness, and difficulty breathing. In severe cases, coral poisoning can lead to paralysis, respiratory failure, and even death.

Prevention

Preventing coral poisoning involves taking certain precautions when handling or cleaning the aquarium. It is important to wear gloves and protective clothing to avoid direct contact with the coral. 

Regular maintenance of the aquarium is also important to prevent the buildup of toxins. This includes regular water changes, cleaning of the tank and equipment, and proper filtration.

Overall, understanding the causes and symptoms of coral poisoning is important for aquarium owners to ensure the safety of both themselves and their marine life. By taking proper precautions and regular maintenance, the risk of coral poisoning can be minimized.

Causes of Coral Poisoning

Coral poisoning in aquariums can occur due to various reasons. Inappropriate water conditions, predator presence, disease, and infections are some of the common causes of coral poisoning.

Inappropriate Water Conditions

Maintaining appropriate water conditions is crucial for the health of coral. If the water conditions are not suitable, it can lead to the death of coral. High levels of nitrates and phosphates in the water can cause algae blooms, which can suffocate the coral and release toxins. Similarly, low levels of calcium and magnesium can lead to the death of coral. It is essential to regularly monitor and maintain the water conditions to prevent coral poisoning.

Predator Presence

Predators such as crabs, snails, and starfish can harm coral, leading to the release of toxins. Some predators feed on coral, while others can damage the coral’s protective layer, making it more susceptible to diseases and infections. It is crucial to keep an eye on the aquarium and remove any predators that can harm the coral.

Disease and Infections

Coral can get infected with various diseases, such as black band disease and white band disease. These diseases can spread quickly and lead to the death of coral. Similarly, bacterial infections can also cause coral poisoning. It is essential to quarantine new coral and regularly check for signs of diseases and infections to prevent the spread of infections.

In conclusion, coral poisoning can occur due to various reasons, and it is crucial to maintain appropriate water conditions, prevent predator presence, and regularly check for signs of diseases and infections to prevent coral poisoning in aquariums.

Symptoms of Coral Poisoning

Coral poisoning can occur when handling or maintaining an aquarium with toxic corals. Symptoms of coral poisoning can vary depending on the severity of the exposure. In this section, we will discuss the physical and behavioral changes that can occur as a result of coral poisoning.

Physical Changes

Physical changes can be one of the first signs of coral poisoning. Flu-like symptoms such as fever, chills, and headaches are common. Additionally, chest pains, coughing, and sore throat can occur. In some cases, numbness or itching in the affected area can be present.

More severe symptoms can include respiratory distress, hemorrhaging, and even death. Progressive symptoms can include muscle pain, stiffness and spasm, speech disturbance, and loss of consciousness. Blood analyses often show elevated lactate dehydrogenase (LDH), creatine phosphokinase (CPK), white blood cells, and leukocytes.

Behavioral Changes

Behavioral changes can also occur as a result of coral poisoning. These changes can include confusion, disorientation, and altered mental status. In some cases, aggression and agitation can occur.

It is important to note that symptoms of coral poisoning can be similar to other illnesses, so it is important to seek medical attention if any of these symptoms occur after handling or maintaining an aquarium with toxic corals.

Nirvana Zoanthid

Prevention and Treatment

Coral poisoning in aquariums can be a serious issue, but there are steps that can be taken to prevent it from happening in the first place. Additionally, there are effective treatments available if an aquarium owner suspects that their fish have been exposed to toxic coral.

Proper Aquarium Maintenance

One of the most important things that aquarium owners can do to prevent coral poisoning is to maintain their aquarium properly. This includes regular water changes, maintaining proper water chemistry, and keeping the aquarium clean and free of debris. Aquarium owners should also be careful when handling coral, as even small cuts or abrasions can lead to exposure to toxic substances.

Effective Quarantine Measures

Another important step in preventing coral poisoning is to quarantine new additions to the aquarium before adding them to the main tank. This allows the aquarium owner to closely monitor new fish and coral for signs of illness or toxicity before introducing them to the rest of the aquarium. Quarantine tanks should be kept clean and free of debris, and aquarium owners should be careful to avoid cross-contamination between the quarantine tank and the main tank.

Timely Medical Intervention

If an aquarium owner suspects that their fish have been exposed to toxic coral, it is important to seek medical attention for the fish as soon as possible. Symptoms of coral poisoning can include lethargy, loss of appetite, and discoloration. A veterinarian or aquatic specialist can provide treatment options, which may include medications or other interventions to help the fish recover.

By following proper aquarium maintenance procedures, implementing effective quarantine measures, and seeking timely medical intervention if necessary, aquarium owners can help prevent coral poisoning in their fish and keep their aquarium healthy and thriving.

Conclusion

In conclusion, it is important for aquarium enthusiasts to be aware of the potential dangers associated with certain types of coral. While corals are generally considered safe, some species can release toxins that can be harmful to humans and animals alike.

To prevent coral poisoning, it is recommended that aquarium owners take precautions when handling coral, including wearing gloves and protective clothing. It is also important to properly clean and maintain aquariums to prevent the buildup of harmful toxins.

If a person suspects they have been exposed to coral toxins, they should seek medical attention immediately. Symptoms of coral poisoning can include nausea, vomiting, diarrhea, and respiratory distress.

While the risks of coral poisoning should not deter people from enjoying the beauty of coral reefs and aquariums, it is important to be aware of the potential dangers and take necessary precautions to ensure the safety of both humans and animals.

FAQ’s

What are the symptoms of palytoxin poisoning?

Palytoxin poisoning can cause a range of symptoms, including nausea, vomiting, diarrhea, muscle weakness, and difficulty breathing. In severe cases, it may also lead to heart failure, coma, or even death. Symptoms may appear within minutes to hours after exposure.

How is palytoxin poisoning treated?

There is no specific antidote for palytoxin poisoning. Treatment is mainly supportive and may include oxygen therapy, intravenous fluids, and medications to manage symptoms such as nausea and vomiting. In severe cases, hospitalization may be necessary.

What is palytoxin and how does it affect coral and humans?

Palytoxin is a potent toxin produced by certain species of coral, including zoanthids. It can also be found in other marine organisms such as fish and shellfish. Palytoxin affects the nervous system and can cause a range of symptoms in humans and animals. It is considered one of the most toxic non-protein substances known.

Is zoanthid coral poisonous to humans?

Yes, zoanthid coral can be poisonous to humans. Some species of zoanthids contain high levels of palytoxin, which can cause severe poisoning if ingested or if the toxin comes into contact with the skin or mucous membranes.

Can fish be affected by coral poisoning?

Yes, fish can be affected by coral poisoning. Some species of fish may be able to tolerate small amounts of palytoxin, but high levels can be lethal. Fish that are exposed to contaminated water or food may develop symptoms such as muscle weakness, difficulty breathing, and convulsions.

Can exposure to coral in a reef tank make humans sick?

Yes, exposure to coral in a reef tank can make humans sick if the coral contains high levels of palytoxin. Aquarium workers and hobbyists who handle coral should take precautions to avoid exposure to the toxin, such as wearing gloves and eye protection and avoiding inhalation of aerosols.

Blue Tip Indo Gold Torch - Cut To Order

Brown Jelly Euphyllia: What it is and How to Treat it

Brown jelly euphyllia is a common problem that many reef tank hobbyists face. It is a contagious disease that infects Euphyllia corals, such as hammer and frogspawn corals, causing tissue to turn into a brown jelly-like substance. The exact cause of this disease is still unknown, but it is often associated with the presence of ciliates in large numbers.

Despite the lack of knowledge about the cause of brown jelly euphyllia, there are several treatments that hobbyists have been successful with. These treatments include siphoning the brown jelly and dipping the infected coral. In severe cases, the best solution is to discard the infected coral. There are also in-tank antibiotic treatments that have been experimented with, with some success.

If left untreated, brown jelly euphyllia can quickly spread and infect other corals in the tank. Therefore, it is important for reef tank hobbyists to be aware of the signs and symptoms of this disease and take immediate action to prevent its spread. In this article, we will explore the causes, symptoms, and treatments for brown jelly euphyllia to help hobbyists better understand and manage this common issue in their reef tanks.

What is Brown Jelly?

Brown Jelly is a contagious disease that commonly affects Euphyllia corals. It is named after the brownish, jelly-like substance that forms on the coral’s tissue. The cause of this disease is still unknown, but it is believed to be caused by a bacterial or protozoan infection. The disease usually starts as a small spot on the coral’s tissue and then spreads rapidly, covering the entire coral. Brown Jelly Euphyllia can cause the coral to lose its color, become slimy, and eventually die. It is important to note that Brown Jelly Euphyllia is highly contagious and can spread quickly to other corals in the tank. Therefore, it is crucial to isolate and treat the infected coral as soon as possible to prevent the disease from spreading. Some common symptoms of Brown Jelly Euphyllia include the coral’s tentacles being retracted, the coral’s tissue turning brown and slimy, and the coral losing its color. If you notice any of these symptoms, it is important to take immediate action to prevent further damage to your coral and other corals in your tank.

Purple Splatter Tip Hammer
Torch Coral

Causes of Brown Jelly with Euphyllia

Bacterial Infections

Brown jelly disease in Euphyllia corals is believed to be caused by bacterial infections. The exact bacteria responsible for the disease is still unknown, but studies have shown that Vibrio species and Arcobacter species may be involved. These bacteria can enter the coral through small wounds or damaged tissue, and can quickly spread throughout the colony.

Once inside the coral, the bacteria begin to break down the coral’s tissue, resulting in the formation of the brown jelly-like substance that gives the disease its name. The bacteria can also cause the coral to become weakened and more susceptible to other infections and diseases.

Environmental Factors

Environmental factors can also play a role in the development of brown jelly disease in Euphyllia corals. Poor water quality, including high levels of nitrates and phosphates, can weaken the coral and make it more susceptible to infections. High water temperatures can also stress the coral and make it more vulnerable to disease.

Additionally, overcrowding in the aquarium can lead to increased stress and competition among corals, which can make them more susceptible to infections. It is important to maintain proper water quality and provide adequate space for each coral to thrive.

In conclusion, brown jelly disease in Euphyllia corals is caused by bacterial infections and can be exacerbated by poor water quality and overcrowding in the aquarium. Hobbyists should take measures to maintain optimal water quality and provide adequate space for their corals to prevent the development of this disease.

Symptoms of Brown Jelly Euphyllia

Visual Cues

Brown jelly disease is characterized by the presence of a brown, slimy substance on the coral tissue. The brown jelly can appear as a thin film or a thick, gooey layer. This substance is actually a bacterial infection that causes tissue necrosis, or death. As the disease progresses, the brown jelly can spread rapidly to other coral colonies, making it a serious threat to reef ecosystems.

Behavioral Changes

Infected euphyllia colonies may exhibit a range of behavioral changes. For example, they may retract their tentacles or stop extending them altogether. The coral may also appear to be shrinking or receding, which is a sign of tissue loss. In some cases, the coral may completely disintegrate, leaving behind only the skeleton. It’s important to note that brown jelly disease is not always visible to the naked eye. In some cases, the bacteria may be present in the coral tissue without any visible signs of infection. For this reason, it’s important to monitor coral colonies regularly for any changes in behavior or appearance. If left untreated, brown jelly disease can quickly spread throughout a coral colony and to neighboring colonies. It can also weaken the coral’s immune system, making it more susceptible to other infections and diseases. To prevent the spread of brown jelly disease, it’s important to quarantine new coral arrivals and to maintain good water quality in the aquarium. Regular water changes, proper filtration, and adequate flow can all help to prevent the growth of harmful bacteria and maintain a healthy reef environment.

Preventing Brown Jelly Euphyllia

Tank Maintenance

To prevent brown jelly euphyllia, it is important to maintain a healthy and clean tank environment. Regular water changes, proper filtration, and adequate lighting can help keep corals healthy and reduce the risk of disease. It is also important to monitor water parameters such as temperature, salinity, and pH, as fluctuations can stress corals and make them more susceptible to disease. In addition to general tank maintenance, it is important to pay attention to the placement of euphyllia corals in the tank. Euphyllia corals should be placed in areas with moderate water flow and adequate lighting. High flow can damage the delicate tissue of the coral, while low flow can lead to the buildup of detritus and other debris, which can contribute to the growth of harmful bacteria.

Quarantine Procedures

Another important step in preventing brown jelly euphyllia is to quarantine new corals before introducing them to the main tank. This can help prevent the introduction of new pathogens and parasites that can harm existing corals. During the quarantine period, it is important to monitor the health of the new coral and treat any signs of disease before introducing it to the main tank. When selecting new corals, it is also important to choose healthy specimens from reputable sources. Sick or stressed corals are more likely to develop brown jelly and other diseases, so it is important to choose specimens that are free from signs of disease or stress. By following these simple steps, aquarists can help prevent brown jelly euphyllia and keep their coral reefs healthy and thriving.

Treating Brown Jelly Euphyllia

Natural Remedies

When it comes to treating brown jelly euphyllia, there are a few natural remedies that can be effective. One option is to physically remove the brown jelly with a pipette or turkey baster around the infected areas. This must be done carefully to avoid smothering other corals. We suggest turning off all of your flow when doing this in order to minimize the risk fo spread.

Another option is to dip the coral in a solution of iodine or pyodine (10% iodine) and potassium chloride (Kcl). Another natural remedy is to introduce enough bacteria and probiotics to ensure a healthy bacteria colony is present. This can be accomplished by dosing the tank with a product like Microbacter7 or Vibrant. Additionally, ensuring UV is installed can help keep the tank clean and prevent the spread of disease.

Medications

If natural remedies are not effective, medications may be necessary. One option is to use Chemiclean, which is a form of erythromycin. Another option is E.M. Erythromycin (API), which can be effective against brown jelly disease. API Fin and Body Cure (Doxycycline hyclate) is another medication that can be used to treat brown jelly euphyllia. It is important to note that medications should be used with caution and only as a last resort. Overuse of medications can harm the coral and the overall health of the tank. It is also important to follow the instructions carefully and monitor the coral closely during treatment. 

Conclusion

Brown jelly disease is a contagious infection that affects Euphyllia corals. The cause of the infection is still unknown, but it is believed to be caused by bacterial or ciliate pathogens. The disease can be identified by the presence of brown, slimy material on the coral’s tissue, which can eventually lead to the coral’s death if left untreated.

There are several treatments that hobbyists have been successful with, including siphoning the brown jelly and dipping the infected coral in a solution of iodine or antibiotics. However, it is important to note that these treatments are not guaranteed to work and can potentially harm the coral if not done correctly.

Preventing brown jelly disease from occurring in the first place is the best course of action. Maintaining proper water quality, avoiding overcrowding in the aquarium, and providing adequate lighting and flow can all help to prevent the spread of the disease. Additionally, quarantining new corals before introducing them to the main tank can help to prevent the spread of infection.

favia LPS coral colony

Aquarium Beneficial Bacteria: What They Are and Why You Need Them

As aquarium enthusiasts, we all want our fish and aquatic plants to thrive in a healthy and clean environment. One of the most important factors in maintaining a balanced aquarium ecosystem is the presence of beneficial bacteria. These tiny microorganisms play a vital role in the nitrogen cycle, helping to break down waste products and maintain water quality.

Without beneficial bacteria, ammonia and nitrite levels in the tank can quickly rise to toxic levels, leading to stress and illness in fish. By establishing a healthy population of beneficial bacteria, we can ensure that the nitrogen cycle is functioning properly, converting harmful waste products into less harmful compounds that can be safely removed through regular water changes. In this article, we’ll explore the role of beneficial bacteria in the aquarium and discuss some of the best ways to establish and maintain a healthy bacterial colony in your tank.

The Importance of Beneficial Bacteria in an Aquarium

As aquarium enthusiasts, we all want our fish to thrive and be healthy. One of the most important factors in achieving this is maintaining good water quality. This is where beneficial bacteria come in.

Beneficial bacteria are essential for a healthy and balanced aquarium ecosystem. They play a crucial role in breaking down the waste produced by fish, dead plant material, and other organic debris that accumulates in the tank. This waste produces harmful ammonia and nitrite, which can be toxic to fish. Beneficial bacteria convert these harmful substances into less harmful ones, such as nitrate, which can be removed through regular water changes.

Without these good bacteria, ammonia and nitrite levels can quickly rise to dangerous levels, causing stress and illness in fish. This is why it’s important to establish a healthy colony of beneficial bacteria in your aquarium.

But how do we cultivate these good bacteria? One way is through the process of nitrogen cycling. This is the process by which beneficial bacteria convert ammonia to nitrite, and then to nitrate. This cycle is essential for maintaining good water quality in your aquarium.

To establish a healthy colony of beneficial bacteria, we need to provide them with the right conditions. This includes providing enough oxygen for the bacteria to thrive. Oxygen is essential for the growth and metabolism of these bacteria. Without enough oxygen, they may not be able to break down waste effectively, leading to poor water quality.

In summary, the importance of beneficial bacteria in an aquarium cannot be overstated. They play a crucial role in maintaining good water quality and ensuring the health and well-being of our fish. By establishing a healthy colony of beneficial bacteria, we can create a thriving ecosystem in our aquariums.

Understanding the Nitrogen Cycle

When it comes to maintaining a healthy aquarium, understanding the nitrogen cycle is essential. The nitrogen cycle is a natural process that occurs in every aquarium and is responsible for breaking down waste into less harmful compounds. In this section, we will explain the three main stages of the nitrogen cycle: ammonia, nitrite, and nitrate.

Ammonia

The first stage of the nitrogen cycle is the production of ammonia. Ammonia is a toxic compound that is produced by fish waste, uneaten food, and decaying plant matter. In high concentrations, ammonia can be deadly to fish and other aquatic life. However, in a healthy aquarium, beneficial bacteria will convert ammonia into nitrite.

Nitrite

The second stage of the nitrogen cycle is the conversion of ammonia into nitrite. Nitrite is also a toxic compound that can harm fish and other aquatic life. However, just like with ammonia, beneficial bacteria will convert nitrite into nitrate.

Nitrate

The final stage of the nitrogen cycle is the conversion of nitrite into nitrate. Nitrate is a less toxic compound that can be safely tolerated by fish and other aquatic life in low concentrations. However, in high concentrations, nitrate can still be harmful, and regular water changes are necessary to keep nitrate levels under control.

In summary, the nitrogen cycle is a natural process that is essential for maintaining a healthy aquarium. By understanding the three stages of the nitrogen cycle, we can take steps to ensure that our aquariums remain safe and healthy for our fish and other aquatic life.

Splatter Purple Tip Hammer
Ultra Rock Flower Anemone

Types of Beneficial Bacteria

In an aquarium, there are several types of beneficial bacteria that play a crucial role in maintaining a healthy and balanced ecosystem. These bacteria help to break down waste and convert harmful substances into less toxic compounds.

Nitrifying Bacteria

Nitrifying bacteria are perhaps the most important group of beneficial bacteria in an aquarium. They are responsible for converting toxic ammonia, which is excreted by fish and other aquatic creatures, into less harmful compounds.

There are two main types of nitrifying bacteria: Nitrosomonas and Nitrobacter. Nitrosomonas bacteria convert ammonia into nitrite, which is still toxic to fish but less so than ammonia. Nitrobacter bacteria then convert nitrite into nitrate, which is relatively harmless to fish in low concentrations.

Heterotrophic Bacteria

Heterotrophic bacteria are another type of beneficial bacteria that can be found in an aquarium. Unlike nitrifying bacteria, they do not play a direct role in the nitrogen cycle. Instead, they help to break down organic matter such as dead plants and uneaten food.

Heterotrophic bacteria are also important for maintaining a healthy balance of bacteria in the aquarium. They compete with harmful bacteria for resources and can help to prevent the growth of harmful bacteria that can cause diseases.

Autotrophs

Autotrophs are a group of bacteria that are capable of producing their own food through photosynthesis or chemosynthesis. In an aquarium, autotrophs can help to maintain a healthy balance of nutrients by converting carbon dioxide into oxygen and other essential compounds.

One example of an autotrophic bacteria commonly found in aquariums is Anabaena. This bacteria is capable of fixing nitrogen, which can help to provide essential nutrients for plants and other aquatic organisms.

Overall, the different types of beneficial bacteria in an aquarium work together to maintain a healthy and balanced ecosystem. By understanding the role of these bacteria, we can take steps to promote their growth and ensure the long-term health of our aquatic pets.

Biological Filtration and Filter Media

When it comes to maintaining a healthy aquarium, biological filtration is key. This process involves the use of beneficial bacteria to break down harmful toxins in the water. To support this process, we need to choose the right filter media.

Filter Pad

Filter pads are a common type of filter media that can be found in most aquarium filters. They are made of a dense material that traps debris and provides a surface area for beneficial bacteria to grow. Filter pads come in different thicknesses and densities, and the right one for your aquarium will depend on the size of your tank and the type of fish you have.

Sponge Filter

Sponge filters are another popular type of filter media. They work by drawing water through a sponge that provides a surface area for beneficial bacteria to grow. Sponge filters are great for small aquariums and breeding tanks, as they are gentle and do not create a strong current. They are also easy to clean and maintain.

Ecobio-Block

Ecobio-Block is a unique type of filter media that combines biological, chemical, and mechanical filtration in one. It is a porous volcanic rock that is infused with beneficial bacteria, enzymes, and minerals. Ecobio-Block can be placed in the aquarium or in the filter, and it will work to maintain a healthy environment by breaking down waste and balancing pH levels.

When choosing a filter media, it is important to consider the size of your aquarium, the type of fish you have, and your filtration needs. By providing a surface area for beneficial bacteria to grow, you can maintain a healthy and thriving aquarium ecosystem.

Maintaining a Healthy Aquarium

As aquarium hobbyists, we all want our fish to thrive in a clean and healthy environment. One of the keys to achieving this is maintaining a healthy colony of beneficial bacteria in our fish tanks. In this section, we’ll discuss some important factors that can affect the growth of these bacteria and how we can keep them thriving.

Gravel and Substrate

Gravel and substrate can play an important role in maintaining a healthy aquarium. They provide a surface area for beneficial bacteria to grow and thrive. It’s important to choose a substrate that is appropriate for the type of fish you have and that allows for good water flow. We recommend cleaning your substrate regularly to prevent the buildup of debris and waste that can negatively impact your water quality.

Fish Waste and Uneaten Food

Fish waste and uneaten food can quickly accumulate in your aquarium and lead to poor water quality. This can be harmful to your fish and can also negatively impact the growth of beneficial bacteria. To prevent this, we recommend feeding your fish only what they can eat in a few minutes and removing any uneaten food promptly. It’s also important to perform regular water changes to remove excess waste and maintain good water quality.

pH and Phosphate Levels

The pH and phosphate levels in your aquarium can also have an impact on the growth of beneficial bacteria. We recommend testing your water regularly and adjusting as necessary to maintain a pH level between 6.5 and 7.5 and a phosphate level below 1 ppm. This will help ensure that your beneficial bacteria can grow and thrive.

Enzymes

Enzymes can be a useful tool in maintaining a healthy aquarium. They can help break down waste and debris, making it easier for beneficial bacteria to digest and process. We recommend using a high-quality enzyme product and following the manufacturer’s instructions carefully.

In conclusion, maintaining a healthy colony of beneficial bacteria is essential for the health and well-being of your fish. By following these tips and keeping a close eye on your water quality, you can create a thriving and healthy aquarium for your aquatic pets.

Conclusion

In conclusion, we have learned that beneficial bacteria are essential for maintaining a healthy and thriving aquarium. These bacteria play a crucial role in breaking down fish waste, dead plant material, and other organic debris that accumulates in the tank. By doing so, they prevent toxic ammonia and nitrite from accumulating and keep the water crystal clear.

We also learned that the establishment of beneficial bacteria in aquariums is pretty straightforward, but we have to take into consideration factors such as temperature, pH, oxygen, and the amount of initial bioload in the tank. By providing the right conditions, we can ensure that the beneficial bacteria thrive and do their job effectively.

It’s important to note that while beneficial bacteria are essential for freshwater aquariums, they are not recommended for saltwater aquariums. In saltwater aquariums, the focus is on creating a natural biological balance, and overdosing with beneficial bacteria can disrupt this balance.

In summary, maintaining a healthy aquarium requires a balance of different factors, and beneficial bacteria play a crucial role in this process. By providing the right conditions and avoiding overdosing, we can ensure that our aquariums remain healthy and thriving for years to come.

Ammonia Cycle Aquarium: How to Keep Your Fish Happy and Healthy

If you’re new to the world of aquariums, you may have heard the term “ammonia cycle” thrown around. It’s an important process that occurs in every aquarium, and understanding it is crucial for maintaining a healthy environment for your fish and other aquatic creatures. Essentially, the ammonia cycle is the process by which harmful ammonia is converted into less harmful nitrites and nitrates.

So why is this important? Well, when fish produce waste, it breaks down into ammonia, which is highly toxic to them. In the wild, this ammonia would be diluted by a large body of water, but in an aquarium, it can quickly build up and harm your fish. That’s where the ammonia cycle comes in – it’s a natural process that helps to break down this toxic ammonia and keep your aquarium clean and healthy.

Understanding the ammonia cycle is essential for anyone who wants to keep an aquarium. Not only does it help to keep your fish healthy, but it also ensures that your aquarium stays clean and clear. In this article, we’ll take a closer look at the ammonia cycle – what it is, how it works, and how you can ensure that it’s functioning properly in your aquarium. So let’s dive in!

blue hippo tang
Juggernaut Bounce Mushroom

What is the Ammonia Cycle?

As aquarium enthusiasts, we know how important it is to maintain a healthy environment for our aquatic pets. The Ammonia Cycle is a crucial process in keeping our aquariums clean and safe for our fish and plants. In this section, we will provide an overview of the Nitrogen Cycle and how the Ammonia Cycle works.

Nitrogen Cycle Overview

The Nitrogen Cycle is a natural process that occurs in all aquatic environments. It is the process by which harmful waste, such as ammonia and nitrite, is broken down into less harmful nitrate. The cycle involves beneficial bacteria that convert ammonia into nitrite, and then nitrite into nitrate.

Ammonia is produced by fish waste, uneaten food, and decaying organic matter. Nitrite is produced by the breakdown of ammonia by Nitrosomonas bacteria. Nitrate is produced by the breakdown of nitrite by Nitrobacter bacteria.

How the Ammonia Cycle Works

The Ammonia Cycle is the first stage in the Nitrogen Cycle. It begins with the production of ammonia by fish waste, uneaten food, and decaying organic matter. Ammonia is toxic to fish and invertebrates, so it needs to be converted into less harmful nitrite.

The conversion of ammonia to nitrite is carried out by Nitrosomonas bacteria. These bacteria oxidize ammonia into nitrite through a process called nitrification. Nitrite is also toxic to fish and invertebrates, so it needs to be converted into less harmful nitrate.

The conversion of nitrite to nitrate is carried out by Nitrobacter bacteria. These bacteria oxidize nitrite into nitrate through a process called nitrification. Nitrate is relatively harmless to fish and invertebrates, but if left unchecked, it can build up to toxic levels and cause problems in the aquarium.

It is important to note that the Ammonia Cycle can take several weeks to establish in a new aquarium. During this time, it is important to monitor the levels of ammonia and nitrite using a test kit. Once the cycle is established, the levels of ammonia and nitrite should be zero, and the level of nitrate should be kept below 40 ppm through regular water changes.

Why is the Ammonia Cycle Important in Aquariums?

Fish Health

As aquarium owners, we want our fish to thrive and live long, healthy lives. The ammonia cycle plays a crucial role in maintaining the health of our aquatic pets. Fish produce ammonia as a waste product, and if left unchecked, high concentrations of ammonia can cause stress, gill and internal organ damage, and eventually death. By establishing a healthy ammonia cycle in our aquariums, we can ensure that ammonia is converted into less harmful substances, such as nitrite and nitrate, which can be safely removed through regular water changes.

Water Quality

Another important reason to establish a healthy ammonia cycle in our aquariums is to maintain water quality. High levels of ammonia in the water can lead to cloudy, foul-smelling water, which is not only unpleasant to look at but can also be harmful to the fish and other aquatic organisms in the tank. By establishing a healthy ammonia cycle, we can ensure that the water in our aquariums remains clear, clean, and safe for our fish to swim in.

Overall, the ammonia cycle is a critical process in maintaining the health and well-being of our aquariums. By ensuring that ammonia is converted into less harmful substances, we can provide our fish with a safe and healthy environment to live in.

Establishing the Ammonia Cycle in Your Aquarium

Cycling Your Aquarium

Establishing the ammonia cycle in your aquarium is crucial to the health and well-being of your fish. To begin, we need to cycle our aquarium. Cycling refers to the process of establishing beneficial bacteria in the aquarium that will break down fish waste and other organic matter. This process can take anywhere from four to six weeks, so patience is key.

There are a few different methods for cycling your aquarium, but the most common method is the fishless cycle. This method involves adding a source of ammonia to the aquarium to feed the bacteria. We recommend using pure ammonia, which can be found at most hardware stores. Add five drops of pure ammonia to every ten gallons of water every day until the cycle is established.

Adding Ammonia

When adding ammonia, it’s important to monitor the levels of ammonia, nitrite, and nitrate in the aquarium. You can use a test kit to measure these levels. During the cycling process, the ammonia levels will spike and then begin to decline. This is a sign that the beneficial bacteria are beginning to establish themselves.

Once the ammonia levels begin to decline, you can begin to add small amounts of fish food to the aquarium to provide additional sources of ammonia for the bacteria. Be sure to monitor the levels of ammonia, nitrite, and nitrate closely during this process. You want to keep the ammonia levels at around 3ppm, and the nitrite levels at 0ppm.

It’s important to note that during the cycling process, the water may become cloudy and there may be a buildup of algae. This is normal and will subside as the cycle becomes established. Be patient and continue to monitor the levels of ammonia, nitrite, and nitrate until the cycle is fully established.

Torch Coral
Soft coral Red Gonipora - Cut To Order

Maintaining the Ammonia Cycle

Once the ammonia cycle is established in our aquarium, it is important to maintain it properly to ensure the health of our fish and other aquatic creatures. Here are some tips on how to do that:

Testing Water Parameters

We should regularly test the water parameters in our aquarium to ensure that the ammonia levels are within the safe range. We can use a test kit to measure the levels of ammonia, nitrite, and nitrate. The ideal level of ammonia is 0 ppm, while the nitrite and nitrate levels should be kept below 0.5 ppm and 20 ppm, respectively.

If we find that the ammonia levels are too high, we can perform a partial water change to dilute the concentration of ammonia in the aquarium. We should also avoid overfeeding our fish, as excess food can contribute to the ammonia levels in the aquarium.

Regular Water Changes

Regular water changes are an important part of maintaining the ammonia cycle in our aquarium. We should change about 10-15% of the water in our aquarium every week to remove any accumulated waste and replenish the aquarium with fresh, clean water. This will help to keep the ammonia levels in check and ensure that our fish and other aquatic creatures have a healthy environment to live in.

During water changes, we should also clean the filter media to remove any accumulated debris and ensure that the filter is working properly. We should avoid cleaning the filter too often, as this can disrupt the ammonia cycle and remove the beneficial bacteria that are responsible for breaking down the ammonia in the aquarium.

By testing the water parameters and performing regular water changes, we can ensure that the ammonia cycle in our aquarium is maintained properly. This will help to keep our fish and other aquatic creatures healthy and happy, and ensure that our aquarium is a beautiful and thriving ecosystem.

Troubleshooting Common Ammonia Cycle Problems

When setting up an aquarium, it is important to establish the ammonia cycle to ensure the health and wellbeing of your fish. However, sometimes things don’t go as planned and you may encounter some common problems during the cycling process. In this section, we will discuss two of the most common problems and how to troubleshoot them.

Ammonia Spikes

One of the most common problems during the ammonia cycle is an ammonia spike. This occurs when the bacteria responsible for breaking down ammonia have not yet established themselves in the tank. As a result, ammonia levels can become very high, which can be harmful to fish.

If you notice an ammonia spike, the first thing to do is to perform a partial water change to dilute the ammonia in the tank. You can also add a bacterial supplement to help establish the necessary bacteria. Be sure to test the water regularly to monitor ammonia levels and continue partial water changes as necessary.

Cloudy Water

Another common problem during the ammonia cycle is cloudy water. This can be caused by a bacterial bloom, which occurs when the bacteria responsible for breaking down ammonia multiply rapidly. While this is a normal part of the cycling process, it can be unsightly and concerning for aquarium owners.

If you notice cloudy water, the best thing to do is to wait it out. The bacterial bloom should clear up on its own as the bacteria establish themselves in the tank. However, you can also try reducing the amount of food you are feeding your fish, as excess food can contribute to the cloudiness. Additionally, you can perform partial water changes to help clear up the water.

FAQs

How long does it take to cycle a tank with ammonia?

Cycling a tank with ammonia can take anywhere from 2 to 6 weeks. It depends on the size of the tank, the amount of ammonia added, and the temperature of the water. The process can be sped up by adding live bacteria supplements to the tank. We recommend testing the water every few days to monitor the progress of the cycle.

How much ammonia is needed to cycle a tank?

The amount of ammonia needed to cycle a tank depends on the size of the tank. A general rule of thumb is to add 4-5 drops of pure ammonia per gallon of water. However, it’s important to test the water regularly to ensure the ammonia levels stay between 2-4 ppm. Adding too much ammonia can harm the fish and prolong the cycling process.

What should the ammonia level be during cycling with fish?

If you choose to cycle your tank with fish, it’s important to keep the ammonia levels as low as possible. We recommend keeping the ammonia levels below 1 ppm to prevent harm to the fish. Test the water regularly and perform partial water changes as needed to keep the ammonia levels in check. It’s important to note that cycling with fish can be stressful for the fish and is not recommended for beginners. We recommend cycling with pure ammonia or live bacteria supplements instead.

Conclusion

Propagating acroporas can be a rewarding and exciting experience for any reef hobbyist. With the right tools, techniques, and knowledge, you can successfully grow and maintain a thriving acropora coral reef. Remember to always prioritize stability and consistency in your reef tank environment, and to research and follow best practices for acclimating new frags.

When fragging acroporas, be sure to use clean, sharp tools and to handle the corals with care. Take your time and follow a step-by-step process to ensure the best chances of success. Adequate flow and lighting are also crucial factors to consider when propagating acroporas.

Additionally, it’s important to monitor your acropora frags closely for any signs of stress or disease. Keep an eye out for changes in color, texture, or behavior, and take action immediately if you notice any issues. Regular water testing and maintenance can also help prevent problems before they arise.

Overall, fragging acroporas requires patience, attention to detail, and a willingness to learn and adapt. With the right approach, you can enjoy the beauty and diversity of these stunning corals in your own reef tank for years to come.

Anemone Hosting Clownfish: The Perfect Symbiotic Relationship

As aquarium enthusiasts, we are always looking for ways to create a beautiful and healthy environment for our fish. One of the most fascinating relationships in the aquarium world is the symbiotic relationship between anemones and clownfish. These fish are known for their unique ability to live among the stinging tentacles of anemones without being harmed.

Clownfish and anemones have a mutualistic relationship, meaning they both benefit from living together. The anemone provides protection for the clownfish by stinging potential predators, while the clownfish provides the anemone with food scraps and helps to circulate the water around it. However, not all clownfish species will naturally host with anemones, and it can take time and patience to establish this relationship in your aquarium.

Rainbow Sunburst Anemone Coral

Anemone Hosting Clownfish: A Symbiotic Relationship

When we think of the ocean, we often picture colorful coral reefs with a diverse array of sea creatures. One of the most iconic relationships found in these reefs is the symbiotic relationship between anemones and clownfish. In this section, we will explore what anemones and clownfish are, and how they form this unique and beneficial relationship.

What is an Anemone?

Anemones are marine animals that belong to the phylum Cnidaria, which also includes corals, jellyfish, and hydroids. They are named after the terrestrial flower because of their colorful appearance and petal-like tentacles. Anemones are sessile, meaning they are attached to a surface and cannot move around. They use their tentacles to capture prey, such as small fish and plankton, and can also defend themselves from predators with their stinging cells.

What is a Clownfish?

Clownfish, also known as anemonefish, are small, brightly colored fish that are found in the tropical waters of the Indian and Pacific Oceans. They are named for their playful and clown-like behavior, and are often associated with the anemones they live in. Clownfish have a special mucus layer on their skin that protects them from the anemone’s stinging cells, allowing them to live among the tentacles without being harmed. They are also immune to the toxins produced by the anemone, which makes them an ideal resident for the anemone.

The Symbiotic Relationship between Anemones and Clownfish

The symbiotic relationship between anemones and clownfish is a classic example of mutualism, where both species benefit from the interaction. The anemone provides the clownfish with protection and shelter from predators, as well as a place to lay their eggs. In return, the clownfish provide the anemone with nutrients in the form of waste, while also scaring off potential predator fish. This relationship is so important that some species of clownfish cannot survive without anemones.

It is important to note that not all anemones are suitable hosts for clownfish. Different species of anemones have different requirements for their environment, and not all anemones produce the same toxins that clownfish are immune to. This means that each species of clownfish has evolved to live with a specific species of anemone, and cannot survive with other species.

Overall, the symbiotic relationship between anemones and clownfish is a fascinating example of how different species can work together to survive and thrive in their environment. It is a reminder of the importance of biodiversity and the interconnectedness of all life on Earth.

Types of Anemones that Host Clownfish

When it comes to hosting clownfish, there are a few types of anemones that are the most popular. In this section, we will discuss the Bubble Tip Anemone, Magnificent Sea Anemone, and Giant Carpet Anemone.

Bubble Tip Anemone

The Bubble Tip Anemone, also known as Entacmaea quadricolor, is one of the most popular anemones for clownfish. They are relatively easy to care for and come in a variety of colors, making them a great addition to any saltwater aquarium. They are known for their bubble-like tips, which are usually a different color than the rest of the anemone. Clownfish will often host in the bubbles of the anemone, creating a beautiful symbiotic relationship.

However, it is important to note that not all clownfish will host in Bubble Tip Anemones. Some species, such as the Tomato Clownfish, are not known for hosting in any type of anemone. It is important to research the specific species of clownfish you plan to keep to ensure they will be compatible with the anemone you choose.

Magnificent Sea Anemone

The Magnificent Sea Anemone, also known as Heteractis magnifica, is another popular choice for clownfish. They are known for their bright colors and long tentacles, which can reach up to a foot long. Clownfish will often host in the tentacles of the Magnificent Sea Anemone, creating a stunning display in your aquarium.

However, it is important to note that the Magnificent Sea Anemone can be more difficult to care for than other types of anemones. They require high levels of light and strong water flow, as well as regular feeding. If you are a beginner aquarist, it may be best to start with a different type of anemone before attempting to care for a Magnificent Sea Anemone.

Giant Carpet Anemone

The Giant Carpet Anemone, also known as Stichodactyla gigantea, is one of the largest anemones that can host clownfish. They can grow up to three feet in diameter and come in a variety of colors, including green, purple, and brown. Clownfish will often host in the center of the Giant Carpet Anemone, creating a stunning display in your aquarium.

However, it is important to note that the Giant Carpet Anemone can be more difficult to care for than other types of anemones. They require high levels of light and strong water flow, as well as regular feeding. They can also be aggressive towards other fish and invertebrates in your aquarium, so it is important to research their compatibility before adding them to your tank.

Black and White Clown

How Do Anemone Hosting Clownfish Benefit Each Other?

Protection from Predators

When a clownfish decides to make an anemone its home, it receives protection from predators. The anemone’s tentacles provide a safe haven for the clownfish to hide in, and the clownfish helps to protect the anemone from butterfly fish that would eat the anemone. This mutual relationship benefits both the clownfish and the anemone, as the clownfish receives a safe home, and the anemone receives protection from predators.

Food and Nutrients

Clownfish also benefit anemones by providing them with food and nutrients. Clownfish produce waste that anemones can use as a source of nutrients. The clownfish also helps to attract larger or smaller fish by their colorful orange and white bodies that the anemone can eat. This mutually beneficial relationship ensures that both the clownfish and the anemone have access to the nutrients they need to thrive.

Anemone Cleaning and Care

In addition to providing food and protection, clownfish also help to keep the anemone clean and healthy. Clownfish are known to clean the anemone by removing parasites and dead tissue from the anemone’s surface. This cleaning process helps to keep the anemone healthy and free from disease. Additionally, clownfish help to oxygenate the tentacles of the anemone as they swim through it, which helps to keep the anemone healthy and thriving.

Overall, the relationship between anemone hosting clownfish is a perfect example of mutualism in nature. Both the clownfish and the anemone benefit from their relationship, and they have evolved to rely on each other for survival. As we continue to study and learn more about this fascinating relationship, we can gain a greater appreciation for the complex and interconnected nature of the natural world.

FAQ’s

Why do anemones host clownfish?

Clownfish and anemones have a symbiotic relationship. Anemones provide protection for clownfish from predators, while clownfish provide food for anemones. The mucus on the clownfish’s skin also protects the anemone from parasites and other harmful organisms.

How long does it take clownfish to host anemone?

The time it takes for clownfish to host anemones varies depending on the species and the individual fish. Some clownfish may host anemones within a few days, while others may take several months. It’s important to be patient and give the fish time to adjust to their new environment.

Can a clownfish over host an anemone?

Yes, it is possible for a clownfish to over host an anemone. This can lead to the anemone becoming stressed and potentially dying. It’s important to monitor the behavior of both the clownfish and the anemone to ensure that they are both healthy and thriving.

Why won’t my clowns host my anemone?

There are several reasons why clownfish may not host anemones. One reason may be that the anemone is not the right species for the clownfish. Another reason may be that the clownfish are not comfortable in their environment and do not feel safe enough to host the anemone. It’s important to ensure that the aquarium environment is suitable for both the clownfish and the anemone.

UC Venus Gonipora

Discovering the Anatomy of a Coral

Corals are fascinating creatures that are an essential part of our marine ecosystem. They are found in shallow and deep waters around the world and are known for their vibrant colors and intricate structures. Not only are they beautiful parts of the ocean but also can be amazing parts of your home.

Firstly, corals are not plants, but rather animals that belong to the phylum Cnidaria. They are made up of thousands of individual polyps that are connected to each other by a thin layer of tissue. Each polyp has a mouth surrounded by tentacles that are used to capture food and defend against predators. The polyps also have a hard, calcium carbonate skeleton that forms the structure of the coral reef.

Secondly, coral reefs are incredibly diverse ecosystems that support a wide range of marine life. They are often called the “rainforests of the sea” due to their high level of biodiversity. Coral reefs provide food, shelter, and breeding grounds for countless species of fish, invertebrates, and other marine organisms. 

Soft coral Red Gonipora - Cut To Order
Neon Green Hammer

What is a Coral?

Corals are fascinating marine invertebrates that belong to the class Anthozoa of the phylum Cnidaria. They are colonial organisms, which means that they are composed of hundreds to hundreds of thousands of individual animals, called polyps. Each polyp has a stomach that opens at only one end. This opening, called the mouth, is surrounded by a circle of tentacles.

Defining a Coral

According to the U.S. Geological Survey, the hard skeleton of coral is formed by the secretion of calcium carbonate by the polyp. The cup-like skeleton deposited by an individual polyp is called a corallite. The term coral is also applied to the skeletons of those animals, particularly to those of the stonelike corals.

Types of Corals

There are many different types of corals, each with its own unique characteristics. Some of the most common types of corals include:

  • Stony corals – These are the most common type of coral and are found in shallow waters. They have a hard, stony skeleton and are often brightly colored.
  • Soft corals – These corals have a soft, flexible skeleton and are found in deeper waters. They are often brightly colored and have a feathery appearance.

Each type of coral has its own unique characteristics and plays an important role in the marine ecosystem. By learning about the different types of corals, we can gain a better understanding of these fascinating creatures and the important role they play in our oceans.

Soft coral - Strawberry Wine Zoanthid
Tri-color Acropora

Anatomy of a Coral

Corals are fascinating creatures that form the basis of some of the most diverse and productive ecosystems on Earth. In this section, we will explore the anatomy of a coral and learn about the different structures that make up these incredible organisms.

Polyps

The basic structural unit of a coral is the polyp, which is a small, cylindrical animal with a mouth and tentacles at one end and a base at the other. Polyps are typically only a few millimeters in size, but they can aggregate together to form large colonies that can be several meters in diameter.

Tentacles

At the top of the polyp is a ring of tentacles that are used to capture food from the water. The tentacles are armed with stinging cells called nematocysts, which can immobilize small prey and deter predators.

Mouth and Gastrovascular Cavity

The mouth of the polyp leads to a gastrovascular cavity, which is a sac-like structure that serves as both the digestive and circulatory system of the animal. Food is broken down in the cavity and nutrients are distributed throughout the body.

Skeletal Structure

Corals secrete a hard, calcium carbonate skeleton that provides support and protection for the polyps. The skeleton is made up of many small cups called corallites, which are formed by the polyps as they secrete calcium carbonate from their bases.

Overall, the anatomy of a coral is a marvel of nature, with intricate structures and systems that allow these animals to survive and thrive in some of the most challenging environments on Earth.

FAQ’s

What is the anatomy of a coral?

Corals are animals that belong to the phylum Cnidaria and the class Anthozoa. They have a simple body structure that consists of a mouth, tentacles, and a stomach. Corals have a hard external skeleton made of calcium carbonate that protects their soft body parts.

What are the 3 main parts of coral?

The three main parts of coral are the polyp, the coenosarc, and the skeleton. The polyp is the individual coral animal that has a mouth, tentacles, and a stomach. The coenosarc is the thin layer of tissue that connects the polyps and allows them to communicate with each other. The skeleton is the hard external structure that is formed by the secretion of calcium carbonate by the polyps.

Learn More

ssc starry night acropora

Acropora Red Bugs: What You Need to Know

Acropora Red Bugs are a common pest in the aquarium hobby that can cause significant harm to Acropora corals. These tiny pests are thought to be copepods and can easily take over and kill your Acropora in a few weeks if left untreated. 

These pests are almost invisible until closer inspection and can rapidly infest most all Acropora species, inhibiting growth, affecting coloration, and reducing polyp extension. It’s important to act quickly if you suspect an infestation of Acropora Red Bugs in your aquarium.

In this article, we’ll cover everything you need to know about Acropora Red Bugs, including how to identify them, the damage they can cause, and the best treatment options available. By the end of this article, you’ll have a better understanding of how to prevent and treat Acropora Red Bug infestations in your aquarium, and you’ll be better equipped to keep your corals healthy and thriving.

Tyree Pinky The Bear Acropora
SSC Milky Way Acropora

What are Acropora Red Bugs?

Acropora Red Bugs, also known as Acro Red Bugs, are tiny pests that can infest and harm Acropora colonies in your aquarium. These pests are almost invisible to the naked eye until closer inspection. Once introduced into the aquarium, they can rapidly infest most all Acropora species, inhibiting growth, affecting coloration, and reducing polyp extension.

Acro Red Bugs are like a flea or mite infection and can easily take over and kill your Acropora in a few weeks if left untreated. They are thought to be copepods and only infest small polyped stony corals (SPS) of the genus Acropora. They are the bane of Acropora keepers, and it is a popular belief among hobbyists that they are the only parasites of stony corals.

These tiny little red bugs are a significant problem for reef aquarists, and they are difficult to get rid of once they have established themselves in your aquarium. They are incredibly resilient and can survive in even the harshest conditions, making them a challenging pest to eliminate.

Symptoms of Acropora Red Bugs

Acropora Red Bugs can wreak havoc on our beloved SPS corals. Here are some common symptoms to look out for:

  • Polyp retraction: Red Bugs can cause polyps to stay retracted, which can inhibit growth and affect the coloration of the coral.
  • Brittle tissue: The tissue of the coral may become more fragile and prone to breaking due to the damage caused by the Red Bugs.
  • Reduced polyp extension: Red Bugs can limit the display of polyps, which can be detrimental to the overall health and appearance of the coral.

If you notice any of these symptoms in your Acropora colonies, it is important to take action as soon as possible. Red Bugs can quickly infest and spread to other corals in the tank, so early detection and treatment is key.

It is also important to note that Red Bugs are very small and can be difficult to spot with the naked eye. Regular monitoring and observation of your corals can help catch any issues early on.

How To Get Rid Of Red Bug

The best way to get rid of your acropora red bugs is by using interceptor. Interceptor is a prescription doc medicine that you will need to get from a vet. Typically vets are a little hesitant to sell you interceptor but in our experience if you explain your situation they will give it to you.

When dosing it is best to either only dose the effected corals and those that might be infected in a separate quarantine tank if possible. Interceptor can kill the invertebrates in your tank and possibly stress out the other corals in your tank. Ultimately the potential losses from dosing interceptor is still better than losing all your sps due to red bugs.

Causes of Acropora Red Bugs

Acropora Red Bugs are small arthropods that can be found in reef aquariums. These pests can cause significant damage to Acropora colonies if left untreated. The most common way to get red bugs is by introducing coral, rock, or contaminated water to your tank.

Buying aquacultured corals can greatly reduce the risk of getting red bugs. Many retailers are known as “chop shops” they get corals directly from the ocean and chop them up and sell them as fast as they can. This leads to a huge risk of introducing red bug and other pests into your tank. At Sunnyside Corals we are careful to only sell aquacultured corals that have either been in our tank for years or that we know has been in someone else’s tank for years. All of our corals go through a strict dipping and quarantine process to assure there are no stragglers like red bug.

By understanding the causes of Acropora Red Bugs infestations, we can take steps to prevent them from occurring in our reef aquariums. Maintaining good water quality, quarantining new additions, feeding in moderation, and providing a stress-free environment for our corals can all help to prevent Acropora Red Bugs infestations.

Prevention of Acropora Red Bugs

Prevention is always better than cure, and this is especially true when it comes to Acropora Red Bugs. These tiny pests can be difficult to get rid of once they have infested your coral, so taking steps to prevent them from appearing in the first place is crucial.

One of the most important things you can do to prevent Acropora Red Bugs is to quarantine any new corals that you add to your tank. This will help to ensure that any pests or parasites that may be present on the coral do not have a chance to spread to your other corals. Check out our quarantine process with any questions. 

Another key preventative measure is to maintain good water quality in your tank. This means keeping your water parameters stable and within the appropriate range for your corals, as well as performing regular water changes and using high-quality filtration equipment. 

We aim to keep very standard levels in our systems.

ALK: 9
CAL: 420
MAG: 1350
Salinity: 1.025

We also use automation tools to help keep these levels stable. Our two main acro systems utilize large, commercial grade calcium reactors. We run a KALK reactor to keep ph up on both systems and we run a zero mag in the calcium reactors to keep the magnesium stable. 

In addition to these general maintenance tasks, there are also some specific steps you can take to prevent Acropora Red Bugs. For example, you can dip your corals before adding them to your system to help eliminate pests. We’ve developed our own dipping process that has worked great for our systems. 

Finally, it’s important to be vigilant and keep a close eye on your corals for any signs of pest infestations. If you notice any unusual behavior or discoloration in your corals, it’s important to take action right away to prevent the problem from getting worse.

By following these preventative measures, we can help to ensure that our corals stay healthy and free from Acropora Red Bugs.

Conclusion

These tiny pests can cause significant damage to your Acropora colonies if left unchecked. It is essential to take action as soon as you notice any signs of infestation. If you can remove the infected coral and treat it separately this is the best-case scenario. Interceptor is hard on corals and it is best to limit how many corals are effected by your treatment if possible.

FAQ’s

What are Acropora Red Bugs?

Acropora Red Bugs are tiny pests that can infest Acropora colonies. They are almost invisible to the naked eye, but can be seen upon closer inspection. Once introduced into the aquarium, they can rapidly infest most all Acropora species- inhibiting growth, affecting coloration, and reducing polyp extension.

How do I know if my Acropora has Red Bugs?

You can identify Acropora Red Bugs by looking for signs such as polyp retraction, poor color, and brittle tissue. If you suspect that your Acropora has Red Bugs, you can also use a magnifying glass to look for tiny red specks on the coral’s surface.

How do I get rid of Acropora Red Bugs?

There are several methods for getting rid of Acropora Red Bugs, is to use interceptor. It is important to follow the instructions carefully and to treat all affected corals. Additionally, it is recommended to quarantine and dip any new corals before adding them to your aquarium to prevent introducing new pests.

Can Acropora Red Bugs harm other corals in my aquarium?

While Acropora Red Bugs primarily infest Acropora colonies, they can also spread to other corals in the aquarium. It is important to treat all affected corals and to monitor your aquarium closely to prevent the spread of pests.

How can I prevent Acropora Red Bugs from infesting my aquarium?

One way to prevent Acropora Red Bugs from infesting your aquarium is to quarantine any new corals before adding them to your aquarium. Additionally, maintaining good water quality and avoiding overfeeding can help prevent the spread of pests. It is also important to regularly

Learn More

Need a Clean Up Crew for Your Reef Tank? Here’s What You Should Know

A clean up crew is a group of invertebrates that help maintain a healthy and balanced marine ecosystem in a reef tank. These invertebrates, such as snails, crabs, and shrimp, consume uneaten food, dead organic matter, and algae, preventing the accumulation of debris that can harm the tank’s water quality.

Adding a clean up crew to a reef tank can be beneficial in many ways. They are natural cleaners that can help reduce the need for manual cleaning and water changes. A clean up crew can also help control the growth of algae, which can be a common problem in reef tanks. Additionally, some invertebrates in the clean up crew, such as hermit crabs, can help aerate the substrate by turning it over, which promotes the growth of beneficial bacteria.

When selecting a clean up crew, it is important to consider the size of the tank, the type of algae present, and the other inhabitants of the tank. Different invertebrates have different roles and preferences, so it is important to choose a variety of species that can work together to keep the tank clean and healthy. With a well-chosen clean up crew, a reef tank can thrive and be a beautiful addition to any home or office.

Nassarius Snail

What is a Clean Up Crew?

A clean up crew, also known as a CUC, is a group of invertebrates and fish that are added to a saltwater aquarium to help maintain its cleanliness. These creatures are scavengers and algae eaters that perform various functions in the tank water, such as aerating and sifting through the sand, removing non-living organic substances, and keeping the algae in check.

A CUC is an essential component of any reef aquarium as it helps to maintain the water quality by removing excess waste and detritus that could otherwise harm the aquarium’s inhabitants. The animals in the crew help remove rotting organic matter that would otherwise cause ammonia, nitrate, and phosphate spikes that could poison the livestock.

Typically, a CUC consists of different kinds of crabs, shrimps, snails, sea stars, urchins, and other invertebrates that are known for their scavenging and algae-eating abilities. Some fish species, such as tangs and blennies, are also known to contribute to the clean-up process.

Benefits of Having a Clean Up Crew

A clean up crew (CUC) is a group of invertebrates and fish that are added to a saltwater aquarium with the purpose of cleaning up the tank. These animals play a critical role in maintaining the overall health of the enclosed aquarium ecosystem. Below are some of the benefits of having a clean up crew in your reef tank:

  • Removes Waste: The primary function of a clean up crew is to remove waste from the tank. They help to consume uneaten food, dead organic matter, and other debris that can accumulate in the aquarium. This helps to keep the water clean and clear, which is essential for the health of the fish and corals.
  • Controls Algae: Algae can be a problem in reef tanks, as it can grow quickly and smother corals. A clean up crew can help to control the growth of algae by consuming it. Different types of invertebrates and fish in the crew have different preferences for the types of algae they consume, so it is important to have a diverse crew to ensure all types of algae are consumed.
  • Prevents Pests: Harmful invertebrates can enter the tank through live rock or other means. A clean up crew can help to prevent these pests from becoming established in the tank by consuming them before they have a chance to reproduce.
  • Enhances Biodiversity: A clean up crew can add to the biodiversity of the tank. Different types of invertebrates and fish have different roles in the ecosystem, and having a diverse crew can help to maintain a healthy balance.

Overall, having a clean up crew in your reef tank can help to maintain a healthy and thriving ecosystem. It is important to research the different types of invertebrates and fish that are suitable for your tank and to ensure that you have a diverse crew to perform all the necessary functions.

Types of Clean Up Crew Members

Here is a list of our favorite clean up crew members that we use in all of our tanks. Each member has it’s own job and can help save you tons of time and lead to a healthier tank.

Emerald Crabs

Emerald crabs are a popular choice as a clean-up crew in saltwater tanks due to their excellent scavenging abilities. These crabs are particularly effective in controlling algae growth, as they have a voracious appetite for all types of algae, including hair algae and bubble algae. In addition, emerald crabs are known to eat uneaten food and dead organisms, keeping the tank clean and free from debris that can cause water quality issues. They are also reef-safe, which means they will not harm other inhabitants of the tank, such as corals and fish.

Snails

Snails are another common type of cleaning crew many aquarists love to use in their new tank. They are effective against cyano, diatoms, and other types of nuisance algae. Some of the common snail species that you can add to your aquarium include Trochus snails, Nassarius snails, Mexican Turbo, and Cerith snails. However, it is essential to note that some snail species can be sensitive to changes in water quality, so it is vital to monitor the water parameters regularly. 

Shrimps

Shrimps are beautiful members of the clean-up crew. They are similar to crabs in their role but are a bit less bossy. Cleaner shrimps are great for removing pests from your fish to help keep them healthy, and the popular Peppermint Shrimp is well known for its effectiveness in eating the aiptasia and mojano pest anemones. Scarlet Cleaner Shrimp is another popular choice for its bright red color and active personality.

Serpent Stars

Serpent stars, also known as brittle stars, are a popular choice for clean-up crews in saltwater tanks due to their excellent scavenging abilities. These invertebrates are highly effective at consuming detritus and leftover food, which helps keep the tank clean and reduce the likelihood of algae growth. They are also great at reaching small spaces and crevices, which makes them ideal for cleaning hard-to-reach areas of the tank. In addition, serpent stars are generally considered reef-safe, which means they are unlikely to harm other inhabitants of the tank, such as corals and fish. 

Sea Urchins

Sea urchins are another unique member of the clean-up crew. They are efficient algae eaters that can help to control algae growth in the tank. Some sea urchin species can also help to aerate the sand bed by moving around it. However, it is essential to note that some sea urchin species can be aggressive towards other tank inhabitants, so it is vital to research the species before adding them to the tank.

Sea Cucumber

Sea cucumbers are an excellent choice for a clean-up crew in a saltwater tank due to their unique and effective cleaning abilities. These fascinating creatures are able to consume large quantities of detritus, uneaten food, and other organic matter, helping to keep the tank clean and reduce the buildup of harmful nutrients in the water. Sea cucumbers are also known for their ability to break down and process hard-to-digest materials, such as dead coral and other debris. In addition, they can help aerate the substrate by stirring it up as they move around the tank. Sea cucumbers are generally considered reef-safe and can be a great addition to a coral reef tank. Overall, adding sea cucumbers to your saltwater tank can help create a healthy and balanced ecosystem while reducing the amount of maintenance required to keep your tank clean

Tangs

Tangs are a popular choice for clean-up crews in saltwater tanks, especially when it comes to controlling lettuce algae. These herbivorous fish have a voracious appetite for various types of algae, including lettuce algae, which is often considered a nuisance in saltwater aquariums. Tangs can consume large amounts of this type of algae, helping to keep the tank clean and reducing the likelihood of algae blooms. In addition, they are known to be hardy and can tolerate a wide range of water conditions, making them a great choice for beginner and experienced aquarists alike. Tangs are also visually stunning, with bright and vibrant colors that can add a pop of color to your tank. 

Copper Bands

Copper band fish are an excellent choice for saltwater tanks that have aiptasia, a common pest anemone that can quickly spread and harm other inhabitants of the tank. Copper band fish have a natural appetite for aiptasia and are highly effective at controlling their population. Additionally, they are known for their algae-eating abilities, which makes them a great addition to a clean-up crew. Copper band fish are also peaceful and generally do not harm other inhabitants of the tank, making them a safe choice to add to a reef tank.

Learn More

How Many Clean Up Crew Members Do You Need?

One of the most common questions asked by reef tank owners is how many clean up crew members are needed. The answer to this question depends on several factors, including the size of the tank, the types of nuisance algae present, and the types of clean up crew members being used.

It is important to note that not all clean up crew members are created equal. Some species are better at removing certain types of algae than others. For example, Trochus snails are great at removing diatoms, while Cerith snails are better at removing hair algae.

When deciding how many clean up crew members to add to a tank, it is important to consider the specific types of algae present and choose species that are known to be effective at removing those types of algae.

It is also important to avoid adding too many clean up crew members to the tank. Overcrowding can lead to competition for resources and may even result in some members starving to death.

Ultimately, the number of clean up crew members needed will vary depending on the specific needs of the tank. It is important to carefully consider the size of the tank, the types of algae present, and the species of clean up crew members being used in order to determine the appropriate number of members needed to keep the tank clean and healthy.

Maintaining Your Clean Up Crew

Once you have established your clean up crew, it is important to maintain them properly to ensure they continue to thrive in your reef tank. Here are some tips to keep in mind:

  • Regularly monitor the population of your clean up crew to ensure that they are not overpopulating or underpopulating your tank. Adjust the numbers as necessary.
  • Provide a varied diet for your clean up crew. While they primarily feed on algae and detritus, supplementing their diet with other foods such as sinking pellets or frozen food can help keep them healthy and strong.
  • Keep the water quality in your tank at optimal levels. This includes monitoring and maintaining the appropriate levels of salinity, pH, and temperature.
  • Regularly clean your tank and remove any excess debris or waste that may accumulate. This will help prevent the build-up of harmful bacteria and other pathogens.

It is also important to keep in mind that some species of clean up crew may have specific needs or requirements. For example, certain snails may require specific types of algae to feed on, while others may need a specific type of substrate to burrow in. Research the specific needs of each species in your clean up crew to ensure they are properly cared for.

Overall, maintaining a healthy and thriving clean up crew is essential to the overall health and well-being of your reef tank. By following these tips and staying attentive to the needs of your crew, you can help ensure that they continue to thrive and contribute to the overall balance and beauty of your tank.

Conclusion

Keeping a clean and healthy reef tank is essential for the survival of its inhabitants. One way to achieve this is by adding a clean-up crew to help maintain the tank’s cleanliness. A clean-up crew is a group of invertebrates and fish that work together to scavenge the tank for detritus, clean up leftover food, and graze on nuisance algae.

When adding a clean-up crew, it is important to consider the types of invertebrates and fish that are best suited for the job. For example, snails are excellent at eating algae, while hermit crabs are great at scavenging for leftover food. It is also important to add the clean-up crew at the right time, depending on the type of algae outbreak in the tank.

Replenishing the clean-up crew should be done once or twice a year, depending on the condition of the reef tank. It is important to keep track of the number of invertebrates and fish in the tank and make sure that they are not overpopulated. Overpopulation can lead to competition for resources and even death.

Overall, a clean-up crew is an essential part of maintaining a healthy and thriving reef tank. By choosing the right invertebrates and fish and replenishing them regularly, hobbyists can ensure that their tank remains clean and healthy for years to come.

Learn More

Zoanthid Garden: How to Create and Maintain One in Your Aquarium

Zoanthid gardens are becoming increasingly popular among aquarists as they offer a stunning display of colors and patterns in reef tanks. These gardens are created by collecting different varieties of zoanthids and placing them together in a specific arrangement to create a beautiful and vibrant display.

Creating a zoanthid garden requires careful planning and consideration of several factors, such as lighting, water flow, and placement. Zoanthids are relatively easy to care for, making them a popular choice for both novice and experienced aquarists.

In this article, we will provide a step-by-step guide on how to create the perfect zoanthid garden in your aquarium. We will discuss the supplies you need, how to care for your zoanthids, and provide tips on how to arrange them to create a stunning display. Whether you’re a seasoned aquarist or just starting, this guide will help you create a beautiful and thriving zoanthid garden in your reef tank.

Captain America Palythoa

What is a Zoanthid Garden?

A Zoanthid garden is a collection of zoanthids, a type of cnidarian, in a reef tank. Zoanthids are also known as zoas or colonial anemones, and they come in a variety of colors and patterns. When different varieties of zoanthids grow together, they create a beautiful and vibrant display that is highly sought after by reef tank enthusiasts.

Zoanthids are relatively easy to care for, making them a popular choice for beginner reef tank keepers. They are fast-growing and hardy, and they can thrive in a variety of water conditions. However, it is important to monitor the water quality in your tank to ensure that your zoanthids remain healthy and vibrant.

Creating a Zoanthid garden requires careful planning and consideration. You will need to choose the right variety of zoanthids to ensure that they grow well together and create a beautiful display. You will also need to provide the right lighting, water flow, and nutrient levels to ensure that your zoanthids thrive.

Creating a Zoanthid Garden

Choose the Right Placement

Zoanthids do best if you place them in moderate lighting and moderate flow. Some zoanthids will do better with more light and flow and others will thrive with lower light and flow. You will need to test this in your own tank to find that sweet spot for each zoanthid. We always look for slightly lower flow areas first and then slowly adjust them to higher flow or light if we feel it is necessary for the zoa.

Selecting the Right Zoanthids

When selecting zoanthids for your garden, consider the size, color, and growth rate of each coral. It’s important to choose zoanthids that are compatible with each other to avoid any aggression or competition. Some zoanthids will out grow and overtake other types of zoanthids. Sometimes there is no way of knowing beforehand but just be prepared for this possibility if you are not careful. Consider starting with a few varieties and gradually adding more over time.

Pink Cat Eyes Zoanthid
WWC Illuminati Zoanthid

Maintaining a Zoanthid Garden

Water Quality

Proper water quality is essential for maintaining a healthy zoanthid garden. Zoanthids require stable water parameters, including temperature, pH, and salinity. Keep the water temperature around 78°F and maintain a pH level between 8.1 and 8.4. Salinity should be kept at a specific gravity of 1.025. Zoanthids are one of the corals that actually do well with slightly elevated levels of Nitrates and Phosphates. Keep in mind that too much is not good and if you have non, your zoas might struggle just as much. Regular water changes, using a high-quality salt mix, and using a protein skimmer can help maintain water quality.

Lighting

Zoanthids require moderate lighting levels. They can thrive under a variety of lighting systems, including metal halides, T5s, LEDs, and fluorescents. However, it is essential to avoid placing zoanthids under direct light, as it can cause bleaching. It is also important to maintain a regular lighting schedule to prevent stress on the zoanthids. Make sure to check out our ultimate guide to aquarium lighting for our exact light setup and schedule we use on all of our zoanthids.

Feeding

Zoanthids are photosynthetic and can obtain nutrition from light. However, they can also benefit from occasional feedings of phytoplankton or zooplankton. It is important to avoid overfeeding, as it can lead to poor water quality and harm the zoanthids. If you start to have algae blooms you are likely overfeeding your tank. 

Cleaning

Regular cleaning is essential for maintaining a healthy zoanthid garden. Remove any detritus from the tank using a turkey baster or a siphon. Doing this regularly can help your zoanthids grow healthier.

Common Issues and Troubleshooting

Zoanthid gardens are generally easy to care for, but they can suffer from a variety of issues. Here are some common problems and troubleshooting tips to help keep your zoanthids healthy and thriving.

Pests and Diseases

Zoanthids can be affected by a variety of pests and diseases, including flatworms, nudibranchs, and bacterial infections. If you notice any of the following symptoms, it may indicate a pest or disease problem:

  • White spots on the zoanthids
  • Discoloration or darkening of the zoanthids
  • Visible pests on the zoanthids

To prevent and treat pest and disease issues, it is important to maintain good water quality and to dip new corals before adding them to your tank. You can also use dips, such as iodine or freshwater dips, to help remove pests and parasites from your zoanthids.

Algae Growth

Zoanthids can be susceptible to algae growth, which can prevent the polyps from opening fully. Common causes of algae growth include high nutrient levels and poor water flow. To prevent and treat algae growth, it is important to maintain good water quality and to ensure adequate water flow in your tank. You can also manually remove algae from your zoanthids using a toothbrush or razor blade. Another great way to control algae growth is by having a good clean up crew in your tank.

Zoanthid Recession

Zoanthid recession, or the gradual loss of polyps, can be caused by a variety of factors, including poor water quality, low nutrient levels, and stress. To prevent and treat zoanthid recession, it is important to maintain good water quality and to ensure adequate nutrient levels in your tank. You can also try feeding your zoanthids with a variety of foods, such as phytoplankton or zooplankton, to help promote growth and health. Sometimes you might have a fish that is picking at your zoanthids as well. Sometimes it is necessary to watch your tank to make sure nobody in your tank has a new favorite snack.

Conclusion

Zoanthid gardens are a great addition to any reef aquarium. They are easy to care for and can add a lot of color and visual interest to your tank. With a little bit of research and planning, you can create a beautiful and thriving zoa garden in your own home.

Once you have selected your zoanthids and placed them in your tank, it’s important to monitor them closely for signs of stress or disease. Regular water changes and proper maintenance of your tank’s equipment will help keep your zoa garden healthy and thriving.

Overall, creating a zoanthid garden is a fun and rewarding project for any reef aquarium enthusiast. With a little bit of care and attention, you can enjoy the beauty and diversity of these amazing corals in your own home.

Our Favorite Zoas

FAQ Section

Where should zoas be placed?

Zoanthids should be placed in an area of low-medium to medium-high flow. Too much flow may make it hard for the polyps to open. You will know your zoanthids are “happy” if they open and are fully extended without seeming to stretch too far upright.

How do you keep a ZOA garden?

Keeping a zoanthid garden requires proper lighting, water quality, and nutrient levels. Zoanthids require low to moderate lighting and should be placed in an area with stable water flow. The water should be kept clean and free of debris, and nutrient levels should be monitored and maintained at appropriate levels.

It is important to watch your zoanthid growth as some zoas will overtake nearby zoanthids and crowed them out. If you want to avoid this you can razorblade way intrusive polyps or just keep each type of zoa separated far enough from one another.

Will zoas grow on sand?

Zoanthids can grow on sand, but they prefer to attach themselves to rocks, shells, or other hard surfaces. If you choose to place them on sand, be sure to provide them with a stable base to attach to, such as a small rock or piece of rubble.

Learn More

JF Snow Cap Montipora

The 10 Best Beginner SPS Corals: Everything You Need to Know

Thinking about getting trying your hand with some SPS corals but not sure which ones would be best to try? If so, you’ve come to the right place! In this article, we’ll be sharing our top 10 beginner-friendly SPS corals that can handle tanks that are maybe not ready for acropora but have been humming along consistently for the last 6 to 12 months. Each one of these corals can take more of a hit than other sps and will also grow fast if you give them the right conditions.

Grafted
Poletti's Yellow Tip Austera

What to Know Before Choosing SPS Corals

Before you choose which SPS corals to add to your reef tank, there are a few things you should consider:

1. Water Parameters

SPS corals generally require stable and consistent water parameters to thrive. Here are some ideal ranges for the important water parameters:

  • pH: The ideal pH range for SPS corals is between 8.0-8.4.
  • Salinity: The recommended salinity for SPS corals is 1.025.
  • Alkalinity: SPS corals require a stable and consistent alkalinity level between 9-12 dKH.
  • Calcium: Maintaining calcium levels between 380-450 ppm is crucial for SPS coral growth and skeletal development.
  • Magnesium: Magnesium levels should be maintained between 1350 and 1400 ppm to support coral health and growth.
  • Nitrate and Phosphate: SPS corals are sensitive to high nutrient levels, so it’s important to keep nitrate levels below 5 ppm and phosphate levels below 0.05 ppm.

Keeping your water parameters stable and consistent over time is key to maintaining the health and growth of your SPS corals.

2. Lighting

SPS corals require intense lighting to thrive, so it’s important to have a high-quality light source that’s appropriate for your tank size and the types of corals you plan to keep. we grow all of our corals under both T-5 lighting and Radions. We run our lighting on a modified AB schedule with our T-5s and Radions. Our acros sit near the top of our tanks to assure that they are getting as much light as possible. We do not have a par meter but most people recommend that your acros sit at around 200 – 300 par lighting. Be aware that more damage can be caused by overexposure to light than not providing enough lighting. Be patient and take a couple of weeks to let your acros adjust to the lighting conditions in your tank to avoid potential harm. For more help on lighting, you can see our exact light set up and schedules on our tank lighting post.

3. Flow

SPS corals also require strong and consistent water flow to keep them healthy and prevent debris from settling on their surfaces. All our pumps run on a varied schedule that dips down at night – to about 15%- and runs on a combo of reef crest and tidal flow during the day -at about 60%. However, we do run our pumps for a couple hours on full blast around noon for nutrient export. All of our pumps are placed strategically in our tanks to allow for good flow without directly hitting any of our corals.

4. Tank Maturity

SPS corals should only be added to a mature tank that has been established for at least 6-12 months. This ensures that the tank has a stable environment and the necessary microorganisms to support the corals.

Our Top 10 Best SPS Corals for Beginners

Now that you know what to consider before adding SPS corals to your tank, let’s take a look at our top 10 beginner-friendly picks:

1. Mystic Montipora

Mystic Montipora is a great beginner SPS coral because it’s hardy and easy to care for. It features a beautiful red body with blue polyps that can add life and vibrancy to any reef tank. Mystic Montipora is also forgiving of less-than-perfect water conditions, making it a great choice for beginners.

2. Rainbow Montipora

Rainbow Montipora is another hardy and easy-to-care-for SPS coral that’s perfect for beginners. It has a stunning rainbow-like coloration that can add a unique and vibrant touch to your reef tank. Rainbow Montipora also does well in a variety of lighting and flow conditions, making it an ideal choice for beginners who are still learning the ropes.

3. Spongode Montipora

Spongode Montipora is a fast-growing SPS coral that’s perfect for beginners who want to see results quickly. It features a bright green coloration and a unique, sponge-like texture that can add interest and variety to your reef tank. Spongode Montipora also does well in a variety of lighting and flow conditions, making it a great choice for beginners.

4. ORA Birds Of Paradise

ORA Birds Of Paradise is a stunning SPS coral that features a green base with bright purple polyps that resemble the birds of paradise flower. Despite its delicate appearance, it’s actually quite hardy and can thrive in a variety of conditions. ORA Birds Of Paradise is an excellent choice for beginners who want a beautiful and unique addition to their reef tank.

5. ORA Green Birdsnest

ORA Green Birdsnest is another hardy and easy-to-care-for SPS coral that’s perfect for beginners. It features a vibrant green coloration and unique, thick growth patterns that can add interest and texture to your reef tank. ORA Green Birdsnest also does well in a variety of lighting and flow conditions, making it an ideal choice for beginners.

6. Forest Fire Digitata

Forest Fire Digitata is a fast-growing and hardy SPS coral that’s perfect for beginners who want to see results quickly. It features a bright orange and red coloration with a pop of green at the tip when grown in proper lighting that can add a pop of color to your reef tank. Forest Fire Digitata also does well in a variety of lighting and flow conditions, making it an easy choice for beginners.

7. Poletti’s Yellow Tip Acropora

Poletti’s Yellow Tip Acropora is a stunning SPS coral that features a bright yellow coloration at the tip in stark contrast to the green base and intricate growth patterns. Poletti’s Yellow Tip is one of the hardier Acropora corals that can thrive in a variety of conditions. Poletti’s Yellow Tip Acropora is an excellent choice for beginners who want a unique and eye-catching addition to their reef tank.

8. Bali Green Slimer

Bali Green Slimer is another great first Acropora to try. It is a hardy and fast-growing SPS coral that’s perfect for beginners. It features a vibrant green coloration and unique, growth patterns that can add interest and texture to your reef tank. Bali Green Slimer also does well in a variety of lighting and flow conditions, making it an ideal choice for beginners.

9. Red Hot Chili Peppers Montipora

Red Hot Chili Peppers Montipora is a hardy and fast-growing SPS coral that’s perfect for beginners who want to see results quickly. It features a green base and red polyps that can add a pop of color to your reef tank. Red Hot Chili Peppers Montipora also does well in a variety of lighting and flow conditions, making it an easy choice for beginners.

10. WWC Grafted Cap Montipora

WWC Grafted Cap Montipora is a beautiful and unique SPS coral that features a bright red and green coloration. It’s hardy and easy to care for, making it a great choice for beginners. WWC Grafted Cap Montipora also does well in a variety of lighting and flow conditions, making it an ideal choice for beginners who want a stunning and unique addition to their reef tank.

Spongodes Montipora

Conclusion

We hope this article has helped you choose the best beginner-friendly SPS corals for your reef tank. Remember to keep an eye on your water parameters, provide adequate lighting and flow, and feed your corals regularly to keep them healthy and thriving. When adding new corals to your tank remember to always go through the proper acclimating and dipping process. We prefer to use Bayer 2-way formula with sps corals especially as it will kill bugs but not your more sensitive sps corals. If you are wanting to dive deeper into sps corals make sure to check out our sps categories page that will give you more tips and tricks to grow sps corals like an expert.

FAQs

How often should I feed my SPS corals?

It’s recommended to feed SPS corals 2-3 times a week.

Can I add SPS corals to a new tank?

No, SPS corals should only be added to a mature tank that has been established for at least 6-12 months.

What lighting is best for SPS corals?

SPS corals require strong lighting, we use a combination of LED radions and t5s. You can see our exact lighting schedule for SPS corals here.

How often should I clean my SPS corals?

SPS corals should be cleaned regularly to prevent debris from settling on their surfaces. You can blow off extra detritus with a turkey baster as well as adequate flow should help keep debris off your sps corals.

Can I keep SPS corals with other types of corals?

Yes, SPS corals can coexist with other types of corals in a reef tank, as long as their specific requirements for lighting and flow are met.

Learn More

Starburst Monti Cap

LPS vs SPS Coral: Which is Better for Your Aquarium?

When it comes to coral reefs, there are many different types of corals to choose from. Two of the most popular types are LPS and SPS corals. LPS stands for “large polyp stony” while SPS stands for “small polyp stony.” These terms refer to the size of the polyps, that make up the coral colonies.

While both LPS and SPS corals are popular choices for reef aquariums, they have some key differences. LPS corals tend to have larger polyps and are generally considered to be easier to care for than SPS corals. SPS corals, on the other hand, have smaller polyps and are often more challenging to keep alive and healthy.

If you’re considering adding coral to your reef aquarium, it’s important to understand the differences between LPS and SPS corals. In this article, we’ll take a closer look at the characteristics of each type of coral, as well as the pros and cons of keeping them in your aquarium. Whether you’re a seasoned reef keeper or just starting out, this guide will help you make an informed decision about which type of coral is right for you.

Torch with Clown fish
ASD Holy Grail Hammer
Duncans

What are LPS Corals?

LPS stands for Large Polyp Stony corals. As the name suggests, these corals have larger polyps compared to SPS corals, which makes them easier to spot. Their polyps are typically between 1 and 2 inches in diameter, and they extend and retract from the coral’s skeleton. LPS corals are also known for their colorful appearance, flowy movement, and unique shapes, which make them popular among reef aquarists.

One of the most significant advantages of LPS corals is that they are generally easier to care for than SPS corals. They are more tolerant of fluctuations in water quality and temperature, making them ideal for beginner reef keepers. They also require less intense lighting and water flow than SPS corals, which makes them less demanding on equipment.

There are many different types of LPS corals, including hammer corals, torch corals, favias, and chalices. Each type has its unique requirements and characteristics, and it’s essential to research each species before adding it to your aquarium. For example, some LPS corals require regular feeding, while others can survive solely on photosynthesis.

What are SPS Corals?

SPS corals, or small polyp stony corals, are a type of coral that has small polyps with a diameter of less than 1cm. They are characterized by their intricate and delicate branching structures, encrusting, or plating growth patterns which are made up of calcium carbonate. SPS corals come in a wide range of colors, including blue, green, pink, and purple, and are a popular choice for reef aquariums.

SPS corals are considered to be more challenging to keep than LPS corals because they require very specific water conditions. They require high levels of calcium, magnesium, and alkalinity, and are sensitive to changes in water temperature and salinity. In addition, SPS corals require high levels of light, which often demands a nicer light set up such as radions and t5s for optimal growth.

Despite their high maintenance requirements, SPS corals are highly prized by reef aquarium enthusiasts for their beauty and unique growth patterns. They are known for their rapid growth and can quickly outgrow their space in an aquarium if not properly maintained. SPS corals are also known for their ability to create a natural habitat for other marine life, providing shelter and food for fish and invertebrates.

SSC Zephyr
Capricornis montipora - Leng Sy Cap sps coral Montipora

Differences Between LPS and SPS Corals

Skeleton Structure

The most significant difference between LPS and SPS corals is their skeleton structure. LPS corals have a thick, fleshy skeleton, while SPS corals have a thin, calcareous skeleton. LPS corals also have a more porous skeleton, which allows them to absorb nutrients from the water more easily. On the other hand, SPS corals have a more solid structure, which makes them more resistant to damage from predators and environmental factors.

Polyp Size and Shape

Another major difference between LPS and SPS corals is their polyp size and shape. LPS corals have larger, more prominent polyps, while SPS corals have smaller, more delicate polyps. LPS corals also have a more varied polyp shape, ranging from round to elongated, while SPS corals have a more uniform, flower-like shape.

Growth Rate

LPS corals generally grow at a slower rate than SPS corals. This is because LPS corals have a thicker skeleton and larger polyps, which require more energy to maintain. SPS corals, on the other hand, have a thinner skeleton and smaller polyps, which allows them to grow more quickly.

Lighting and Water Flow Requirements

SPS corals require strong lighting and high water flow to thrive, while LPS corals can tolerate a wider range of lighting and water flow conditions. SPS corals need intense lighting because they have a symbiotic relationship with photosynthetic algae, which provides them with energy. LPS corals, on the other hand, do not rely as heavily on photosynthesis and can get by with lower light levels.

Feeding and Care

LPS corals require more feeding and care than SPS corals. They need to be fed a variety of foods, including plankton, brine shrimp, and other small organisms. They also require regular water changes and maintenance to keep their fleshy polyps healthy. SPS corals, on the other hand, can get by with less feeding and care, as they rely more on photosynthesis for energy.

Popular LPS Corals

Large Polyp Stony (LPS) corals are a great choice for beginners or those who are looking for an easy-to-care-for coral. These corals are known for their large fleshy polyps that extend from a hard calcareous skeleton. Here are some of the most popular LPS corals:

  • Torch Coral: This coral has long, flowing tentacles that resemble a torch. It comes in a variety of colors, including green, purple, and orange. The Torch Coral prefers low to moderate lighting and moderate water flow.
  • Frogspawn Coral: The Frogspawn Coral has large, fleshy polyps that resemble a frog’s foot. It comes in a variety of colors, including green, pink, and orange. The Frogspawn Coral prefers moderate lighting and moderate water flow.
  • Hammer Coral: The Hammer Coral has hammer-shaped tentacles that resemble a hammerhead shark. It comes in a variety of colors, including green, purple, and blue. The Hammer Coral prefers low to moderate lighting and moderate water flow.

These LPS corals are relatively easy to care for and can add a lot of color and movement to your reef tank. It’s important to provide them with the proper lighting and water flow to ensure their health and growth.

Popular SPS Corals

SPS corals are a popular choice for reef aquarium enthusiasts because of their unique shapes and colors. Here are some of the most popular SPS corals:

  • Acropora – This is one of the most popular SPS corals. It comes in many different colors and shapes, and is known for its fast growth rate.
  • Montipora – This SPS coral is also available in many different colors and shapes. Often it is hardier than Acropora but can grow just as fast or faster than Acropora.

When it comes to caring for SPS corals, it’s important to provide them with the right conditions. They require high water flow and intense lighting, so make sure your aquarium is equipped with the proper equipment. It’s also important to maintain stable water parameters, including temperature, salinity, and pH.

Overall, SPS corals can be a beautiful addition to any reef aquarium. Just be sure to research their care requirements before adding them to your tank.

Conclusion

Both LPS and SPS corals are stunning and can add beauty and diversity to any reef tank. However, they have different requirements and characteristics that make them unique.

If you are a beginner, LPS corals may be a better choice for you as they are generally easier to maintain and require less intense lighting and water flow. They also tend to be less expensive than SPS corals.

On the other hand, if you are an experienced aquarist and have the proper equipment and knowledge, SPS corals can be a rewarding challenge. They require more attention and care, but they offer a wide range of colors and shapes that can create a stunning reef display.

Ultimately, the decision between LPS and SPS corals comes down to your personal preferences, experience level, and the resources you have available. Regardless of which type of coral you choose, it’s important to research their specific requirements and provide them with the proper care to ensure their health and longevity in your tank.

FAQ Section

Are LPS or SPS corals easier?

It depends on the species and the conditions in your tank. Generally, LPS corals are considered easier to care for than SPS corals because they are less demanding in terms of lighting and water flow. However, some LPS corals can be sensitive to changes in water chemistry and may require more attention than others. SPS corals, on the other hand, require strong lighting and high water flow, which can be challenging to maintain. However, some SPS corals are more forgiving than others and can be suitable for beginners with some experience.

Are SPS corals for beginners?

SPS corals are generally not recommended for beginners because they require more specialized care than LPS or soft corals. They require strong lighting, high water flow, and stable water chemistry, which can be difficult to maintain for inexperienced hobbyists. However, some SPS corals are more forgiving than others and can be suitable for beginners with some experience. It is important to do your research and choose species that are known to be hardy and adaptable. We often recommend you do not add SPS to your tank for at least 6 months to a year as your tank needs time to stabilize before adding sps.

Can you mix LPS and SPS corals?

Yes, you can mix LPS and SPS corals in the same tank, but it requires careful planning and consideration of the requirements of each species. LPS corals typically require lower lighting and water flow than SPS corals, so you may need to create separate zones in your tank to accommodate both types of corals. It is also important to consider the compatibility of different species, as some corals may compete for space or resources by stinging one another.

Learn More

How Kalkwasser Dramatically Increased Our Coral Growth

Kalkwasser was a game-changer for our tanks! In this post, we discuss how we were able to completely change the growth rate of our acropora. In just a few months some of our most stagnant acros quadrupled or more in size! We dive into what exactly is Kalk, how we use it, why we use it and why you should consider it in your tank. If you have ever been skeptical to try out kalk, our images in this blog are proof enough that kalk can be a game changer when used correctly.

RMF Red Devil Nasuta 11/20/2021

rmf red devil nasuta

RMF Red Devil Nasuta 4/12/2022

rmf red devil nasuta

What is Kalkwasser?

Kalkwasser, also known as calcium hydroxide, is a popular reef tank additive used to maintain optimal calcium and alkalinity levels. It is a fine white powder that is mixed with fresh RO/DI water to create a clear liquid solution. This solution is then dosed into the aquarium to supplement the calcium and alkalinity levels.

One of the benefits of using Kalkwasser is its ability to help raise pH levels in the aquarium. This is because the solution is highly alkaline and can neutralize acidic substances in the water. Additionally, Kalkwasser is relatively inexpensive compared to other reef tank additives, making it a cost-effective option for maintaining calcium and alkalinity levels.

However, it is important to note that Kalkwasser should be used carefully and in moderation. Overdosing can lead to a buildup of calcium and other minerals, which can be harmful to the inhabitants of the aquarium. It is also important to properly mix the solution and remove any leftover residue before dosing into the aquarium. We prefer to use Two Little Fishies Kalkwasser as we have found it is the least likely to gum up your system and mixes the best.

Benefits of Using Kalkwasser

Using Kalkwasser in your reef aquarium can provide several benefits. Here are some of the most important ones:

  • Raises Calcium and Alkalinity: Kalkwasser is an excellent source of calcium and alkalinity, which are essential for the growth and health of corals, snails, and clams. By adding Kalkwasser to your tank, you can maintain the proper levels of calcium and alkalinity, which can help your reef thrive.
  • Boosts pH: Kalkwasser is also known for its ability to boost pH levels in reef aquariums. This is particularly useful if you have a low pH problem in your tank. By adding Kalkwasser, you can help stabilize the pH and create a more stable environment for your reef inhabitants.
  • Removes Carbon Dioxide: Kalkwasser has the ability to remove carbon dioxide from the water in your reef aquarium. Carbon dioxide can build up in your tank and cause pH to drop. By adding Kalkwasser, you can help remove carbon dioxide and prevent pH fluctuations.
  • Easy to Use: Kalkwasser is relatively easy to use compared to other calcium and alkalinity supplements. It can be added directly to your tank or used in a dosing system. It is also relatively inexpensive compared to other supplements.

Overall, using Kalkwasser in your reef aquarium can provide several benefits that can help your reef thrive. It is important to note that Kalkwasser should be used in moderation and with caution, as adding too much can cause pH to rise too high and harm your reef inhabitants.

Matt V Sangria 11/20/2021

matt v sangria

Matt V Sangria 6/30/2022

matt v sangria

How to Use Kalkwasser

Preparing Kalkwasser Solution

Kalkwasser is a simple and straightforward method for maintaining calcium and alkalinity levels in a reef aquarium. To prepare the solution:

  • Mix 1/2 to 1 teaspoon of Two Little Fishies kalkwasser powder per gallon of fresh water in a container.
  • Stir the mixture vigorously until the powder is completely dissolved.
  • Allow the mixture to settle for at least an hour before using it.

Dosing Kalkwasser Solution

Once the kalkwasser solution is prepared, it can be dosed into the aquarium. It is important to note that kalkwasser should be added slowly and carefully to avoid any sudden changes in pH or alkalinity levels. Here are some dosing tips:

  • Start by adding a small amount of the solution to the aquarium. Make sure you are consistent each day.
  • Gradually increase the amount of kalkwasser added over time, monitoring the pH and alkalinity levels closely.
  • It is best to add kalkwasser to the aquarium at night when the pH levels are naturally lower.
  • Use a dosing pump to ensure accurate and consistent dosing.
  • Monitor the calcium and alkalinity levels regularly and adjust the dosing accordingly.

Remember, kalkwasser is just one method for maintaining calcium and alkalinity levels in a reef aquarium. It is important to research and understand other methods as well to determine the best approach for your specific aquarium needs.

Precautions and Safety Measures

While Kalkwasser is an effective way to maintain calcium and pH levels in your reef tank, it is important to handle it with care. Here are some precautions and safety measures to keep in mind:

  • Always wear gloves and eye protection when handling Kalkwasser. It can cause skin and eye irritation.
  • Store Kalkwasser in a cool, dry place away from direct sunlight and heat sources.
  • Never mix Kalkwasser with other chemicals or additives. This can result in dangerous reactions.
  • Be sure to use the correct amount of Kalkwasser for your tank size. Overdosing can have harmful effects on your tank’s inhabitants.
  • Monitor your tank’s pH levels regularly when using Kalkwasser. Sudden spikes or drops in pH can be harmful to your tank’s inhabitants.

It is also important to note that Kalkwasser should not be used with certain types of aquariums, such as those with low pH or high alkalinity levels. If you are unsure if Kalkwasser is right for your tank, consult with a professional or do extensive research before use.

Overall, following proper precautions and safety measures when using Kalkwasser can help you have the same increase in coral growth that we experienced.

Tyree Pinky The Bear 11/20/2021

Tyree Pinky The Bear Acropora

Tyree Pinky The Bear 6/30/2022

Tyree Pinky The Bear Acropora

Conclusion

Kalkwasser is a simple and effective way to maintain the pH, calcium, and alkalinity levels in your saltwater aquarium. It is easy to use and cost-effective, making it a popular choice among beginner and experienced reef keepers alike.

When using kalkwasser, it is important to measure and dose it correctly to avoid any negative effects on your tank. Overdosing can lead to high pH levels and precipitation, while underdosing can result in low pH and calcium levels. It is recommended to use a dosing pump and a pH controller to ensure accurate dosing and monitoring of pH levels.

Another important thing to keep in mind is the potential buildup of calcium carbonate in your tank. This can be prevented by using a calcium reactor or periodically performing water changes.

Overall, kalkwasser is a great addition to any reef tank and can help maintain a healthy and thriving ecosystem. With proper dosing and monitoring, it can provide numerous benefits to your tank and its inhabitants.

FAQ Section

How do I start kalkwasser?

Kalkwasser is a great way to maintain calcium and alkalinity levels in your reef tank. To start using kalkwasser, you will need a few things:

  • A container to mix the kalkwasser solution
  • A way to add the kalkwasser solution to your tank, such as a dosing pump or gravity-fed drip system
  • A way to measure the pH and alkalinity levels in your tank, such as test kits or a pH controller

Once you have these items, you can mix the kalkwasser solution according to the instructions on the package. It’s important to start slowly and monitor your pH and alkalinity levels closely. Gradually increase the amount of kalkwasser you add to your tank until you reach the desired levels.

How long does it take for kalkwasser to work?

Kalkwasser can take several hours to fully dissolve in your tank, so it’s important to add it slowly over time. You should start to see an increase in your calcium and alkalinity levels within a few days of starting to use kalkwasser. However, it’s important to continue monitoring your levels and adjusting your dosing as necessary.

What are the cons of kalkwasser?

While kalkwasser is a great way to maintain calcium and alkalinity levels in your reef tank, there are some potential downsides to using it:

  • Kalkwasser can raise the pH of your tank, which can be harmful to some species of fish and invertebrates.
  • Overdosing kalkwasser can lead to high levels of calcium and alkalinity, which can be harmful to your tank inhabitants.
  • Kalkwasser can be messy to mix and use, and it can also leave a white residue on your equipment and tank walls.

Despite these potential downsides, many reef tank hobbyists find kalkwasser to be a reliable and effective way to maintain calcium and alkalinity levels in their tanks.

Learn More

SSC Cloud Streets

Don’t Let Flatworms Ruin Your Reef: Tips for Dealing with Acropora-Eating Pests

Acropora Eating Flatworms (AEFW) are a type of parasitic flatworm that feed on Acropora corals. These flatworms can be a nightmare for SPS reefers as they can quickly infest a reef tank and cause the rapid death of coral colonies. AEFW are also known as Amakusaplana acroporae, and they are a species of free-living marine polyclad flatworms that prey on Acropora corals in reef aquariums.

AEFW are oval-shaped and can grow up to 6 mm in length. They are not like Red Planaria or mollusk-eating flatworms, as they only affect Acropora corals and not any other type of coral. If you see flat oval disks coming out of the coral, it is most likely infested with AEFW.

There are some natural predators known to eat AEFW, including some wrasse species. However, these fish will only eat the adult flatworms and not the eggs. Dipping the coral can also be successful in killing the adults, but any eggs will be protected from the dip and will simply hatch again when back in your tank. Our process for dipping corals helps minimize this risk but it is important to take preventative measures to avoid introducing AEFW into your reef tank, as they can quickly cause irreparable damage to your coral colonies

What is Acropora Eating Flatworm?

Acropora Eating Flatworm (AEFW) is a type of flatworm that feeds on Acropora corals, which are a type of stony coral. These flatworms are small, clear, and blob-like, and they can be difficult to spot. They are known to cause significant damage to Acropora corals, which can lead to the death of the coral colony if left untreated.

AEFWs are considered to be a major pest in reef aquariums, as they can quickly spread and infest entire colonies of Acropora corals. They survive by eating the coral’s tissue and laying their eggs around the base of the coral’s skeleton. If left unchecked, they can cause significant damage to the coral’s structure and lead to the death of the coral colony.

One of the challenges of dealing with AEFWs is that they can be difficult to detect. They are very small and can blend in with the coral’s tissue, making them hard to spot with the naked eye. Some signs that you may have an AEFW infestation include bite marks on the coral’s tissue, egg clusters around the base of the coral, and a general decline in the health of the coral colony.

Harmful Effects of Acropora Eating Flatworm on Coral Reefs

Acropora eating flatworms (AEFW) are a major threat to coral reefs. These flatworms feed on Acropora corals, which are known for their intricate and complex structures that provide habitats for a wide variety of marine life.

When AEFW infest Acropora corals, they cause significant damage to the coral’s tissue. This damage can lead to coral bleaching, which is a process in which the coral loses its symbiotic algae, resulting in the coral turning white and eventually dying. AEFW can also cause stunted growth and deformities in Acropora corals, which can have a cascading effect on the entire coral reef ecosystem.

Studies have shown that AEFW can have a significant impact on the health of Acropora corals. In one study, it was found that AEFW infestations reduced coral growth rates by up to 75%. This reduction in growth rates can have a significant impact on the ability of Acropora corals to recover from other stressors, such as coral bleaching.

In summary, AEFW pose a significant threat to coral reefs by damaging Acropora corals, reducing their growth rates, and causing coral bleaching. It is important to take steps to mitigate the impact of AEFW on coral reefs to ensure the health of your acropora.

Identification of Acropora Eating Flatworm

Acropora eating flatworms (AEFW) are a common pest in reef aquariums that can cause significant damage to coral colonies. These flatworms are typically brown or clear and have a flat, oval-shaped body that can grow up to several millimeters in size. AEFW are known to infest Acropora corals, but they can also be found on other coral species.

The easiest way to identify whether or not you have AEFW is to look for bite marks and eggs around the base of your Acropora. AEFW are hard to spot with the naked eye, but if you look closely, you may be able to see them on the surface of the coral. They attach themselves to the coral and feed on the coral tissue, leaving behind small, circular bite marks.

Another way to identify AEFW is to look for oval-shaped disks coming out of the coral. These disks are actually the flatworms themselves, and they can be seen protruding from the coral surface.

If you suspect that you have AEFW in your aquarium, it is important to act quickly to prevent them from spreading and causing further damage. The longer you wait, the more difficult it will be to eradicate them from your tank.

There are several treatment options available for AEFW, including freshwater dips, hydrogen peroxide dips, and the use of chemical treatments such as flatworm exit. It is important to research each treatment option carefully and follow the instructions carefully to avoid harming your coral or other tank inhabitants.

Overall, identifying AEFW early is key to preventing them from causing significant damage to your coral colonies. Regular monitoring and observation of your tanks can help you catch any signs of infestation early on and take action to prevent further damage.

Prevention and Control of Acropora Eating Flatworm

Biological Control

Biological control is a natural way to control the population of Acropora eating flatworms. One of the most effective biological controls is the use of wrasses. Wrasses are natural predators of flatworms and can help keep their population in check. Another biological control method is to introduce a type of bacteria called Vibrio coralliilyticus. This bacteria is known to attack and kill flatworms, and can be introduced into the aquarium through a probiotic supplement.

Chemical Control

Chemical control involves the use of chemicals to kill the flatworms. One of the most effective chemicals for treating flatworms is Levamisole. This chemical can be added to the aquarium water in small doses and will kill the flatworms without harming the coral. However, it is important to note that the use of chemicals can have negative effects on the aquarium’s ecosystem and should only be used as a last resort.

Mechanical Control

Mechanical control involves physically removing the flatworms from the coral. This can be done using a baster or a turkey baster to blast the flatworms off the coral. Another mechanical control method is to use a toothbrush to gently scrub the flatworms off the coral. However, only do this outside of your tank to avoid just moving the flatworms around in your tank or the release of toxins.

It is important to note that prevention is the best approach to controlling Acropora eating flatworms. Quarantining any new coral before adding it to the aquarium can help prevent the introduction of flatworms. Additionally, maintaining good water quality and avoiding overfeeding can help prevent the population of flatworms from growing. We have a step-by-step guide on best practices for dipping new corals and quarantine measures you can check out.

Conclusion

Acropora-eating flatworms are a destructive pest that can have a significant impact on corals. The flatworms have a high reproductive rate and can quickly spread throughout a coral colony, causing significant damage to the coral tissue.

Research has shown that warmer water temperatures can lead to faster rates of development and shorter generation times for the flatworms, which can exacerbate their impact on coral populations. However, chemical treatments such as levamisole HCl and praziquantel have been shown to be effective in removing the flatworms from infected corals when used in conjunction with water movement.

Overall, the management of Acropora-eating flatworms requires a multifaceted approach that includes both chemical and biological controls. This is why we always say you need to dip your new corals. It is 100 times better to lose one coral because you dipped vs lose your whole system because of a stray hitchhiker. Our dipping process is one of the best ways to kill pests and not your corals but there is never a guarantee from any coral vendors or hobbyists that their corals don’t have hitchhikers.

FAQ Section

How do you get rid of Acropora eating flatworms?

There are several ways to get rid of Acropora eating flatworms, including using a flatworm removal dip or treatment, introducing natural predators such as wrasses or peppermint shrimp, or manually removing them with a turkey baster or pipette.

How do I know if my Acropora is eating flatworms?

If your Acropora is infested with flatworms, you may notice visible signs such as small white or brown flatworms on the coral’s surface, or a decline in the coral’s overall health and growth rate. Some flatworms may also leave visible trails or bite marks on the coral’s tissue.

What do acropora eating flatworms look like?

Acropora eating flatworms are typically small, flat, and oval-shaped, with a size ranging from 1-5 mm. They can appear white, brown, or translucent, and may have distinct patterns or markings on their bodies.

What is the size of Acropora eating flatworm?

Acropora eating flatworms typically range in size from 1-5 mm, although some may grow larger under certain conditions.

Learn More

How to Frag Acropora: A Step-by-Step Guide

Acropora corals are one of the most popular and sought-after species in the reef-keeping hobby. They are known for their beautiful colors, intricate growth patterns, and fast growth rates. However, they can be difficult to propagate due to their delicate nature, making fragging them a challenge for many hobbyists. In this article, we will discuss the best practices for fragging acropora corals and reducing stress on the coral during the process.

When done correctly, fragging acropora corals can be a great way to expand your coral collection, share your corals with other hobbyists and prune back unhealthy growth. However, improper fragging techniques can lead to stress on the coral, which can result in poor growth or even death. We will cover the tools and techniques necessary for successful fragging, as well as tips for promoting new growth and reducing stress on the coral.

Whether you are a seasoned reef-keeper or just starting out, learning how to frag acropora corals is an essential skill for any hobbyist. With the right tools and techniques, you can successfully propagate these beautiful corals and share them with others in the hobby. Follow our guide to learn how to frag acropora corals and reduce stress on your coral during the process.

WWC Heartbreaker acropora
wwc heartbreaker frag after fragging

Benefits of Fragging Acropora

Acropora corals are a popular choice for reef aquarium enthusiasts due to their beautiful branching structures and vibrant colors. However, these corals can grow rapidly and become too large for the aquarium, potentially causing damage to other corals or the tank itself. This is where fragging comes in as a useful tool for managing Acropora growth.

By fragging Acropora, you can promote healthier and more sustainable growth for your coral. When you cut off a branch or piece of the coral, it stimulates growth in the remaining fragments, encouraging the coral to grow in a more compact and manageable form. This can also help prevent the coral from becoming too large and shading out other corals in the aquarium or blocking too much flow.

However, it’s important to note that fragging should only be done on healthy and mature specimens. Fragging a sick or stressed coral can do more harm than good, and can even lead to the death of the coral. It’s also important to use proper fragging techniques and equipment to minimize stress and damage to the coral during the process.

Overall, fragging Acropora can be a beneficial practice for both the health of your coral and the sustainability of the hobby. With proper care and technique, you can enjoy a thriving and diverse reef aquarium while minimizing the impact on natural reefs.

Tools and Materials

Before you start fragging your Acropora, you will need to gather a few tools and materials. Here are some of the essential items you’ll need:

  • Sharp scissors or a scalpel
  • Bone cutters or pliers
  • Latex gloves
  • Eye protection
  • Containers for the frags and mother colony
  • Glue or epoxy
  • Reef-safe cutting board or surface
  • Bucket of saltwater
  • Bandsaw with a diamond blade (optional)

It’s important to use sharp tools to make clean cuts and minimize stress on the coral. Dull tools can crush or tear the coral tissue, leading to damage or death. You should also wear latex gloves and eye protection to protect yourself from any potential irritants or toxins in the coral.

When choosing containers for your frags and mother colony, make sure they are clean and free of any contaminants or residues. You can use plastic cups, Tupperware, or other similar containers. Just make sure they are large enough to hold the frags and provide enough space for water flow. We typically have a holding container and a rinse container. When breaking off new frags there is often slime and debris that you need to rinse off.

For attaching the frags, you can use either glue or epoxy. Make sure to use a reef-safe product that won’t harm your coral or other inhabitants. We have found that super glue gel is the best option. Make sure it is the Gel type or it won’t work.

SSC Zephyr
SSC Zephyr Acropora

Section 4: Preparation

Preparing the Fragging Site

To prepare the fragging site, you’ll need a few tools and materials. First, set up a clean and well-lit workspace. Make sure you have access to clean saltwater for rinsing and dipping the corals (two separate containers). You’ll also need a fragging kit that includes a sharp scalpel or bone cutter, frag plugs or tiles, and frag glue or putty. Next, prepare the acropora colonies for fragging. Turn off the aquarium pumps and let the water settle for a few minutes. Remove the acropora colony from the tank and place it on a clean and dry surface. Start by using a scalpel or bone cutter to carefully cut the coral into frags. Make sure each frag has a healthy and intact polyp. We typically preper to not cut our frags under 1 inch as survival rates drop when cut smaller. Place each frag on a frag plug or tile and secure it with frag glue or putty. Finally, return the frags to the aquarium and turn on the pumps.

Taking your coral out of your tank is not always possible. If you are careful you can reach into your tank and use your bone cutters to break off frags inside your tank. Be very careful when doing this, as you might easily lose the frag in your tank or cause damage to surrounding colonies. When fragging this way, you will still want a container to rinse your new frags in close by to properly clean and prep your new frag.

Fragging Techniques

Method 1: Using Bone Cutters

One of the most common methods of fraggin acropora is to use bone cutters to break off a piece of the coral. Here are the steps to follow:

  • Choose a healthy coral with a thick branch or stem to frag.
  • Place the coral on a flat surface, such as a cutting board or piece of tile.
  • Using a pair of bone cutters, make a clean cut through the coral branch or stem by firmly cutting at the base of the branch you want to cut.
  • Once the coral has been cut, rinse the new frag in a container of tank water.
  • Place the new frag on a frag plug or piece of rubble and secure it with glue or putty.

Method 2: Use a Bandsaw with a diamond blade

Another method that we like to use is to cut our acros with our Bandsaw which has a diamond blade. This creates a precise, clean cut that is sometimes necessary with certain growth patterns.

  • Choose a healthy coral with a small branch or stem to frag.
  • Position the coral so you can reach the base of the stem with your blade.
  • Slowly push your coral through making sure to not put too much pressure on your blade.
  • Once the coral has been cut, rinse the frag and colony out in a container with your tank water. Remove any residue that is on the coral.
  • Place the new frag on a frag plug or piece of rubble and secure it with glue or putty.

It is important to note that fragging can be stressful for corals and should be done with care. Always use clean tools and follow proper safety precautions when fragging. If you choose to use a bandsaw, always use a diamond blade to ensure you do not cut yourself. Additionally, be sure to give the new frags time to heal and acclimate to their new environment before making any adjustments to their placement or water flow.

Post-Fragging Care

Placement of Fragged Pieces

After fragging your acropora, it is crucial to place the frags in the right location. Make sure to choose a spot with good water flow and lighting. Acropora frags require high lighting, so placing them in a shaded area will not be suitable. Also, ensure that the frags are not in direct contact with other corals, as this can cause damage to both corals.

Water Quality

It is essential to maintain good water quality after fragging your acropora. Keep an eye on the water parameters, including temperature, pH, salinity, and nutrient levels. High nutrient levels can lead to algae growth, which can harm the acropora frags. Regular water changes and the use of a protein skimmer can help maintain good water quality.

Lighting

Acropora frags require high lighting levels to thrive. Ensure that the light intensity is appropriate for the species you are fragging. If you are unsure, research the lighting requirements of the species or consult with an expert. Also, make sure to adjust the light intensity gradually over time, as sudden changes in lighting can shock the acropora frags. In conclusion, proper post-fragging care is crucial for the survival and growth of your acropora frags. Ensure that you place the frags in the right location, maintain good water quality, and provide appropriate lighting. With proper care, your acropora frags will thrive and grow into beautiful corals.

For a full rundown on best practices for acropora coral care check out our category page.

Conclusion

Propagating acroporas can be a rewarding and exciting experience for any reef hobbyist. With the right tools, techniques, and knowledge, you can successfully grow and maintain a thriving acropora coral reef. Remember to always prioritize stability and consistency in your reef tank environment, and to research and follow best practices for acclimating new frags.

When fragging acroporas, be sure to use clean, sharp tools and to handle the corals with care. Take your time and follow a step-by-step process to ensure the best chances of success. Adequate flow and lighting are also crucial factors to consider when propagating acroporas.

Additionally, it’s important to monitor your acropora frags closely for any signs of stress or disease. Keep an eye out for changes in color, texture, or behavior, and take action immediately if you notice any issues. Regular water testing and maintenance can also help prevent problems before they arise.

Overall, fragging acroporas requires patience, attention to detail, and a willingness to learn and adapt. With the right approach, you can enjoy the beauty and diversity of these stunning corals in your own reef tank for years to come.

FAQ Section

What is the easiest coral to frag?

The easiest coral to frag is a soft coral, such as a mushroom coral or a Xenia coral. These corals are typically easy to cut and propagate, making them great for beginners.

How do you start fragging corals?

To start fragging corals, you will need a few tools, including a sharp scalpel or coral cutter, gloves, and safety glasses. Next, you will need to select a healthy coral colony and carefully cut a small piece off the edge of the colony. Make sure to clean the frag before placing it in your desired location in your tank.

Does fragging hurt corals?

Fragging can be stressful for corals, and there is a risk of damage or infection during the process. However, if done carefully and with proper tools and techniques, fragging can be a beneficial way to propagate and expand your coral collection without harming the original colony. It is important to ensure the health and safety of both the original colony and the new frags.

Learn More

RMF Red Devil Nausuta

Brighten Up Your Acropora Collection: Top Lighting Techniques for Coral Growth

Acropora corals are among the most popular species in the hobby, with their intricate structures and vibrant colors captivating aquarists worldwide. However, achieving optimal growth and coloration requires more than just good water chemistry; lighting plays a crucial role in the health and vitality of Acropora colonies. In this article, we’ll explore the top lighting techniques for promoting healthy Acropora growth, including spectral requirements, intensity, and duration.

Understanding Acropora Lighting Requirements

Before we dive into specific lighting techniques, let’s first take a closer look at the lighting needs of Acropora corals. As photosynthetic organisms, corals rely on light energy to produce food and grow. However, not all light is created equal; corals require specific wavelengths and intensities to thrive. That is why in this blog post we are going to break down the lighting set up we use and why we chose to use this set up. You can also check out our full lighting blog with an in-depth breakdown of schedules and setup.

Spectral Requirements

Acropora corals require a broad spectrum of light, with wavelengths ranging from 400 to 700 nanometers (nm). This range includes both blue and red light, which are essential for photosynthesis and growth. In addition, Acropora corals require a moderate amount of green light to support their pigments’ fluorescence.

Intensity

Intensity is another critical factor in Acropora lighting. Generally, Acropora corals require high-intensity lighting, with recommended PAR (Photosynthetically Active Radiation) levels of 200-400 micromoles per square meter per second (umol/m2/s). This high-intensity lighting helps to promote healthy growth, coloration, and fluorescence.

Duration

Finally, the duration of lighting is also crucial for Acropora corals. In the wild, Acropora colonies are exposed to natural light cycles, with periods of bright sunlight followed by darkness. In a reef aquarium setting, it’s essential to replicate this natural cycle. Generally, Acropora corals require 8-12 hours of bright light, followed by 12-16 hours of darkness.

Saltwater aquarium light set up, Acropora lighting, lps coral lighting, sps coral lighting, softy coral lighting

Top Lighting Techniques for Promoting Healthy Acropora Growth

Now that we understand the lighting requirements for Acropora corals let’s dive into the top lighting techniques for promoting healthy growth.

T5 Lighting

T5 lighting is a popular choice among reef aquarists, and for good reason. These fluorescent lights emit a broad spectrum of light, including blue, red, and green wavelengths, making them ideal for Acropora corals. Additionally, T5 lights can be easily adjusted to achieve the recommended PAR levels, making it easy to dial in the perfect lighting for your Acropora collection. We personally feel like T5s have lead to our success with the best coloration and growth in our Acros.

LED Lighting

LED lighting is another popular option for reef aquariums, and for good reason. These lights offer a high degree of control over spectral output and intensity, allowing for precise tuning to the needs of your Acropora corals. Additionally, LED lights are energy-efficient and long-lasting, making them a cost-effective lighting solution for your reef aquarium.

Metal Halide Lighting

While metal halide lighting has fallen out of favor in recent years, it remains an effective lighting option for Acropora corals. These lights emit a high-intensity, broad spectrum of light, making them ideal for promoting healthy growth and coloration in Acropora colonies. However, metal halide lights can be expensive to operate and require a cooling system to prevent overheating.

ssc starry night acropora
Matt V Sangria

Our Acropora Lighting 

Over the years we have tried and tested a wide variety of different types and have ultimately chosen to use a Radion and T-5 combo. We use Radion gen 3s and 4s for the most part but still run a few gen 2s. We use the ATI Blue Plus Bulbs with our T-5s. We found that by running a combination of Radions and T-5s we have the best success with coloration and growth with our corals, especially Acropora.  If you want to successfully grow lots of Acropora this is the setup that we recommend. However, if you only want to grow mainly LPS and Softy Corals with only a few acros, you can be successful with just running Radions and no T-5s. The problem with only running radions for an acro heavy tank is that you run into issues with the amount of light spread. Your acros will appear colorful on top but dull and brown on the underside. This will affect the acro as it grows into a colony as the base will not receive enough light and may affect growth. The way to combat that is by either having a higher concentration of Radions or adding a T-5 light. Often times people favor adding T-5s because they are known to perform well but also you can save a lot of money because T-5s are a fraction of the price of radion lights.

For a more detailed dive into our lighting set up check out our full aquarium lighting blog post for our exact schedule and set up.

Acropora Placement

Placement is key when it comes to lighting exposure to your corals. The higher up your coral is placed in your system, the more light it receives and this can have a significant impact on their growth and overall health. Here are some general guidelines for placing different types of Acropora corals in your tank:

Branching Acropora Corals:

  1. Branching Acropora corals, such as Acropora digitifera and Acropora tenuis, have thin, delicate branches that grow in a bush-like pattern. These corals prefer high light conditions and should be placed in areas of the tank with high PAR levels. They also require strong water flow to bring nutrients to their delicate branches. Therefore, it is recommended to place these corals in the upper to middle areas of the tank, where they can receive strong light and water flow.

Staghorn Acropora Corals:

  1. Staghorn Acropora corals, such as Acropora echinata, have thick branches that grow in a staghorn-like pattern. These corals also prefer high light conditions but can tolerate slightly lower PAR levels compared to branching Acropora corals. They require moderate to strong water flow to bring nutrients to their branches. Therefore, it is recommended to place these corals in the middle to lower areas of the tank, where they can receive moderate light and water flow.

Plating Acropora Corals:

  1. Plating Acropora corals, such as Acropora millepora and Acropora valida, have thin, plate-like structures that grow in a horizontal direction. These corals prefer moderate to high light conditions and moderate water flow. They should be placed in areas of the tank with moderate PAR levels and moderate water flow. It is recommended to place them on the bottom of the tank, where they can receive moderate light and water flow.

Table Acropora Corals:

  1. Table Acropora corals, such as Acropora nobilis, have thick, plate-like structures that grow in a horizontal direction, forming a table-like shape. These corals prefer moderate to high light conditions and moderate water flow. They should be placed in areas of the tank with moderate PAR levels and moderate water flow. It is recommended to place them on the bottom of the tank, where they can receive moderate light and water flow.

It is important to note that these are general guidelines, and the placement of your Acropora corals may vary depending on the individual needs of the corals in your tank. It is always recommended to monitor the growth and health of your corals and adjust their placement accordingly. Additionally, it is important to ensure that your corals have enough space between them to prevent overcrowding, which can lead to stunted growth and poor health.

FAQ Section

What is the best light for Acropora?

The best light for Acropora corals is one that provides a broad spectrum of light, including blue, red, and green wavelengths. This light should also be high-intensity, with recommended PAR levels of 200-400 umol/m2/s.

How much light does Acropora need?

Acropora corals require 8-12 hours of bright light, followed by 12-16 hours of darkness.

Do Acropora need white light?

Acropora corals do not require white light specifically, but they do require a broad spectrum of light that includes blue, red, and green wavelengths.

What are ideal Acropora parameters?

The ideal parameters for Acropora corals include a temperature range of 75-82°F (24-28°C), salinity levels of 1.024-1.026, and calcium levels of 400-450 ppm. Additionally, it’s essential to maintain stable water chemistry and avoid large swings in parameters.

In conclusion, achieving healthy and vibrant Acropora colonies requires more than just good water chemistry. Proper lighting is crucial for promoting growth, coloration, and fluorescence. By understanding the lighting requirements of Acropora corals and using the top lighting techniques outlined in this article, you can create a thriving and beautiful reef aquarium that will be the envy of all your friends.


Learn More

Sonic Flare Zoanthid

A Beginner’s Guide to Acclimating Corals: Tips and Tricks

Knowing how to acclimate corals is essential to smoothly transition new corals to your tank. If new to the hobby or have been at it for years, the excitement of adding new corals to your aquarium never gets old. However, introducing corals to a new environment can be challenging and stressful for both the corals and their caretakers. That’s where acclimation comes in. Acclimation is the process of slowly and safely introducing corals to their new environment, giving them time to adjust to changes in water chemistry, temperature, and lighting. In this blog, we’ll explore the importance of coral acclimation and provide you with some tips and tricks to help ensure the health and success of your new coral additions. So, whether you’re a seasoned coral keeper or just starting out, sit back, relax, and let’s dive into the world of acclimating corals!

Do I Need to Acclimate My Corals 

When you get your new corals you most likely have the perfect place in mind and want to add it to your tank right away. That being said, it is strongly recommended that you do not directly place your new coral into your tank. The process of moving a coral from one tank to another causes extreme stress. By placing it in a new system, without acclimating it first, you risk shocking your new coral and potentially killing it. By acclimating your coral you allow the coral to gradually adjust to the new water conditions

The primary reason for acclimating corals is to give them time to adjust to changes in water parameters such as temperature, salinity, and pH. These parameters can vary greatly between different aquariums, and sudden changes can shock and stress the corals. Acclimating the corals gradually over a period of time allows them to slowly adjust to the new conditions, reducing the likelihood of stress and health problems.

Acclimation also allows the corals to adjust to the lighting conditions of the new aquarium. Light is essential for the growth and health of corals, and sudden changes in lighting intensity can cause the corals to bleach, which is a condition where the corals expel their zooxanthellae (photosynthetic algae) and turn white. By slowly acclimating the corals to the new lighting conditions, you can help prevent bleaching and ensure the corals remain healthy and vibrant.

Overall, acclimating coral is a critical process that should not be overlooked. By taking the time to acclimate your corals properly, you can help ensure their health and longevity in your aquarium.

How to Acclimate Your Saltwater Coral 

Here at Sunnyside, this is the acclimation process that has helped us to see a lot of success when it comes to adding new corals into our tanks.

  1. Float your new corals in the bag they arrive in, in your tank.

  2. Introduce your coral slowly to your tank water.

  3. Dip your corals.

  4. Rinse your corals.

  5. Place your new corals in your tank.

1. Float your new corals in the bag they arrive in, in your tank.

Start by floating the new frag in the tank or sump in order to get the temperature up. The goal is to get the water your new coral came into the same temperature as the tank before you start introducing it to new water.

2. Introduce your coral slowly to your tank water.

Take the water from the bag the coral came in and place it, as well as the coral, into a separate container to start the process. Do a slow drip or a series of small cups full of your system’s water and add it slowly to the container until you have at least doubled the water that the coral came in so it is a 50/50 ratio of your tank water and the new coral’s old water. This process should take 5-10 minutes. 

3. Dip your corals

At this point, you want to put our corals through the dipping process. Learning how to dip your corals is key to a healthy system and should not be skipped even if you are worried about the health of your coral.

4. Rinse your corals.

After our coral has been dipped, always do a rinse with the water that you are moving the coral into. Typically let the coral sit in clean tank water in the container for approximately 5-10 minutes before moving it into its new home. 

5. Place your corals in your tank or QT tank

All of our corals are acclimated and placed into a quarantine tank when we first get them and then we acclimate them again when we move them to their final destination. Some hobbyists recommend starting your frag lower in your system to provide it with low flow and lighting and then moving it slowly until it’s placed where you want it to go. The idea behind this is that you can avoid bleaching your coral by acclimating it to the flow and lighting. We typically choose to directly place our corals where we want them to be instead. This allows them to be where we know they’ll be happiest. 

However, acclimating the lighting and flow can be helpful if you’re just starting out and are concerned about placement. We have a lot of experience with the types of corals in our systems, allowing us to have a pretty good idea of where they need to be. That being said, we do continue to watch them after they’ve been placed to see if any adjustments need to be made. If so, we them move them accordingly. 

Ultimately it’s important to note that every tank is different. There are a lot of factors that contribute to keeping your coral happy and healthy. We have found that this process works the best for us, but also encourage you to use this as a guide for your own system and find what works best for you. Please, reach out to us if you have any questions and one of our experts will be happy to help you.

Learn More

Master the Art of Coral Dipping: Tips and Tricks for Success

How do I dip my new corals is one of the questions we often get from customers. While there are many methods to dipping your corals, this is the process that we use in order to kill any unwanted pests and not our corals, especially our touchy Acropora. You can use this same process or adjust it to fit your situation. We always recommend that you at least dip your corals once before they go into your tanks. No coral is worth introducing harmful pests into your tank.

Do I Need to Dip My New Corals?

For those of you wondering if you really need to dip new corals, the answer is YES. There is a risk that your new stunning coral might die but that small chance is a lot better than having a bug introduced to your tank that is a pain to get rid of and may kill other corals. If you follow our dipping method, your chances of killing any corals during the dipping process are very low. Dipping coral allows you to reduce the risk of infection, disease, and parasites. It also helps to sanitize and heal flesh wounds on the coral. Pests are able to hitchhike their way into your tank on corals, frags, mounts and rock. They can also be suspended in the water column or hidden in the sand. This means that by simply sharing water or sand from another tank, you can infect your system. In order to be proactive, it’s important to always dip new corals; regardless of whether or not they were dipped by the previous owner/ seller. Even if you trust the source you’re getting them from, there’s always a small risk of something being passed along. 

How Do I Dip My Coral?

Making sure you dip your coral correctly is crucial! Here is how we dip all of our coral to make sure there are no hitchhikers and your corals don’t die from dipping. You may not have a temporary quarantine system or any quarantine system but, having one is highly recommended! If you do not have one you can skip steps 4 – 7 and place corals directly in your tank.

  1. Start the acclimation process.
  2. Add Bayer 2-way formal to acclimated water with coral for 8 to 10 minutes. 
  3. Rinse your corals for 8 to 10 minutes in clean tank water.
  4. Put in a temporary quarantine system (optional)
  5. Repeat the acclimation and dip process (optional)
  6. Move to a permanent quarantine system (optional)
  7. Repeat the acclimation and dip process (optional)
  8. Move corals into your tank.

1. Start The Acclimation Process

When your corals first arrive you will want to make sure to float them in your tank as soon as possible. This allows the temperature of the water the coral is in to be brought up to the same temperature as your system’s water. This will increase the likelihood that your coral will survive. This should happen within 2 hours of arriving at your home. Coral should be floated in the tank water they’re going to be added to. 

Once the coral is brought up to temp pour out the coral and its water into a bucket (size depending on the quantity of coral). Then begin acclimating the coral by adding water from the tank the coral will be going into, to the container. The goal is to double the initial water volume for a 50/50 mix of the old water and your system’s water.

2. Add Bayer 2-way formal to acclimated water with coral for 8 to 10 minutes. 

Now that you’ve started acclimating our coral, it’s time to add our dip solution. There are a few different types of dips that we like. Coral RX and Revive are nice because they’re a clear solution; which allows you to see if there is anything coming off of your corals. However, these dips are harsher and are typically too harsh for acropora, especially deep water smooth skin acros. The brand we use the most is Bayer because we are heavy on sticks and Bayer does the job without being as harsh on the coral. Specifically, we use Bayer 2-way formula, which may not be available in stores but is available online. It’s important that you use this particular formula (0.72% Imidacloprid, 0.36% Beta-cyfluthrin, and 98.92% other ingredients) as there is a newly updated ‘complete’ formula that will kill your corals. It’s also important to note that you can not mix dipping solutions together. 

Corals are taken out of the acclimated water and placed into another bucket that is 100% from the temporary quarantine water mixed with the Bayer 2-way formula. A small pump is added to this bucket in order to circulate the dip solution. We don’t have an exact measuring system when it comes to how much we use, but as a general rule of thumb, we usually do about 1 lid full (8 oz) to every gallon. The water should look milky after the solution has been added. Leave the corals in the dip solution for approximately 8-10 minutes. 

3. Rinse your corals for 8 to 10 minutes in clean tank water.

Coral is then rinsed in another bucket with clean tank water. Let it sit and rest in that water for about 8 – 10 minutes in order to watch and see if anything else comes off the coral. Before taking the corals out of this bucket, it is best to give it a little shake in the water to make sure you get off any stragglers. 

4. Put in a temporary quarantine system (optional)

Now place our coral into the temporary quarantine system. A temporary quarantine allows you time to see if there is anything on the coral. While the 1st dip will kill pests, it won’t kill any eggs. However, the eggs will hatch within a week. After a week’s time, if we aren’t seeing any remaining pests, we restart the dip and acclimation process again in order to move the coral to our permanent quarantine tank.

5. Repeat the acclimation and dip process (optional)

Each time that you move corals between tanks, it is smart to dip and acclimate the coral again. This lessens the likelihood that you are moving pests between tanks and it gives the coral time to adjust to the new water. Dipping your corals so much can be hard on the coral. This is another reason why we use Bayer 2-way formula. It is not as hard on the coral but does a great job of killing pests.

6. Move to a permanent quarantine system (optional)

After a week in our temporary quarantine, we repeat steps 1-3 with our permanent quarantine system’s water and then move our coral into our permanent quarantine. Our coral stays here for a minimum of a week, but normally for about a month. This gives us an opportunity to observe the coral for any possible lingering pests and to watch the overall health of the coral

7. Repeat the acclimation and dip process (optional)

Each time that you move corals between tanks, it is smart to dip and acclimate the coral again. This lessens the likelihood that you are moving pests between tanks and it gives the coral time to adjust to the new water. Dipping your corals so much can be hard on the coral. This is another reason why we use Bayer 2-way formula. It is not as hard on the coral but does a great job of killing pests.

Dipping coral 3 times definitely makes the coral unhappy. Not all of our corals survive the process and those that do may need help brightening back up, but for us the risk is worth it. Our goal is to reduce risk to our systems as much as possible

8. Move corals into your tank

Once it’s determined that the coral is healthy, we start the dip and acclimation process for a 3rd time in order to move the coral into one of our permanent systems. The coral is then rinsed for a third time, and then finally, moved into its permanent home. During this time we also determine whether or not to cut off the plug/ base of the coral. Doing so can help reduce your risk of any hitchhikers, but it’s a personal choice based on the type of coral, whether or not it’s worth losing that growth, and what source you received your coral from. 

How To Set Up a Quarantine Tank 

While we recommend some type of permanent quarantine set up, we understand that that’s not possible for all hobbyists. However, we do recommend some type of quarantine, even if it’s a temporary set up. It’s a lot easier to empty, dry out and start over with a quarantine system than it is your show tank. 

Temporary Quarantine

Depending on the size and number of coral we use a 20, 30 and 50 gallon Rubbermaid Tupperware container for our temporary quarantines. When we set up a temporary tank the containers we use are completely dry and haven’t been used for weeks. We then add seasoned water from one of our systems into the container. 

Next we will add a small skimmer as well as an over the tank filter to run in carbon. The skimmer and tank filter both need to have been rinsed and dried for at least a week from last use. You don’t necessarily need to add a skimmer, but you will want to add an over the top filter. Our temporary quarantine tanks also have lights set up similar to our other systems. One of the most important things to note is that these quarantine set ups require daily water changes. We recommend swapping at least 20% of the water volume with water from your system. A lot of failure and unhappy corals stems from not providing these daily water changes

While you might not need a system as extreme as ours, it’s important to take precautions when it comes to bringing new corals into your tanks. Creating an effective dipping process is a key factor in a happy, healthy and thriving tank. We encourage you to find a system that works best for you. Please, reach out to us if you have any questions and one of our experts will be happy to help yo

Learn More

Saltwater aquarium light set up, Acropora lighting, lps coral lighting, sps coral lighting, softy coral lighting

The Ultimate Guide to the Best Lighting Schedule

Proven Track Record

Sunnyside Corals has a long track record of successfully growing a large variety of corals. Currently, we have over 400 different types of corals growing in our systems. While having success with a large variety of corals, our main focus and success has mainly been with Acropora. The setup that we describe in the post will be mainly focused on growing Acropora but, we do also include our lighting setup for our LPS and Softy tanks as well.  This post explains exactly what lighting we use and why so that you can replicate the success that we have. However, please note, that this is not the only way to do your lighting but just how we have found the greatest success in growing a large variety of corals, especially Acropora.

Our Lighting Set up

Over the years we have tried and tested a wide variety of different types and have ultimately chosen to use a Radion and T-5 combo. We use Radion gen 3s and 4s for the most part but still run a few gen 2s. We use the ATI Blue Plus Bulbs with our T-5s. We found that by running a combination of Radions and T-5s we have the best success with coloration and growth with our corals, especially Acropora.  If you want to successfully grow lots of Acropora this is the setup that we recommend. However, if you only want to grow mainly LPS and Softy Corals with only a few acros, you can be successful with just running Radions and no T-5s. The problem with only running radions for an acro heavy tank is that you run into issues with the amount of light spread. Your acros will appear colorful on top but dull and brown on the underside. This will affect the acro as it grows into a colony as the base will not receive enough light and may affect growth. The way to combat that is by either having a higher concentration of Radions or adding a T-5 light. Often times people favor adding T-5s because they are known to perform well but also you can save a lot of money because T-5s are a fraction of the price of radion lights.

Saltwater aquarium light set up, Acropora lighting, lps coral lighting, sps coral lighting, softy coral lighting

The Best Acropora Lighting

Acropora coral need a lot of light and as mentioned before a mixture of T-5s and Radions or a higher density of Radions is going to be best. We have our lights set up 12 to 16 inches above the tanks. This allows for there to be less heat transferred to the tanks but keeps the intensity of the lights strong. Here is a breakdown of our lighting above all of our Acropora and SPS tanks.

Radions: Below is our schedule for our radions. To start out we have a steep ramp-up period where we just blast the corals with a strong blue at 90% brightness and 90% intensity. We then transition into adding a small amount of whites, greens, and reds over the next hour. Our whites we bump up to 20% with the green and red run at only 5% strength. We run this setting for around 4 hours before we start to ramp it down again. During our final ramp down we switch back to heavy blues with no whites, reds, or greens at all. This ramp-down lasts for about another 4 hours for a total cycle time of 12.5 hours.

T-5s: Our T-5s are run mostly during the peak when we are running all blues with a mix of whites, reds, and greens. We run it for the same 7 hours or so and just run it on a manual timer that kicks on at the same time each day.

Acropora lighting schedule, saltwater aquarium lighting schedule

The Best LPS and Softy Tank Lighting

LPS and Softy corals don’t need nearly as much light as Acropora. On most of our tanks that do not have any acropora we hang the lights a little higher and run them at 85% intensity instead of 90% like we do on our SPS tanks. Our lights are hung as high as 24 inches above the water line for all of our LPS and Softy tanks.

Radions: Below is our schedule for our radions. To start out we have a steep ramp-up period where we just blast the corals with a strong blue at 85% brightness and 85% intensity. We then transition into adding a small amount of whites, greens, and reds over the next hour. Our whites are set to only 10% while green and red are as low as 5% strength. We run this setting for around 4 hours before we start to ramp it down again. During our final ramp down we switch back to heavy blues with no whites, reds, or greens at all. This ramp-down lasts for about another 4 hours for a total cycle time of 12.5 hours.

T-5s: We don’t run T-5s over most of our Softy and LPS tanks, however, we have seen that some LPS and Zoanthids do also benefit from having t-5s as well. For the tanks that we do have T-5s, we run them during the peak for about 7 hours on a timer. If you look at the schedule below, we would run our t-5s from about 12 PM until 7 PM for example.

LPS Coral lighting schedule, saltwater aquarium lighting schedule

Best Tank Lighting With Limited Space

Not everyone has space to put their lights up 24 inches. We have one tank that is set up with two radion gen 4s that are mounted using RMS XR30 G4 TANK MOUNT KIT  that hangs close to the water. The cons with this is first, it emits a lot of heat onto the tank and can make it hard to keep a constant temperature. It also can make it so your intensity needs to be dialed way back. Our tank also has a mesh screen covering it which blocks a large portion of the light. Here are the settings that we use for this tank and have seen our LPS and Mushrooms do great with.

Radions: Below is our schedule for our radions. To start out we have a steep ramp-up period where we just blast the corals with a strong blue at 80% brightness and 55% intensity. We then transition into adding a small amount of whites, greens, and reds over the next hour. Our whites are set to only 20% while green and red are as low as 5% strength. We run this setting for around 4 hours before we start to ramp it down again. During our final ramp down we switch back to heavy blues with no whites, reds, or greens at all. This ramp-down lasts for about another 4 hours for a total cycle time of 12.5 hours.

T-5s: We don’t run T-5s over this tank because we are not growing any SPS corals and for the setup would not be as esthetically pleasing. We only grow LPS and Softies in this tank.

Every Tank Is Different

Remember that every tank and setup is different. We have found that these settings and setup work best for us but we are always experimenting and adjusting as our corals grow and we get new stock. Some corals will love this setup and others may not however, we have been able to successfully grow more than 400 different types of coral using this setup and general lighting schedule. Please, reach out to us if you have any questions and one of our experts will be happy to help you.

Learn More